Edit the OnPoint Audit engagement letter
![]()
Content in this topic requires OnPoint Audit.
Sample standard letters are included in OnPoint Audit. You can review and edit the engagement letter draft and add your own wording to meet requirements and firm preferences in OnPoint Audit before you send it to the client to complete, sign and return.
To edit the engagement letter:
- Open the 1-250 Terms of engagement - Engagement letter - Draft and select Edit (
 ) at the top of the document. Text toolbar appears.
 - Once you're satisfied with the contents of the engagement letter, select the sign off icon (
 ).
). - Choose the applicable role for your signoff. Once the content is reviewed, you can send a copy to your client.
While editing the letter, you will also see the following functionality:
| Field | Value |
| Instructions | Contains information about the contents of the letter, and includes instructions for finalizing the draft. |
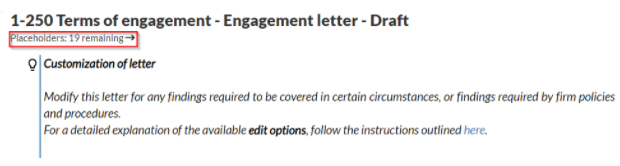
| Placeholders | Tracks your progress on placeholders and displays the number of placeholders that haven’t been replaced with specific information related to the engagement, organization or client. The top of the letter displays the number of placeholders awaiting responses. Tip - click the remaining placeholders to quickly navigate to the placeholders in the document. |
| | Shortcut to create document specific issues. |
| | Documents with issues. |
| | Print the document. |
| | Review tools to allow a reviewer to see what has been changed in the document. |
| | Turns on document edit functionality. Edit actions include:
|
| | More actions. More actions include:
|
| | Sign off the document. |
Replace text and field placeholders
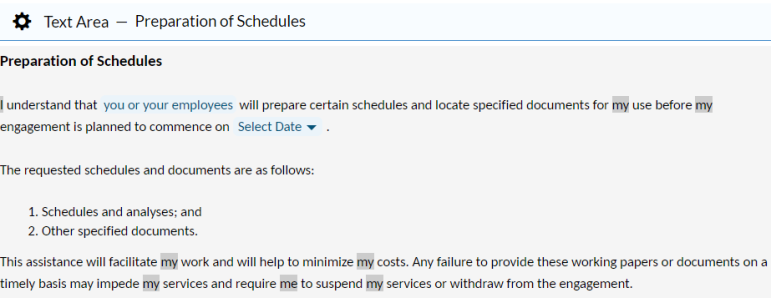
The engagement letter content includes placeholders for some text and fields that you need to replace with specific information related to your engagement, organization or client.
To edit the text in a letter, select Edit (![]() ). Begin typing in any Text Area to customize the wording. Throughout the letter, fields that are highlighted grey pull their responses from other areas of the engagement, or from the Cloud entity.
). Begin typing in any Text Area to customize the wording. Throughout the letter, fields that are highlighted grey pull their responses from other areas of the engagement, or from the Cloud entity.
For example:
The Placeholders indicator located at the top of the document, under the engagement letter document title, tracks your progress on placeholders and displays the number of placeholders that haven't been replaced by specific information. You can also select the indicator to navigate to the next empty placeholder.
To replace a text placeholder:
-
Select the text placeholder.
Note: The blue highlighted text in the document are placeholders.
-
At the Text Placeholder popup, replace the placeholder text as required and select Save.
Note: Placeholders are in the form of picklists or input values. You can either make a selection from the available options or manually type a value. If you don't want to change the placeholder text, you must select the placeholder and select Save at the Text Placeholder dialog so it's removed from the placeholder's remaining indicator.
To replace a field placeholder:
-
Select the field placeholder.
Note: The blue drop-down fields in the document are placeholders.
-
Select a value or specify a date as indicated in the placeholder field.
Change engagement glossary terms and dynamic text
Note: You can only change an existing glossary term or a dynamic text output if the override option is enabled in your product at the firm level by the administrator.
An engagement glossary contains terms. Terms are words and phrases that you can reuse throughout the product. When a term is changed, it is changed everywhere the author defines it.
Dynamic text fields change if certain conditions are met. For example, if the client responds 'Yes' to a procedure in a checklist, then 'Agreed' shows in the dynamic text field.
Your documents may contain terms from the glossary or dynamic text fields. Depending on your product, you may be able to override glossary terms and dynamic text outputs.
To change an engagement glossary term or a dynamic text output:
-
Select the document’s text area you want to change.
Note: Areas highlighted in gray are either glossary terms or dynamic text fields.
-
Select the glossary term or dynamic text to open the Data Link dialog.
Note: If you select a glossary term, you can select information (
 ) to see the number of places that term is used.
 -
Change the Output as desired and select Save.
When the Output condition is met, the text changes in all the places it is used in the engagement. If a different condition is met after the change, the Output changes to match the configured output text for that condition.
Insert the firm logo
You can insert the firm logo in any text area or in the document header or footer.
To insert the firm logo:
-
Select the text field where you want to insert the logo.
-
Select Insert Logo (
 ) at the formatting toolbar.
The firm logo is added in the text field.
If no logo is available in the firm template, a placeholder with a link to Cloud displays so you can upload a logo.
Note: You can only upload a firm logo in the firm template. To access the firm template, you must have the Settings Admin role or similar. For more information, see Built-in roles and Assign security roles.
Add a page break
You can add a page break anywhere in the document to manually mark where a specific page ends and a new page starts. This allows you to control the page layout for printing.
To add a page break, select +New section | +Page break. A page break is inserted with a default title Page Break. You can select the default title to change it. Note that this title is not part of the document content and will not be displayed when printed.
Note: You can’t add a page break in an empty grouping area. You must add text areas or guidance sections.
-
To add text areas, select +New section | +Text Areas.
-
To add guidance sections, +New section | +Guidance Sections.
To delete a page break, select Settings (![]() ) | Delete | Yes.
) | Delete | Yes.
Add a table of contents
You can add a table of contents to make it easier for users to navigate through your letter.
To add a table of contents, select +New section | +Table of Contents. A table of contents is inserted with a default title Table of Contents. You can select the default title to change it. Note that this title is not part of the document content.
To delete a table of contents, select Settings (![]() ) | Delete | Yes.
) | Delete | Yes.
Set up the print options
Select the Print (![]() ) icon to convert the document to a PDF format to print or save the document. Note that guidance sections are never included in the PDF.
) icon to convert the document to a PDF format to print or save the document. Note that guidance sections are never included in the PDF.
To set up print options:
-
Go to the Document Map, select More actions (
 ) | Print Settings.
 -
If you want to have different settings for a page break or a grouping area or the Table of Contents, select Settings (
 ) | Edit Print Settings.
Specify the preferred settings for Letterhead, Page Size and Margins.
-
Select Landscape to change the page orientation. The default is Portrait.
-
Clear the Count in page numbering check box if you want page numbering to start after the Table of Contents page.