Personnaliser les risques
Remarque : Le contenu de cette rubrique est destiné aux auteurs de réseaux.
Pour commencer, sélectionnez l'icône Information (![]() ) dans le menu supérieur, puis choisissez Paramètres. La boîte de dialogue Paramètres du produit s'ouvre et vous permet d'afficher et de personnaliser les paramètres si nécessaire.
) dans le menu supérieur, puis choisissez Paramètres. La boîte de dialogue Paramètres du produit s'ouvre et vous permet d'afficher et de personnaliser les paramètres si nécessaire.
Under the Risks drop-down, select Fields.
Pour ajouter et personnaliser les champs d'identification du risque, de description du risque, d'assertions, de méthode d'évaluation et de références :
Sélectionnez un champ pour l'inclure dans le module des risques.
Sous ÉTIQUETTE PERSONNALISÉE, saisissez votre terme personnalisé pour chaque champ.
Pour chaque champ, sélectionnez :
- la case à cocher Dialogue pour afficher le champ dans la boîte de dialogue Nouveau risque.
- la case à cocher Carte pour afficher le champ dans la carte de risque.
- les cases à cocher Dialogue et Carte pour afficher le champ dans le dialogue Nouveau risque et la carte de risque.
Par exemple, sélectionnez ![]() pour l'inclure dans le module des risques.
pour l'inclure dans le module des risques.
Une fois que vous avez sélectionné un champ, sa section de personnalisation est disponible dans la boîte de dialogue.
Dans la section Assertions, vous pouvez accéder directement à Fonctionnalités | Assertions pour ajouter ou modifier une assertion existante en sélectionnant le lien Assertions .
Pour ajouter et personnaliser les champs de type de risque et de niveau de risque :
Sélectionnez Type et Niveau pour inclure ces champs dans le module des risques.
Dans la section de personnalisation pour le niveau,
entrez votre terme personnalisé pour niveau de risque àCUSTOMLABEL.
entrez votre terme personnalisé pour Normal, significatif et frauduleux.
Dans la section de personnalisation de Type,
entrez votre terme personnalisé pour le type de risque àCUSTOMLABEL.
entrez votre terme personnalisé pour État financier et affirmation.
Une fois que vous avez sélectionné un champ, sa section de personnalisation est disponible dans la boîte de dialogue.
Pour ajouter et personnaliser les champs de réponse d'audit, de contrôle et de conclusion :
Sélectionnez un champ pour l'inclure dans le module des risques.
Sous ÉTIQUETTE PERSONNALISÉE, saisissez votre terme personnalisé pour chaque champ.
Dans la section Personnalisation des conclusions, saisissez un terme personnalisé pour chaque type de conclusion.
Entrez un terme personnalisé pour Le risque a été traité.
Saisissez un terme personnalisé pour " Il existe une déficience significative du contrôle".
Saisissez un terme personnalisé pour Une réponse d'audit est requise.
Saisissez un terme personnalisé pour Autre.
Par exemple, sélectionnez ![]() pour l'inclure dans le module des risques.
pour l'inclure dans le module des risques.
Une fois que vous avez sélectionné un champ, sa section de personnalisation est disponible dans la boîte de dialogue.
Si vous souhaitez créer une page d'aide pour vos clients afin de décrire les fonctionnalités, les champs et les attributs des risques, vous pouvez activer l'option Aide et ajouter l'URL. Une fois cette option activée, une icône d' aide (![]() ) s'affiche dans les fiches de risque et dans la boîte de dialogue Nouveau risque.
) s'affiche dans les fiches de risque et dans la boîte de dialogue Nouveau risque.
Vous pouvez également choisir d'inclure les deux cases à cocher Inclure dans les éléments à déclarer et Les procédures de fond ne sont pas suffisantes dans la fiche de risque. Vous pouvez également ajouter un texte personnalisé pour chaque case à cocher.
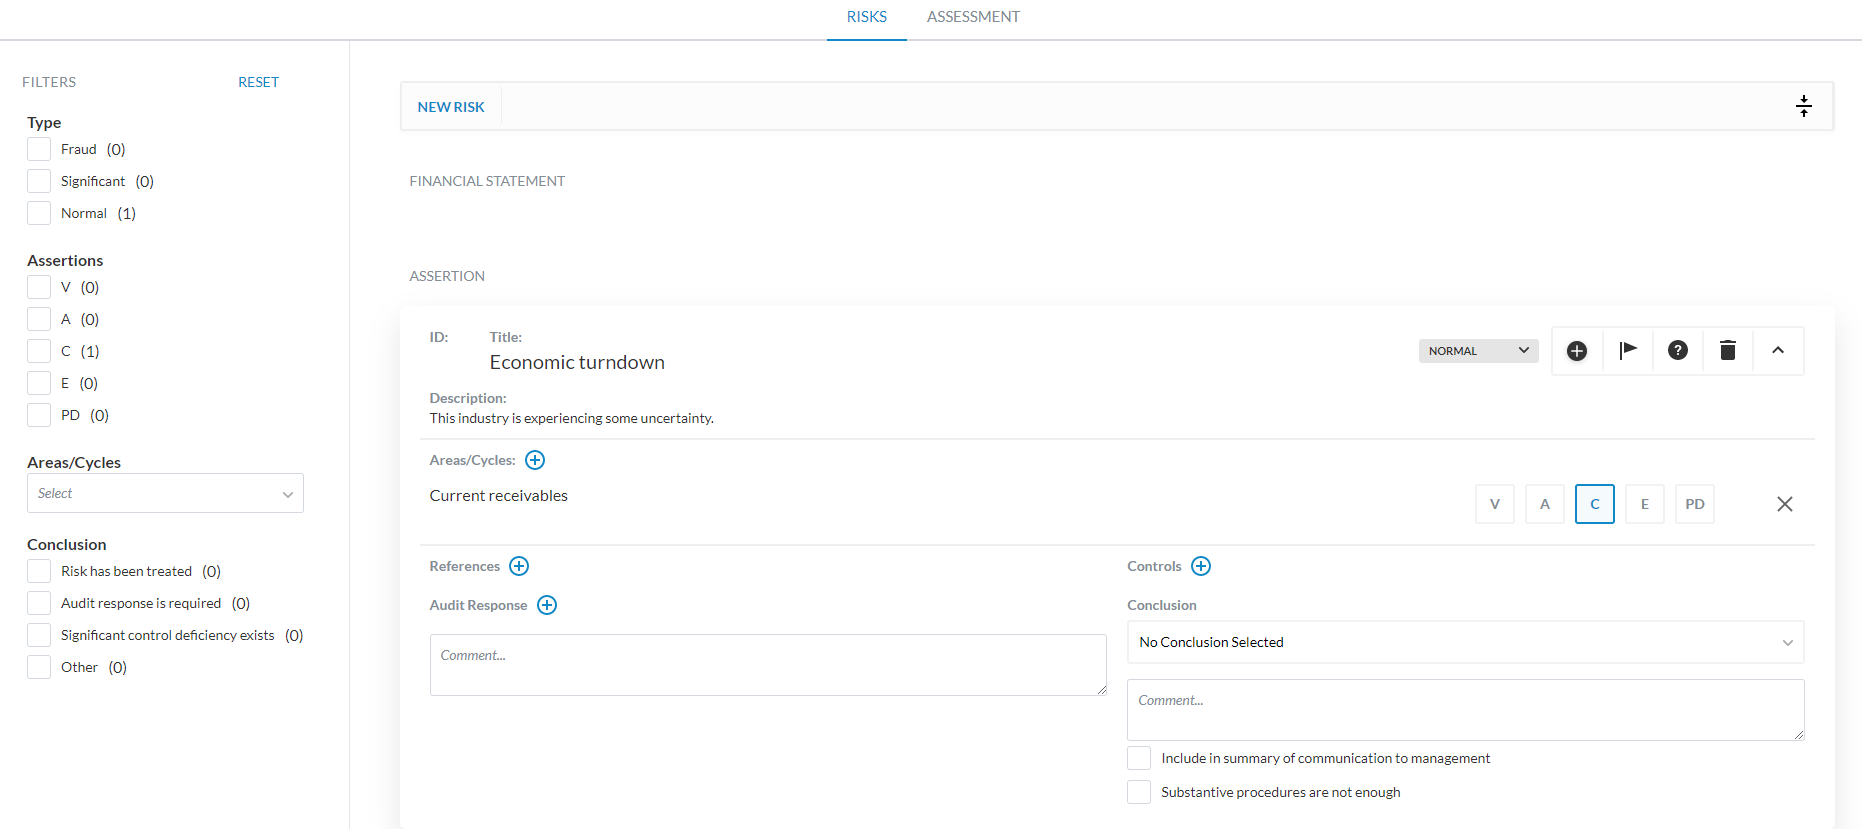
La figure suivante présente les champs personnalisables de la page des risques.
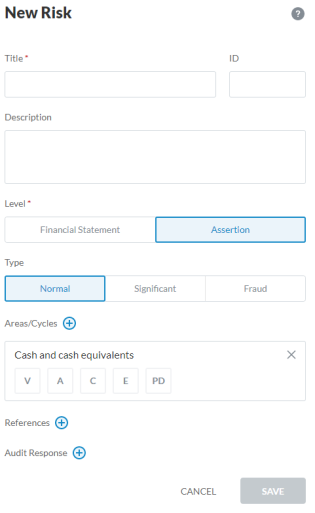
La figure suivante présente les champs personnalisables de la boîte de dialogue Nouveau risque.

Personnaliser les échelles et la cartographie RMM
Vous pouvez choisir le nombre d'échelles dans votre produit pour les risques inhérents (RI), les risques de contrôle (RC) et les risques d'anomalies significatives (RMM) et personnaliser leurs noms d'affichage. Vous pouvez également prédéfinir le mappage RMM dans le produit.
Sélectionnez Risque | Échelles pour commencer.
Adapter les barèmes aux risques inhérents :
Allez à la section Risque inhérent .
Dans l'option Échelle d'évaluation, sélectionnez le nombre d'échelles souhaité.
Dans la rubrique Personnalisation de l'étiquette, saisissez le terme personnalisé et le nom abrégé souhaités pour chaque échelle.
Par exemple, vous pouvez renommer Very Low en Mild et définir le nom court en ML.
Personnaliser les échelles pour les risques de contrôle :
Accédez à la section " Risque de contrôle" .
Dans l'option Échelle d'évaluation, sélectionnez le nombre d'échelles souhaité.
Dans la rubrique Personnalisation de l'étiquette, saisissez le terme personnalisé et le nom abrégé souhaités pour chaque échelle.
Par exemple, vous pouvez renommer Very Low en Mild et définir le nom court en ML.
Adapter les échelles aux risques d'inexactitudes significatives :
Go to the RMM section.
Dans l'option Échelle d'évaluation, sélectionnez le nombre d'échelles souhaité.
Dans la rubrique Personnalisation de l'étiquette, saisissez le terme personnalisé et le nom abrégé souhaités pour chaque échelle.
Par exemple, vous pouvez renommer Very Low en Mild et définir le nom court en ML.
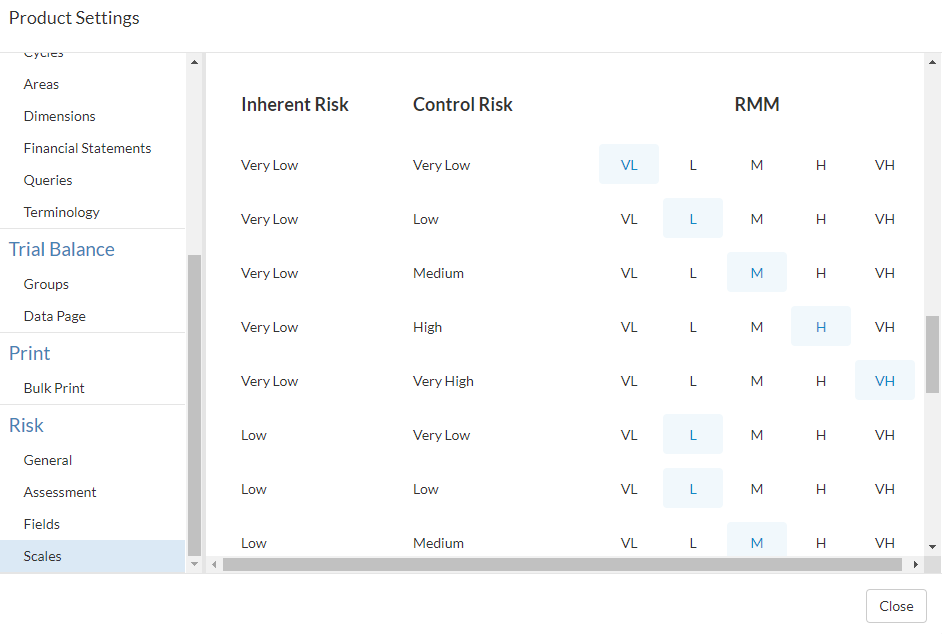
Pour prédéfinir le mappage RMM :
Allez dans la section RMM Mapping.
Sélectionner l'échelle RMM souhaitée pour chaque combinaison d'échelle IR et CR.
Par exemple, vous pouvez prérégler l'échelle RMM sur Très faible (VL)si l'IR et la CR ont une échelle Très faible (VL).
Personnaliser les échelles de probabilité de survenance des risques d'anomalies :
Passez à la section Probabilité de survenance d'une inexactitude .
Dans l'option Échelle d'évaluation, sélectionnez le nombre d'échelles souhaité.
Dans la rubrique Personnalisation de l'étiquette, saisissez le terme personnalisé et le nom abrégé souhaités pour chaque échelle.
Par exemple, vous pouvez renommer Very Low en Mild et définir le nom court en ML.
Personnaliser les échelles en fonction de l'ampleur des risques potentiels d'inexactitude :
Passez à la section " Ampleur de l'inexactitude potentielle ".
Dans l'option Échelle d'évaluation, sélectionnez le nombre d'échelles souhaité.
Dans la rubrique Personnalisation de l'étiquette, saisissez le terme personnalisé et le nom abrégé souhaités pour chaque échelle.
Par exemple, vous pouvez renommer Very Low en Mild et définir le nom court en ML.


