Set up and import a trial balance containing dimensions
Note: This feature may not be available in your product.
You can assign dimensions to accounts based on spreadsheet columns in a CSV or Excel file. This provides a streamlined approach to assigning multiple dimensions as part of an Excel/CSV import flow, rather than having to manually assign them.
To assign dimensions to accounts:
-
In the trial balance spreadsheet:
-
Make sure there is a column to hold the financial group number for each account. The financial group must match one of the financial groups in the financial grouping structure defined for the product template.

-
Where there is a single dimension category and multiple dimensions, create a single column for the dimension category whose values will list the dimension numbers. In our example, the Location column represents the Location dimension category. Its values are the unique dimension ID numbers that will also be defined in the Engagement Settings under Features | Dimensions.

-
Where there are multiple dimension categories, create a column for each dimension category. It is recommended that your column headers match the dimension category name. The header of the column should be the dimension category, and its values should be the unique dimension IDs in that category.

-
Enter an engagement and set up the dimension structure on the Engagement Settings dialog, where there will be at least 1 dimension category with multiple related dimensions.
-
Select the Information icon (
 ) at the top menu, then choose Settings. The Engagement Settings dialog opens.
 -
Go to Features | Dimensions.
-
Select + Dimension Category, then add a name for the new dimension category.
-
Select + Add dimension to add a dimension for the new category.
-
Enter a name for the new dimension.
-
Select View numbers to see unique dimension numbers that are autogenerated for each dimension. In Number, users can change the unique ID for each of the dimensions, instead of using the autogenerated ID. For example, users may want to change the ID to 100/10/200/23/ or to some other combination of letters and numbers.

-
Once dimension categories and their related dimensions have been created, assign each dimension category to its respective financial groups in the dimension setup, within Engagement Settings:
-
Select More actions (
 ) | Assign Groups.
-
If your product has multiple financial grouping structures, select the grouping structure you want from the dropdown.
-
Select all the applicable financial groups.
-
You can expand and collapse financial groups to view subgroups and use the search bar to find the appropriate groups.

Note: The exact dimension numbers listed in Number must match the dimension numbers already defined within the trial balance data.

Note: You can only assign an account to one dimension within a category. To assign an account to multiple dimensions, each dimension must fall under a different category.
Import the trial balance
-
Go to the Data page. The Data page opens to the Datasets tab.
-
If you’ve previously imported data, select Add data.
-
If your engagement is consolidated and has internal subsidiary entities, select the entity for which you want to import data from the list.
-
-
Under DATA FILE UPLOAD, browse or drag the CSV or Excel file to the file upload area. If the file has already been uploaded to the Documents tab, select Import from Documents, then select it from the list of available documents in the engagement.
-
In the Configure new dataset dialog, select Trial balance from the Dataset type dropdown.
-
If planning balances are enabled in your product, select whether you are importing the Final trial balance or a Planning trial balance.
-
Review the automatically selected header row to ensure the correct header has been selected. If you want to manually select the header row, select Adjust header row and select the correct row.
-
If you are importing a CSV file and want to change the delimiter to something other than the default comma (,), select Adjust header row and select the correct delimiter.
Note: Both the automatic header detection and manual header selection only take into account the first 30 rows of the imported file. Rows beyond the first 30 rows cannot be selected as a header.

-
Select Upload.
-
On the Datasets tab, click Configure to assign columns in the imported data to Caseware fields.
-
Assign the column containing the financial group number to the Financial Group Number field.

-
On the Assign Fields page, assign the column containing the dimension number to Dimension. You are prompted to then select the dimension category.
In the example we have been using, the Location column in the CSV file containing the trial balance is assigned to the Dimension field.
You are then prompted to select the dimension category. In this example, this is Location.

-
Select Import.
Assign multiple accounts to a financial group with a dimension
You can select multiple accounts and assign them simultaneously to a financial group with a dimension. This feature adds a deeper level of categorization to the existing bulk assignment feature for financial groups.
The accounts can be either unassigned or reassigned.
To assign multiple accounts to a financial group with a dimension:
-
Ensure your dimensions are created in your engagement.
-
Import a trial balance that contains dimensions.
-
Go to the Data page and click Assign Accounts from the left-side menu.
-
Select multiple unassigned accounts under the column Assign Accounts.
-
You can assign multiple accounts in bulk by doing one of the following methods:
-
Use the Assign button:
-
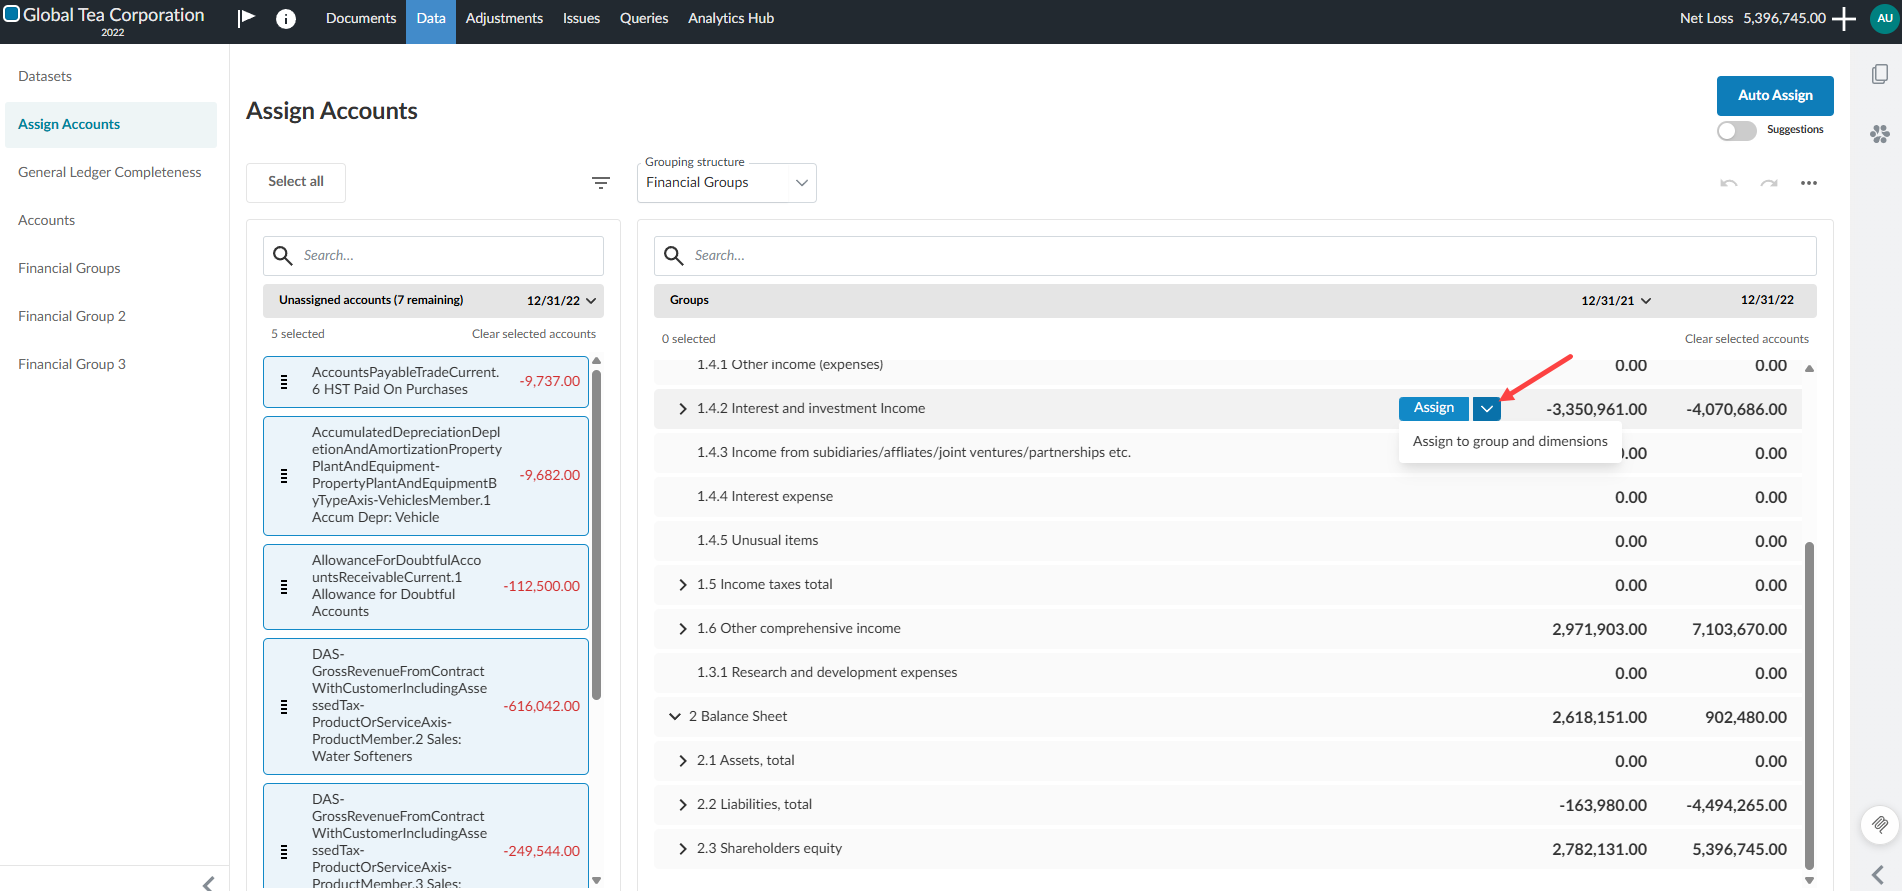
Hover over the row of the desired financial group and select the chevron next to Assign and select Assign to group and dimensions. The Assign dimensions dialog box will open.
-
Click the dimension where you wish to assign the accounts.
-
Click Save.
-
-
The Assign button on the financial group row:
-
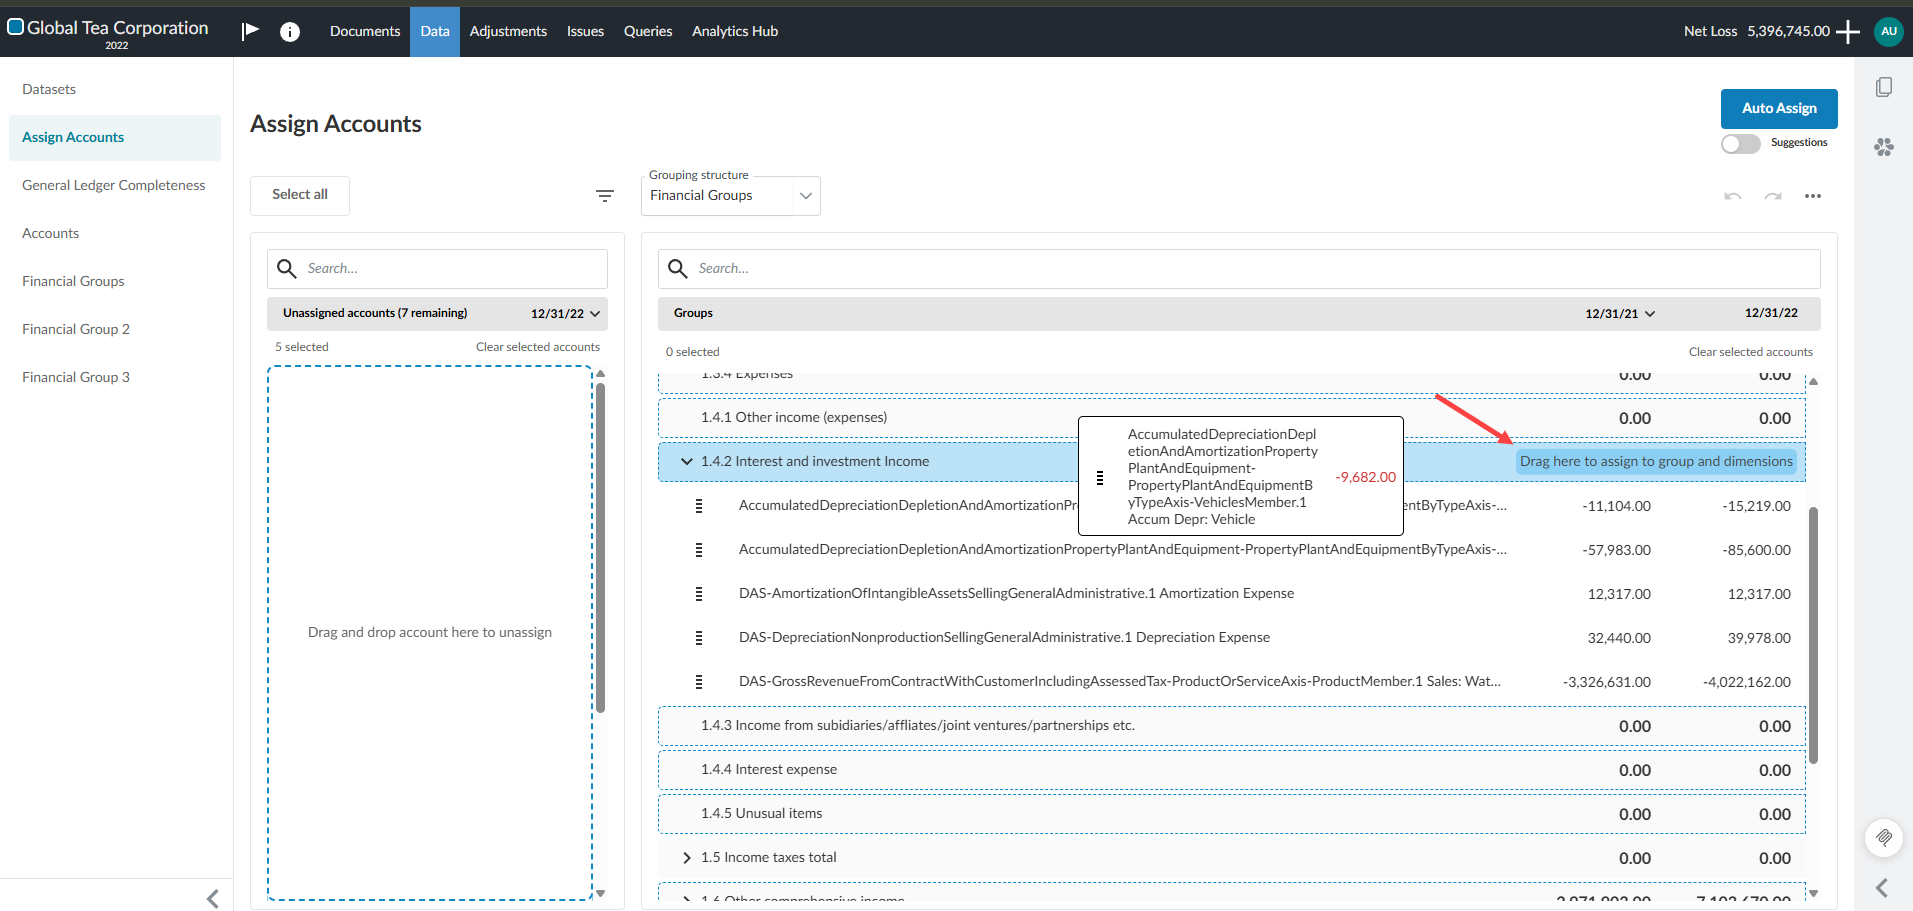
Drag and drop:
-
Drag the accounts to the right-side of the financial group row until Drag here to assign to group and dimensions appears on the row.The Assign dimensions dialog box will open.
-
Click the dimension where you wish to assign the accounts.
-
Click Save.
-
-
You can continue to assign accounts to financial groups without including dimensions by dragging the accounts to the left-side of the financial group row where the message to Drag here to assign to group and dimensions does not appear.
Notes:
The bulk assignment button is only enabled when all selected accounts share a compatible dimension category.
Undo is limited to the last bulk assignment within the current session.
An account can be assigned to multiple dimension categories but only one dimension per category.
The drag and drop area on the financial group row:
Unassign or reassign accounts from a financial group with dimensions
You can unassign or reassign accounts from financial groups with dimensions.
To unassign accounts from a financial group with dimensions:
-
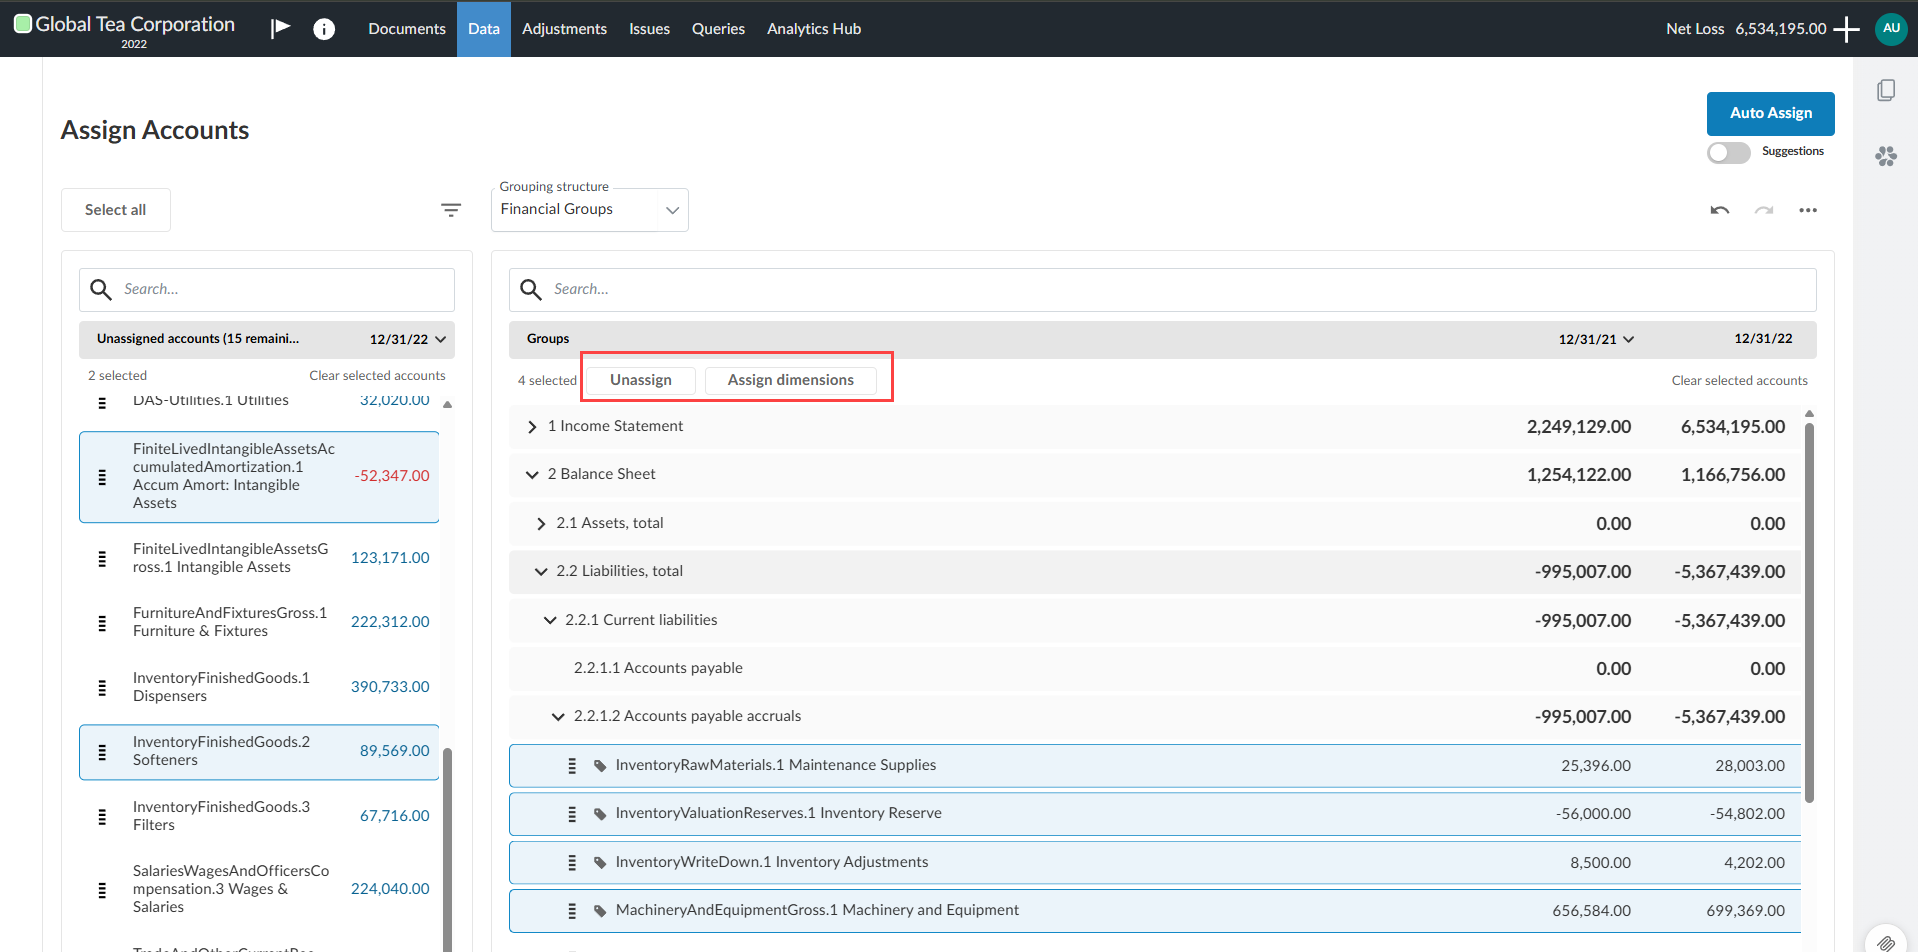
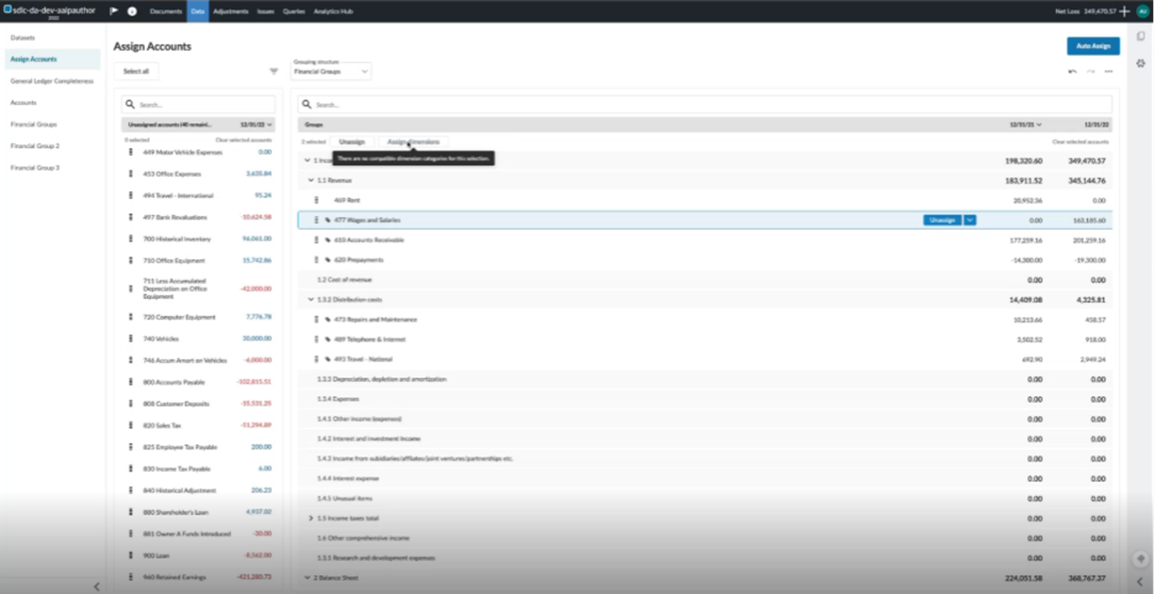
Select the account(s) within a financial group with dimensions. These accounts have tags to the left of their names which identify their dimension. Two tabs will appear at the top of the Groups section: Unassign and Assign dimensions.
-
Click the Unassign tab to unassign the selected accounts in bulk and push them back into the Assign Accounts column under Unassigned accounts.
-
You can unassign each account individually by hovering your mouse over account row until the Unassign button appears.
-
Click the Unassign button to unassign the individual account.
-
To reassign accounts from a financial group with dimensions:
-
Select the account(s) within a financial group with dimensions. These accounts have tags to the left of their names which identify their dimension. Two tabs will appear at the top of the Groups section: Unassign and Assign dimensions.
-
Click the Assign dimensions tab to reassign the selected accounts in bulk. The Assign dimensions dialog box will open.
-
Click the dimension where you wish to reassign the accounts.
-
Click Save.
-
You can reassign each account individually by hovering your mouse over the account row until the Unassign button appears.
-
Select the account within a financial group with dimensions that you wish to reassign.
-
Click the chevron beside the Unassign button. The Assign dimensions dialog box will open.
-
Click the dimension where you wish to reassign the accounts.
-
Click Save to reassign the individual account.
-
Example of an account tagged with the dimension assigned to it:

The tabs that appear once accounts that have been assigned to a dimension are selected:
Incompatible dimensions
You can reassign multiple accounts to different dimension values within the same dimension category. For example, you can reassign accounts from Location values such as Burnaby → Kelowna → Penticton. However, you cannot reassign accounts that do not share a common dimension category.
If the selected accounts do not share a common dimension category, the Assign dimension tab becomes unavailable. When you hover over the tab, a tooltip appears with the message: There are no compatible dimension categories for this selection.
The inactive Assign dimension tab:
Add dimension values in individual input cells in dynamic tables
You can link a value from the trial balance for a specific account and dimension directly to an individual cell in a dynamic table using the Formula icon [![]() ].
].
Note: Dimensions may not be available in your product. To learn more about dimensions, refer to: Set up trial balance with dimensions.
To add a value within a dimension to an input cell in a dynamic table:
-
Click the More Actions icon [
.png) ] from a dynamic table in your financial statement,
] from a dynamic table in your financial statement, -
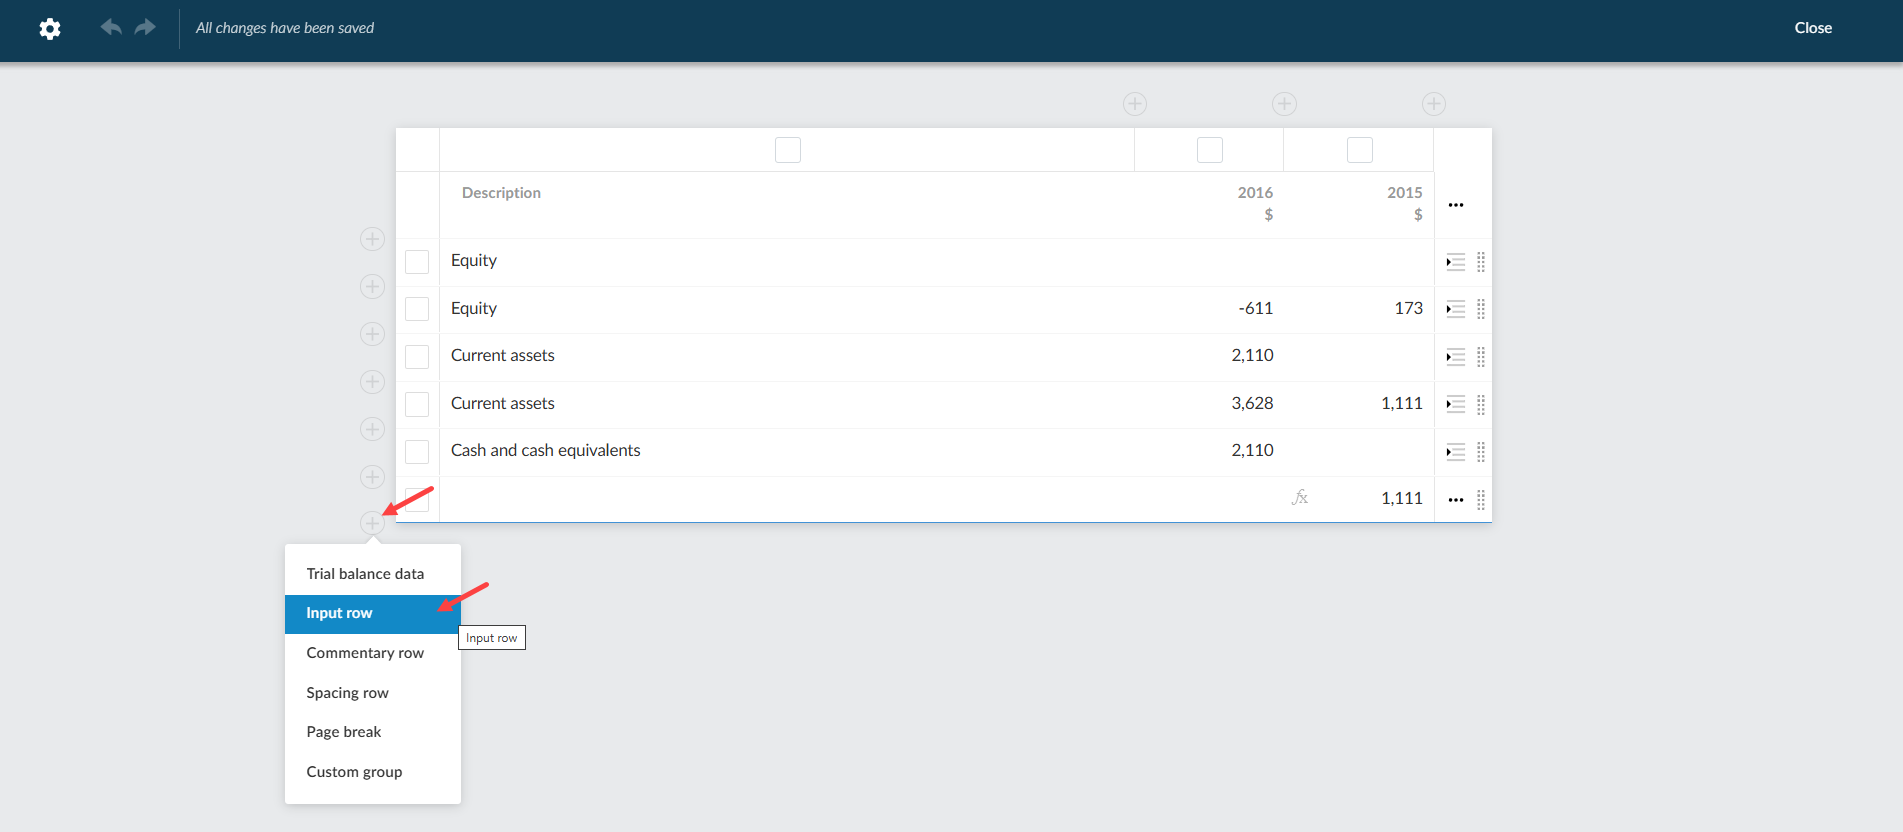
Click Edit dynamic table. The Edit dynamic table dialog box will open.
-
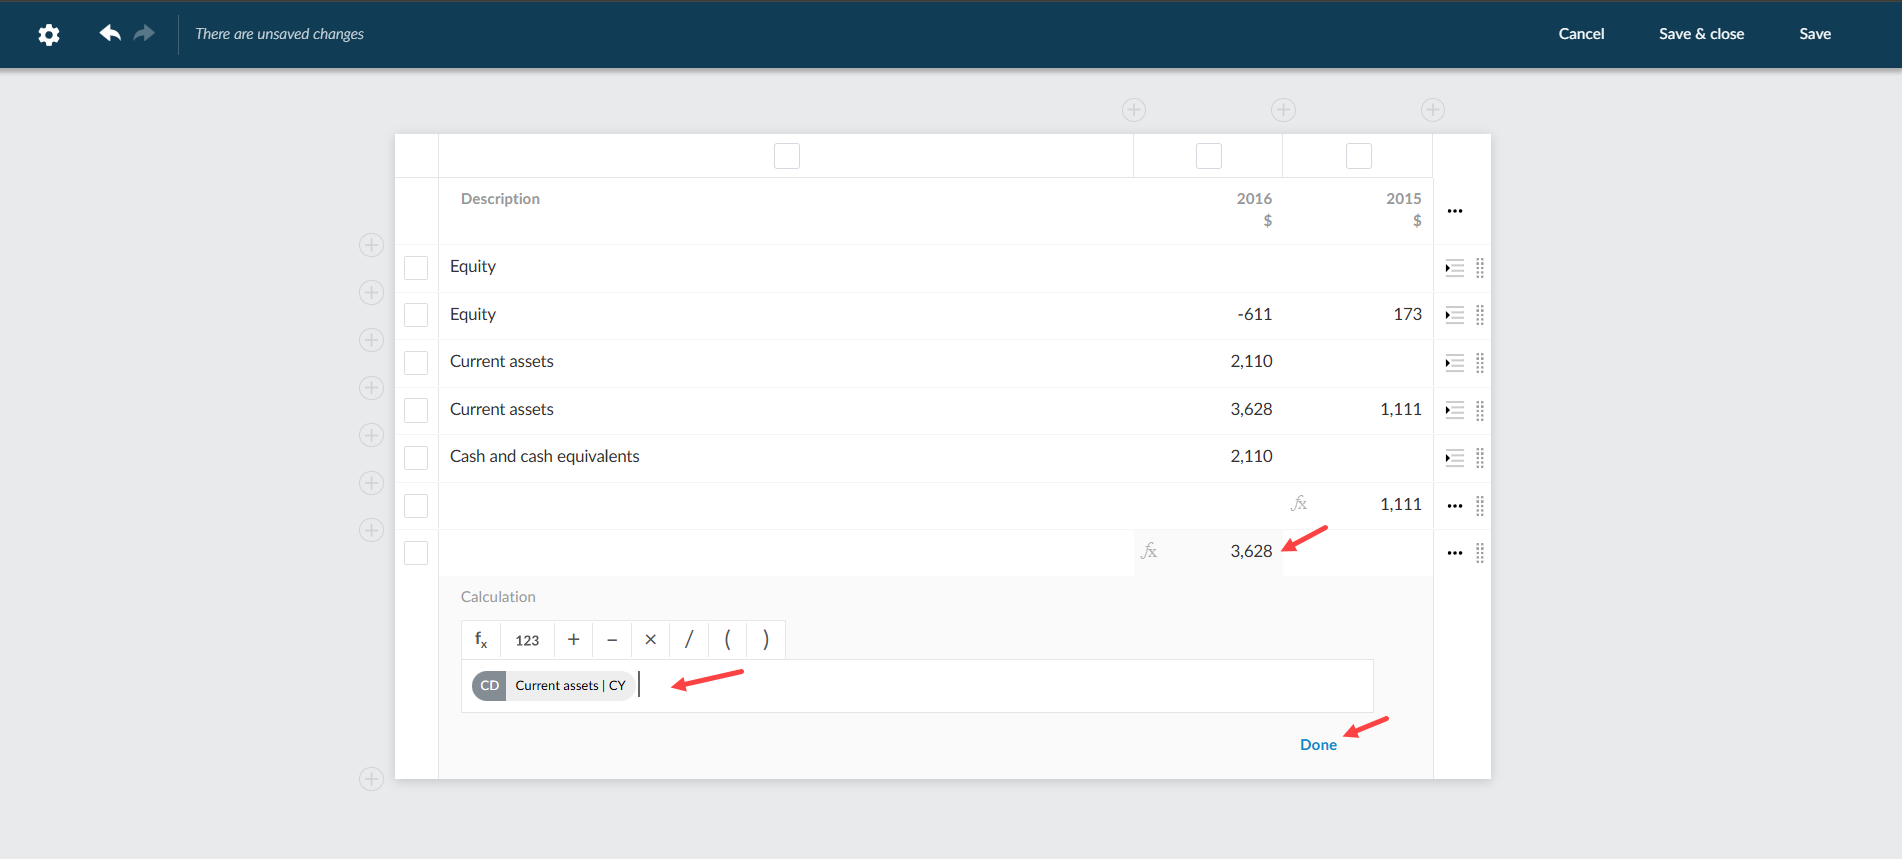
Click the Add icon [
 ] on the left-side of a row and click Input row.
 -
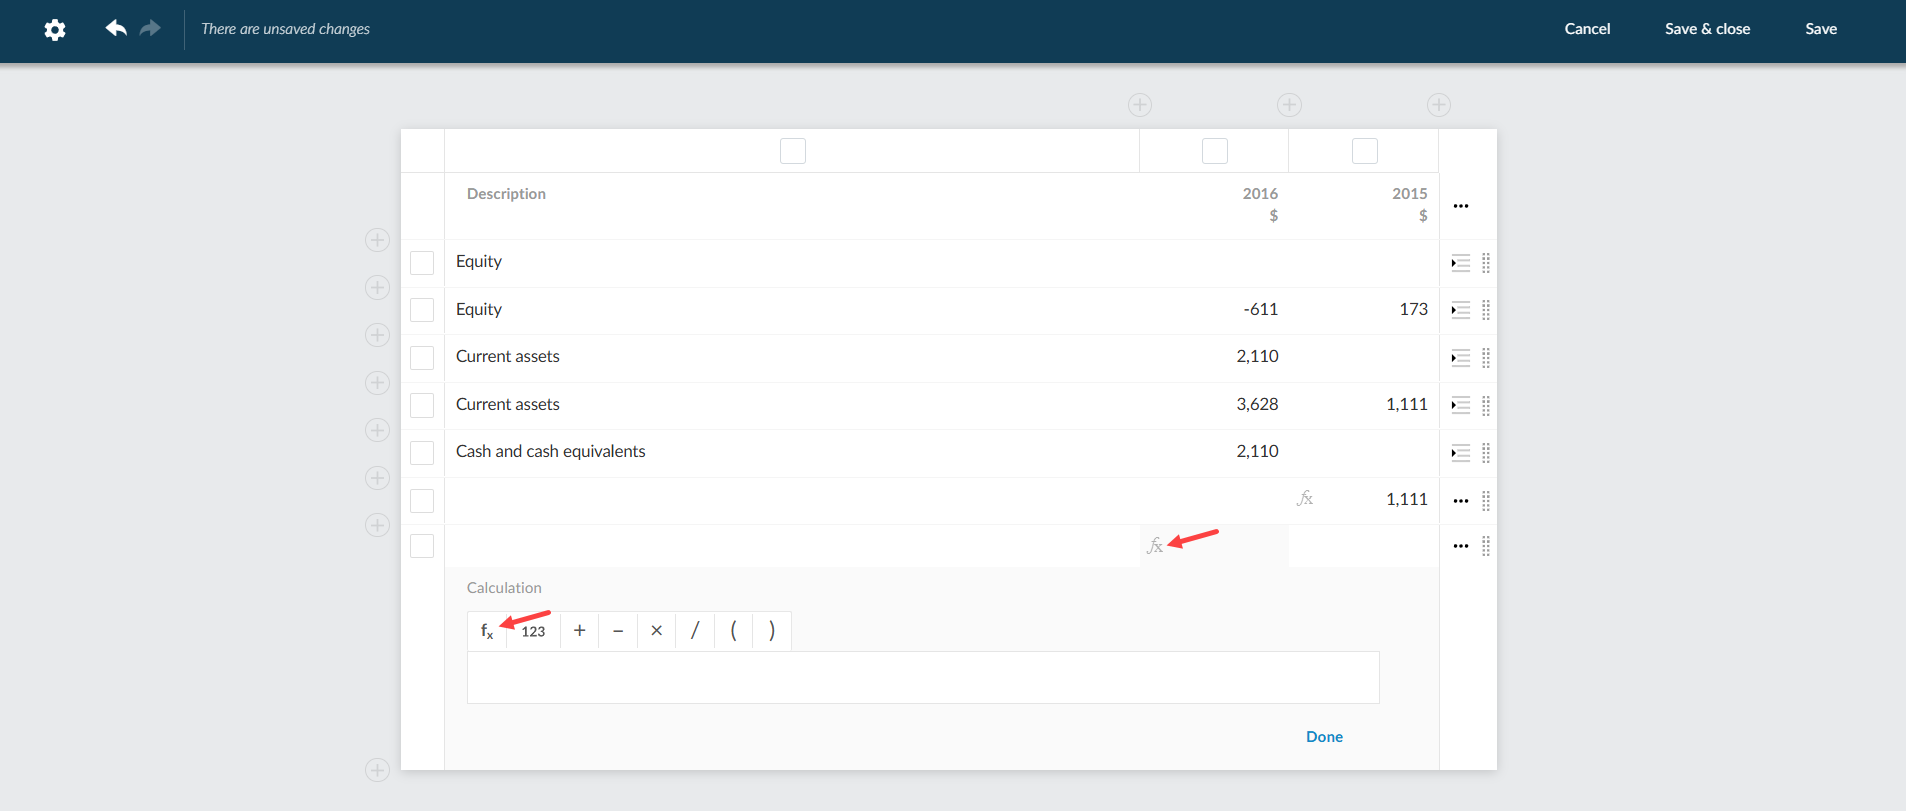
Click the empty cell under the column where you want to add the dimension value.
-
Click the Function icon [
 ] that appears. A function ribbon will open.
 -
Click the Function icon[
] on the function ribbon. A Datalink dialog box will open. -
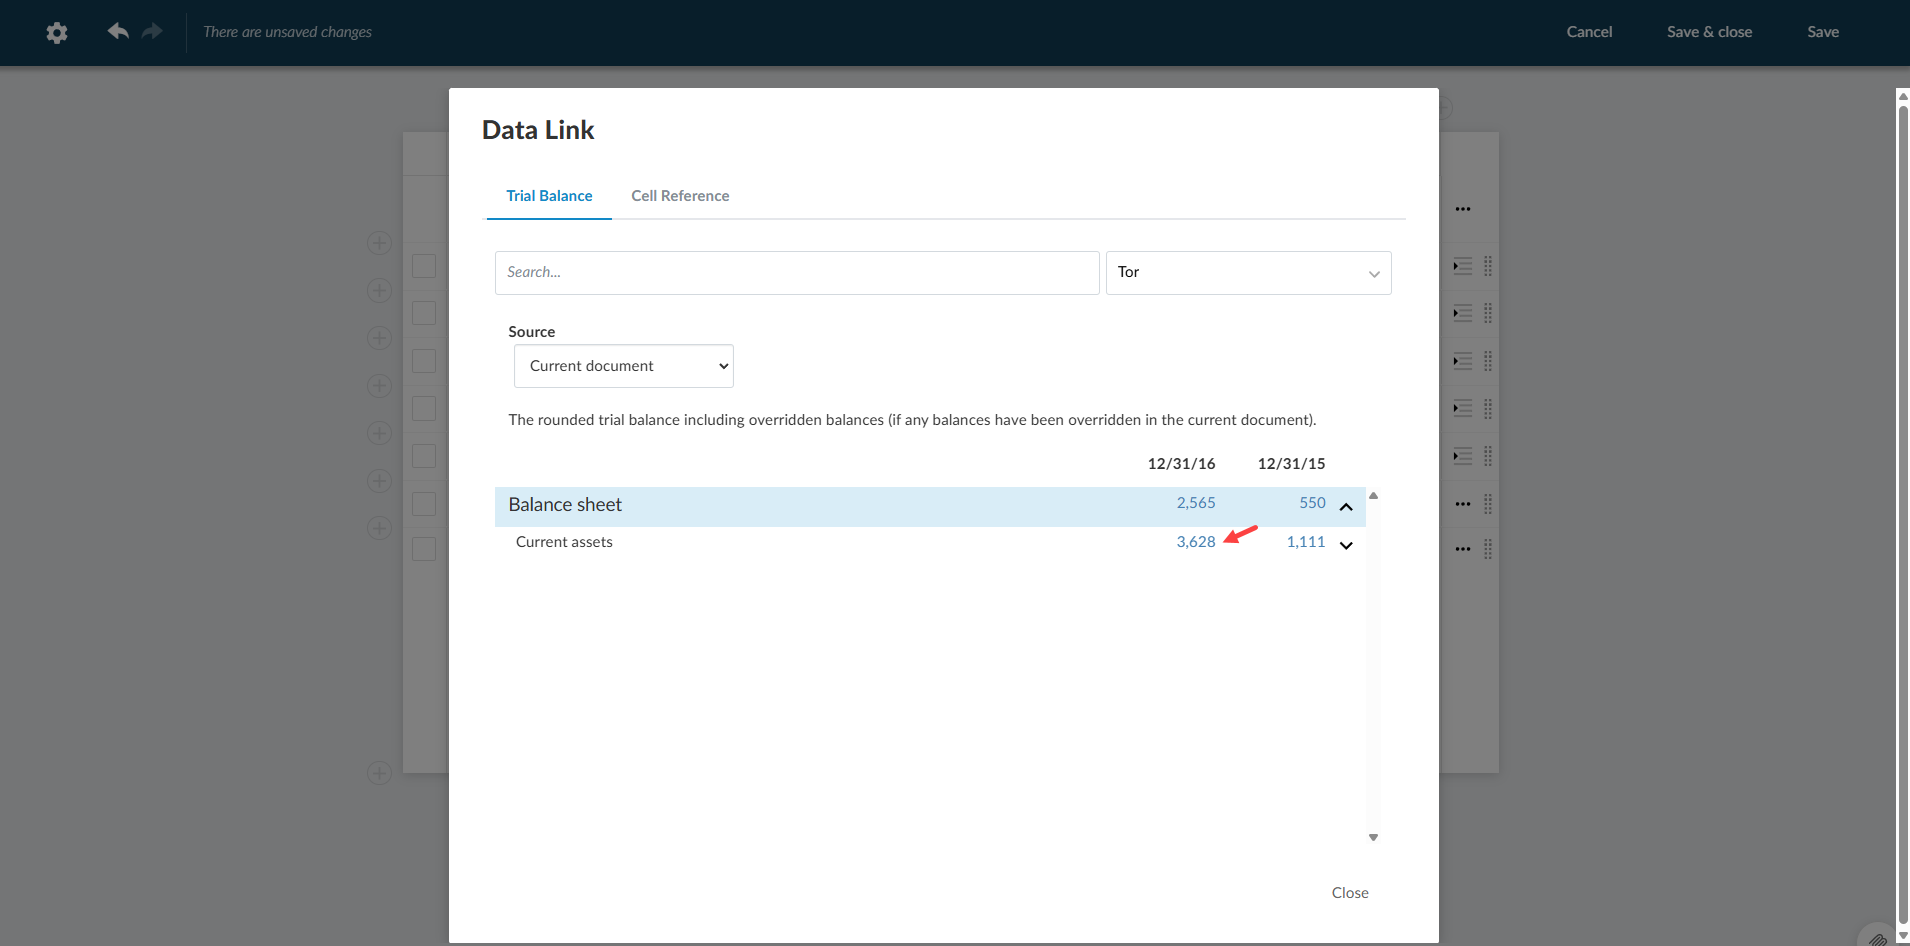
Select a dimension from the Select dimension dropdown menu. A list of applicable trial balance values will appear.
-
Select the value that you wish to enter into the input cell of your dynamic table.
-
Click Done.
-
Click Save & close. The dimension value will appear on your dynamic table.
Add input row to your dynamic table:
Select the fx function inside the input row cell:
Select the dimension:
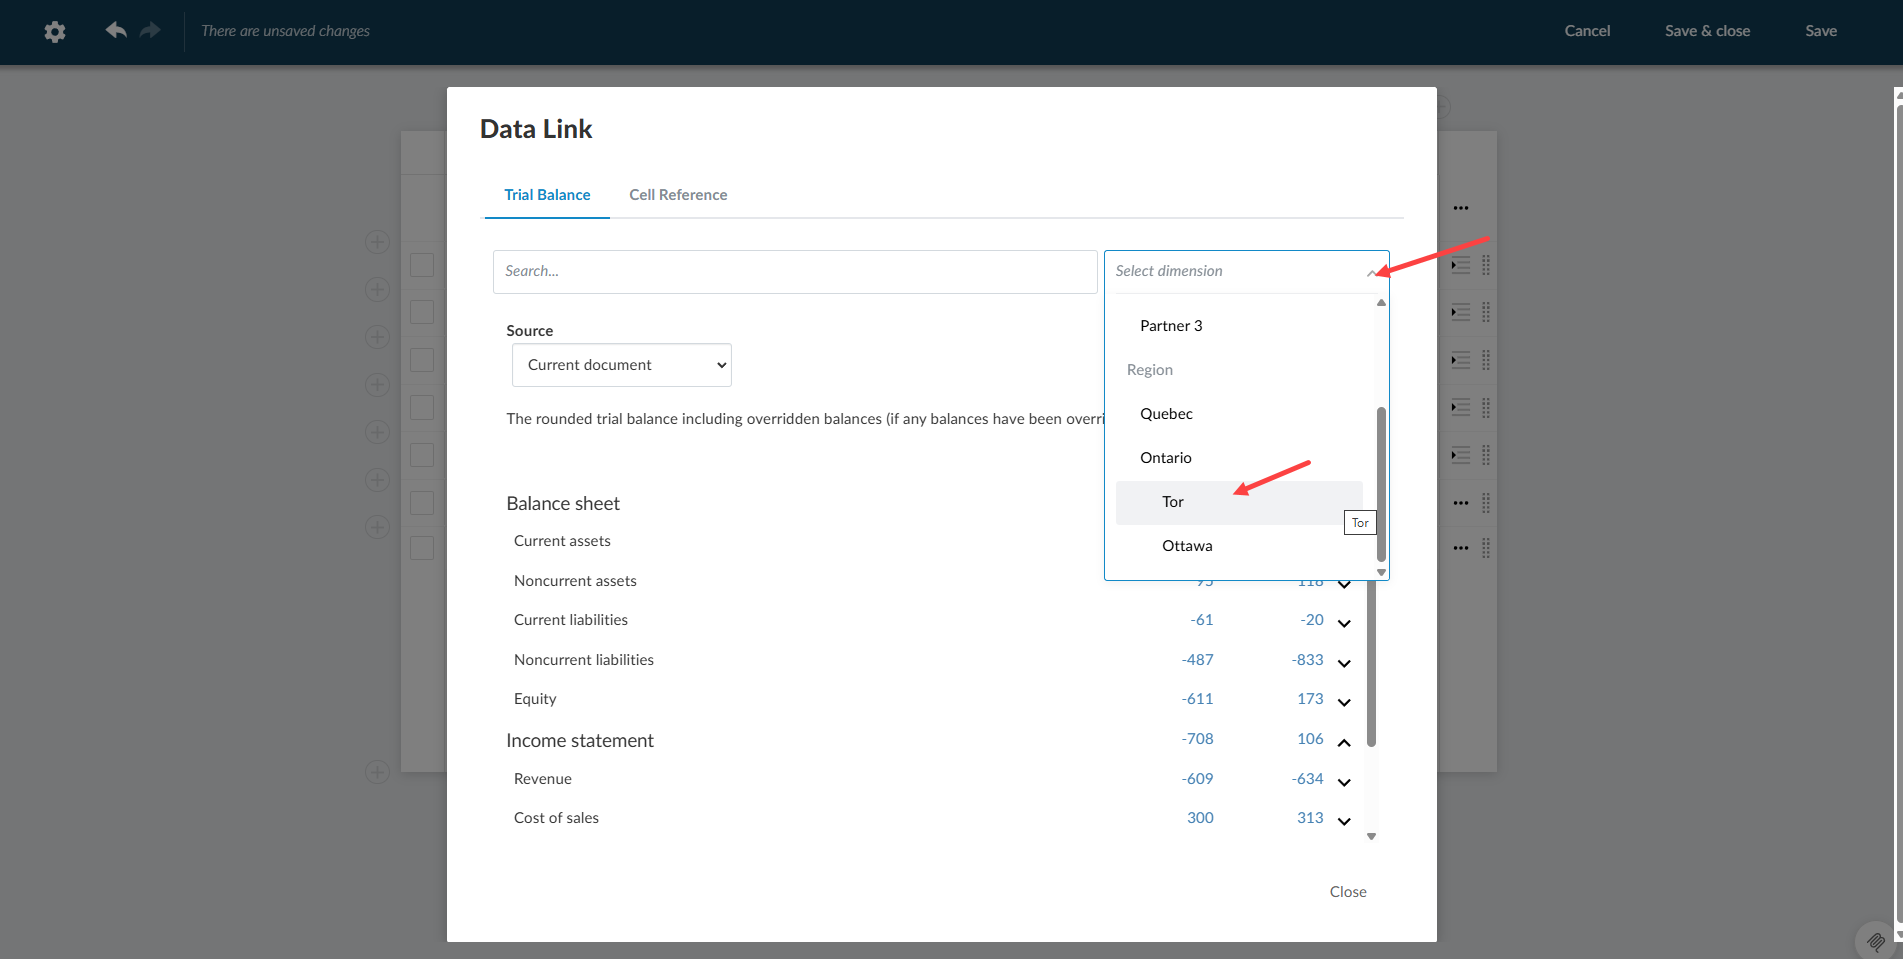
Select the value:
Dimension value added to input row:
Dynamic table with dimension value in individual cell: