Export data from Xero to Caseware Cloud
See the instructions below to export your transaction data from Xero for import into Caseware Cloud.
The process for importing and exporting datasets varies slightly depending on the type of data you are exporting, for example, trial balance, general ledger, various types of subledger, or other data.
For information on importing transaction files to Caseware Cloud, see instructions to do so via CSV or Excel and through connected accounting software packages.
Export the trial balance
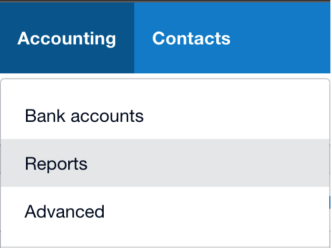
To export the trial balance:
- In the Accounting drop-down menu, select Reports.
- Navigate to the Taxes and Balances section and select Trial Balance.
- Select your preferences regarding date range, columns, comparisons and grouping and select Update.
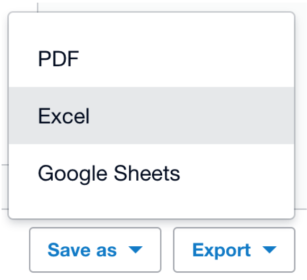
- At the bottom-right of the page, click Export and select the Excel option.
TIP: To save files as CSV for more flexible use, open the Excel file, select Save As…, and under the Save as type, select All Files. Type .csv as the file extension.
Export the general ledger
To export the general ledger:
- In the Accounting drop-down menu, select Advanced.
- From the Advanced Features menu, select Export accounting data.
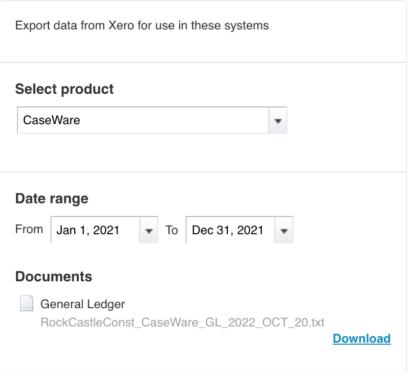
- From the Select a product drop-down menu, under the General Ledger section, click Caseware.
- Select the date range for your General Ledger activity. For example, if you're auditing the year ended 31 December 2020, your file should be dated from 1 January 2020 to 31 December 2020.
- Select Download to save your general ledger file.
- Change the file extension from .txt (default) to .csv.

Export the subledger – accounts payable (AP)
See the instructions below to export the various types of subledger — accounts payable data.
Export AP invoices/payments made
To export accounts payable – invoices/payments made data:
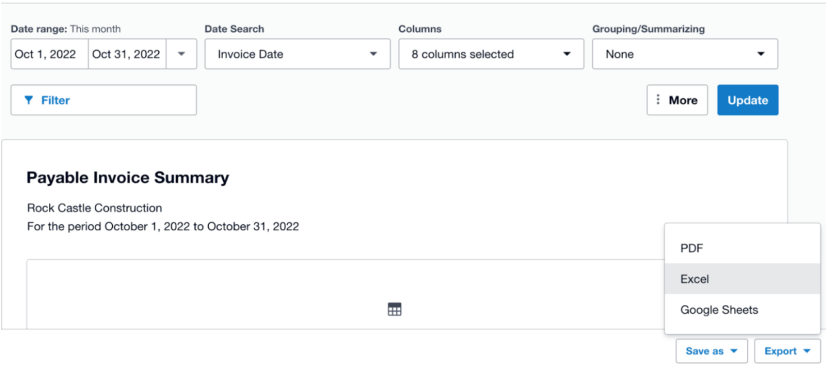
- In the Accounting drop-down menu, select Reports.
- In the Payables and Receivables section, select either Payable Invoice Summary or Payable Invoice Detail depending on your requirements.
- Select your preferences regarding date range, columns, comparisons and grouping and select Update.
- At the bottom-right of the page, click Export and select the Excel option.
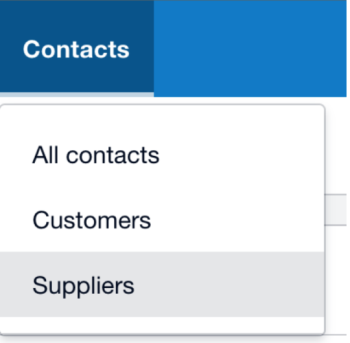
Export AP suppliers
To export accounts payable – suppliers data:
- From the Contacts drop-down menu, select Suppliers.
- Select the three dots in the top right corner and click Export to save the file as .csv.

Export AP open balances
To export accounts payable – open balances data:
- In the Accounting drop-down, select Reports.
- In the Payables and Receivables section, select either Aged Payables Summary or Detail depending on your requirements.
- Select your preferences regarding date range, columns, comparisons and grouping and select Update.
- At the bottom-right of the page, click Export and select the Excel option.
Export the subledger – accounts receivable (AR)
See the instructions below to export the various types of subledger — accounts receivable data.
Export AR invoices/AR cash received
To export accounts receivable – invoices/cash received data:
- In the Accounting drop-down menu, select Reports.
- In the Payables and Receivables section, select either Receivable Invoice Summary or Detail depending on your requirements.
- Select your preferences regarding date range, columns, comparisons and grouping and select Update.
- At the bottom-right of the page, click Export and select the Excel option.
Export AR customers
To export accounts receivable – customers data:
- Select Customers from the Contacts drop-down menu.
- Select the three dots in the top right corner and click Export to save the file as .csv.
Export AR open balances
To export accounts receivable – open balances:
- In the Accounting drop-down menu, select Reports.
- In the Payables and Receivables section, select either Aged Receivable Summary or Detail depending on your requirements.
- Select your preferences regarding date range, columns, comparisons and grouping and select Update.
- At the bottom-right of the page, click Export and select the Excel option.
Export the subledger – inventory
See the instructions below to export the various types of subledger — accounts receivable data.
Export inventory transactions
To export subledger – inventory transactions data:
- In the Accounting drop-down menu, select Reports.
- In the Transactions section, select either Inventory Item Summary or Detail depending on your requirements.
- Select your preferences regarding date range, columns, and comparisons. In the Grouping/Summarizing drop-down menu, select Inventory Account.
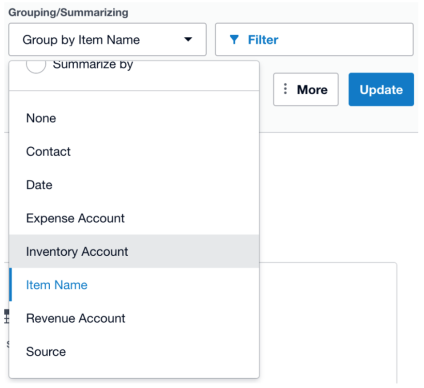
- Select Update, and in the bottom right, click Export and select the Excel option.
Export inventory on hand
To export subledger – inventory on hand data:
- In the Accounting drop-down menu, select Reports.
- In the Reconciliations section, select Inventory Item List.
- Select your preferences regarding date range, columns, and comparisons. In the Grouping/Summarizing drop-down menu, select Inventory Account.
- Select Update, and in the bottom right, click Export and select the Excel option.