Add dimensions
NOTE: This feature may not be available in your product.
A dimension is a group property. An account can be assigned to one dimension within a specific group for further sorting and categorization.
You can create one or more dimension categories then populate the categories with dimensions. For example, you can create a dimension category called Location then create a dimension for each location that your client has. Once you create dimensions, you can then assign them to financial groups.
Note the following restrictions for assigning dimension categories to groups:
-
End users cannot delete dimensions created by authors.
-
Firm authors and end users cannot modify dimension categories for groups that have inherited categories from higher level groups
To start, select the Information icon (![]() ) at the top menu, then choose Settings. The Product Settings dialog opens, where you can view and customize settings if needed.
) at the top menu, then choose Settings. The Product Settings dialog opens, where you can view and customize settings if needed.
To add a set of dimensions:
-
Go to Features | Dimensions.
-
Select + Dimension Category, then add a name for the new dimension category.
-
Select + Add dimension to add a dimension for the new category.
-
Enter a name for the new dimension.
-
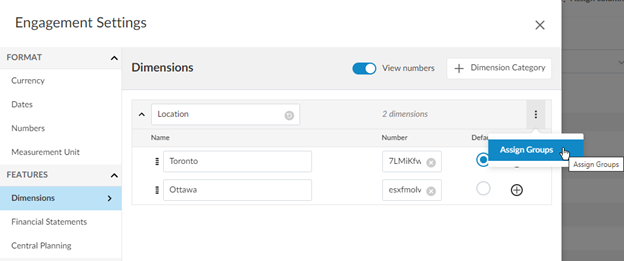
Select View numbers to see unique dimension numbers that are autogenerated for each dimension. In Number, you can change the unique ID for each of the dimensions, instead of using the autogenerated ID. For example, you may want to change the ID to 100/101/200/201/ or to some other alphanumeric combination.

These dimension numbers can be used to associate dimensions with transactions.
You can drag and drop dimensions to rearrange them within a category and use the up and down arrows to expand and collapse categories. You can also select Delete Dimension ( ) to remove a dimension.
You can select Add ( ) to add a second-level dimension to your primary dimension. You can also add third-level dimensions to second-level dimensions.
You can set any dimension without children to be the default dimension for the category. Accounts in groups with this category applied will be automatically mapped to this dimension. For dimension categories without a default dimension set, accounts will not be automatically mapped to any dimension.
When you have created your dimensions, you should then assign the dimension categories to financial groups. Note that you can assign multiple dimension categories to a single group.
To assign a dimension category to a financial group:
-
Go to the category in the product settings.
-
Select More actions (
 ) | Assign Groups.
 -
If your product has multiple financial grouping structures, select the grouping structure you want from the drop-down.
-
Select all the applicable financial groups.
You can expand and collapse financial groups to view sub-groups and use the search bar to find the appropriate groups.
Note that you can also assign dimension categories to a group from the Group properties dialog.