Integrate online accounting software with Caseware Cloud

Content in this topic requires CasewareCloud Time.
You can export invoices from Caseware Cloud to Xero or QuickBooks Online (QBO). This process is faster and more precise than manual data entry. Before you export invoices, you need to:
-
Link your accounting software to Cloud.
-
Configure the integration settings.
Link online accounting software to Caseware Cloud
To export invoices to online accounting software, link Cloud to an existing account.
Note: If you're a QBO user, you must enable Custom transaction numbers before you export invoices. For more information, see Change the number on invoices or other transactions.
To link online accounting software to Cloud:
-
Ensure you have the Settings Admin role and any Time permission.
-
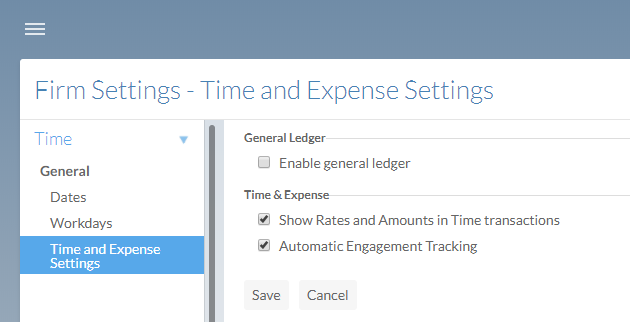
Ensure the general ledger (GL) is disabled. For more information on disabling the GL, see Time and Expense Settings.
-
From the Cloud menu (
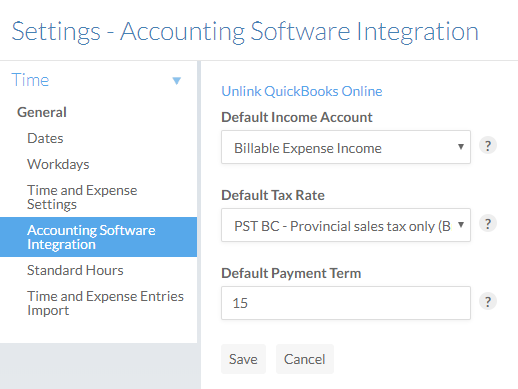
 ), select Settings | Time | General | Accounting Software Integration.
 -
Select Link to QuickBooks Online or Link to Xero, then sign in to your account.
Note: After linking to a Xero account, attempting to change the account may result in a data retrieval error.
Configure integration settings
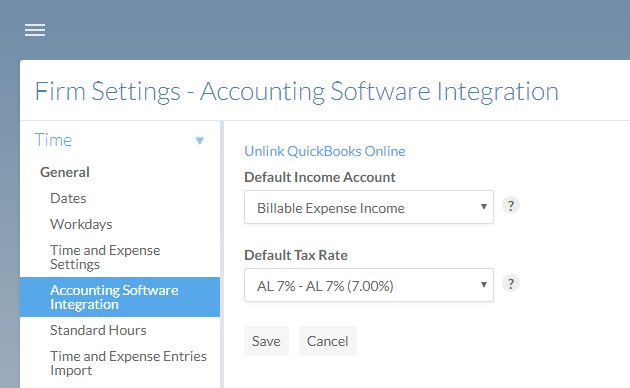
To ensure that your invoices are correctly exported to your online accounting software, you need to set the default income account, default tax rate and default payment term.
Set the default income account
Exported invoices are applied to an income account that you select from the Default Income Account drop-down.
To set a default income account:
-
Ensure you have the Settings Admin role and any Time permission.
-
From the Cloud menu (
), select Settings | Time | General | Accounting Software Integration. -
Select an income account from the Default Income Account drop-down.
-
Select Save.
Set the default tax rate
When you export invoices from Cloud to the accounting software, the tax jurisdiction is automatically mapped using a best-effort approach based on the tax rates set in Cloud. Alternatively, you can manually set a default tax jurisdiction by selecting a Default Tax Rate in Cloud.
The tax rates in the Default Tax Rate drop-down differ depending on your Cloud settings and your accounting software.
QuickBooks Online
Tax rates in QBO matching your Primary Tax Rate and your Secondary Tax Rate populate in the Default Tax Rate drop-down. For example, if your Primary Tax Rate is set to 10% and your Secondary Tax Rate is set to 5%, then tax rates in QBO with a primary rate of 10% and a secondary rate of 5% display in the Default Tax Rate drop-down.
Xero
Tax rates in Xero matching the total of your Primary Tax Rate and your Secondary Tax Rate populate in the Default Tax Rate drop-down. For example, if your Primary Tax Rate is set to 10% and your Secondary Tax Rate is set to 5%, then tax rates that total 15% from Xero display in the drop-down.
To learn more about setting tax rates, see Firm settings - CasewareCloud Time.
If your clients are located in the same jurisdiction as your business, set the Default Tax Rate to your business tax jurisdiction. If you are exporting invoices for clients outside of your business jurisdiction, you may have to manually set the correct tax jurisdiction in your accounting software after you export the invoices.
For example, let's assume your business operates out of Nova Scotia, Canada and you have clients in both Nova Scotia and New Brunswick. Both jurisdictions require a tax rate of 15% for goods and services. If most of your clients are in Nova Scotia, set the Default Tax Rate to Nova Scotia. This way, each exported invoice that charges a 15% tax will have Nova Scotia set as the jurisdiction in your accounting software. If you export an invoice for New Brunswick (which also has a 15% tax rate), you need to manually change the jurisdiction in your accounting software.
To set a default tax rate for exported invoices:
-
Ensure you have the Settings Admin role and any Time permission.
-
From the Cloud menu (
), select Settings | Time | General | Accounting Software Integration. -
From the Default Tax Rate drop-down, select the applicable tax rate.
-
Select Save.
Set the default payment term
The default payment term determines the number of days before the expected payment is due. For example, an invoice issued on July 10th with a default payment term of 7 is due on July 17th.
A default payment term of 0 sets the due date of all exported invoices to the date the invoice is issued. For example, an invoice created on September 1st with a payment term of 0 will have September 1 as the due date as well.
Once you integrate your accounting software, the default payment term is automatically set to 30.
To set a default payment term:
-
Ensure you have the Settings Admin role and any Time permission.
-
From the Cloud menu (
), select Settings | Time | General | Accounting Software Integration. -
In the Default Payment Term field, enter a number between 0 and 999.
-
Select Save.
After you have completed integration, you can export invoices to your online accounting software. For more information, see