Import data from SAP® using SmartExporter
You can export trial balance and general ledger data from SAP® using SmartExporter, and then import it into your Caseware Cloud app. You must have a license for SmartExporter, for more information, see Distributors.
Note: Caseware Cloud currently supports the import of the trial balance (the “Financial Statements.csv” file), and general ledger (the “GL Postings All Items.csv” file). Subledgers will be supported in subsequent releases.
Export your data from SmartExporter
If you want to import trial balance or general ledger data into your engagement from SAP® using SmartExporter, you must first export that data from SAP® using SmartExporter.
To export trial balance data from SmartExporter:
-
On the SmartExporter home page, locate the Favorites menu and select Run or manage Favorites.

-
Double-click a template to select it from the list of preloaded Data Request favorites.
Note: If you do not have any Data Requests preloaded, use the Import button
( ) in the Favorites menu to import a Data Request template. These templates are provided to you for this purpose.
-
Under the Connection tab, select the Connect Now button at the bottom of the page to test the connection.

-
Skip the Select Tables tab. The following tables are added by default based on the preloaded template:
-
/AUDIC/FAGL_ACCOUNT_ITEMS_ALV
-
/AUDIC/RFBILA_ALV
-
AUDIC/RFITEMGL_ALV
-
-
Select the Quick-Filters tab, and modify the data to align with your requirements. Complete all the fields marked with an asterisk (*).
-
Company Code
-
Reporting Year
-
Reporting Periods
-
Financial Statement Version
-
Line Item Status

-
-
Skip the Fields and Filters tab. The relevant fields that will be retrieved from SAP® are added by default.
-
On the Joins tab, for each of the tables, specify the joins to include in the Data Request. The join expressions, fields, and filters are preselected in the template but you can change them if required. The selected joins are retrieved from the SAP system during the Data Request:
To export trial balance data, you must include:
-
accountNumber = ‘RACCT’ (Account number),
-
Account Number text = ‘TEXT’ (Text for B/S P&L),
-
comparisonPeriodBalance = ‘COMPVAL’ (Total of the Comparison Period), and
-
reportingPeriodBalance = ‘REPVAL’ (Total of Reporting Period)
To export general ledger data, you must include:
-
accountNumber = 'KONTO' (Account Number)
-
amount = 'WRSHB' (Amount in Document Currency - Foreign Currency)
-
itemtext = 'SGTXT' (Item Text)
-
documentNumber = 'BELNR' (Document Number of an Accounting Document)
-
documentType = 'BLART' (Document Type)
-
postingDate = 'BUDAT' (Posting Date in the Document)
-
lineNumber = 'BUZEI' (Number of Line Item Within Accounting Document)
-
On the Options tab, select the location on your computer where you want to save your files. To change the save location for downloaded files, select Browse.
-
Under Save my tables as the following type, select CSV with header.

-
On the Finish tab, select Schedule an unattended run.

-
Under Place job in SAP® system, select your preferred schedule for the job. If you want to run the job immediately, select Immediately. Otherwise, select at and specify the date and time.

-
Select the Place Data Request in Queue button.
Once the job has been placed in the queue, a list of the queued jobs appears highlighted in green.
-
Close the view by selecting Close in the bottom-right corner.

-
Select Finish to save your work.
-
To view and download the saved files, go to the Home view and under Data Requests, select Manage Data Request Activity.

-
In the Manage Data Request Activity view, select Details for the file you want to download.

-
Select Download.

-
Confirm the location where you want to save your files, and select Start download. Once the download has completed, select Close.

Import your data
After you export your data, you can then import it into your engagement file.
To import the data into your engagement:
-
Navigate to the Data page. The Data page opens to the Datasets tab.

If you’ve previously imported data, select Add data.
If your engagement is consolidated and has internal subsidiary entities, select which entity you want to import data for from the list.
-
Under IMPORT FROM DATA CONNECTOR, select SmartExporter (Export from SAP®) from the list of data sources.
If the option is not visible, you can use the search box to find it.
-
At the Upload stage of the import wizard, select or drag-drop the general ledger and trial balance data files you exported, then select Next.
-
At the Configure Data stage of the import wizard:
-
Reporting period is automatically filled with the reporting period of the data.
-
Year start date is automatically filled with the start date of the data.
-
Year end date is automatically filled with the end date of the data.
-
In Select dataset type, choose the dataset types you are importing.
Note: Only the trial balance and general ledger datasets are currently available for import from SmartExporter (Export from SAP®).
If you selected Trial balance, select Import the last 5 years of TB to import up to five years of trial balance data if it is available in the file you exported.
Select Next.
At the Confirmation stage of the import wizard, review the information and select Import.
To view the imported data, click View data next to the dataset you imported..A new page appears displaying the data.
By default, all the columns in your dataset display. Click Columns to deselect those you want to hide.
Click Filters to filter the data displayed in the dataset.
For more information, refer to View the client's general and subledger data.
Reimport the trial balance
After you complete the import, you can reimport the trial balance data at any point in time or import a new trial balance:
When you reimport data,
-
Account names and balances will be overwritten with the reimported data for accounts that already exist in the engagement
-
Any new accounts in the reimported data that do not already exist in the engagement will be added to the engagement.
-
Accounts that exist in the engagement that are not included in the reimported data will be deleted, unless:
-
The existing account has a balance for a period, balance type or other entity that is not included in the reimported data. For example, if the existing account has a prior year balance but the reimported data only includes data for current year balances, the existing account will not be deleted.
-
The existing account has a corresponding adjustment, issue or annotation.
-
-
Any adjustments, issues and annotations made prior to reimport will remain after the data is reimported.
Note: If you reimport the data from a different source (from a different file name, for example) and there are accounts in the existing data that are not in the new data, the balance of these existing accounts is set to 0.
Note: In engagement files created from carry forward, account balances from prior years are not overwritten or deleted by the new data from reimport.
To reimport the trial balance:
-
Reassign the fields in the trial balance. Select Options (
 ) | Reassign fields on the Datasets tab on the Data page.
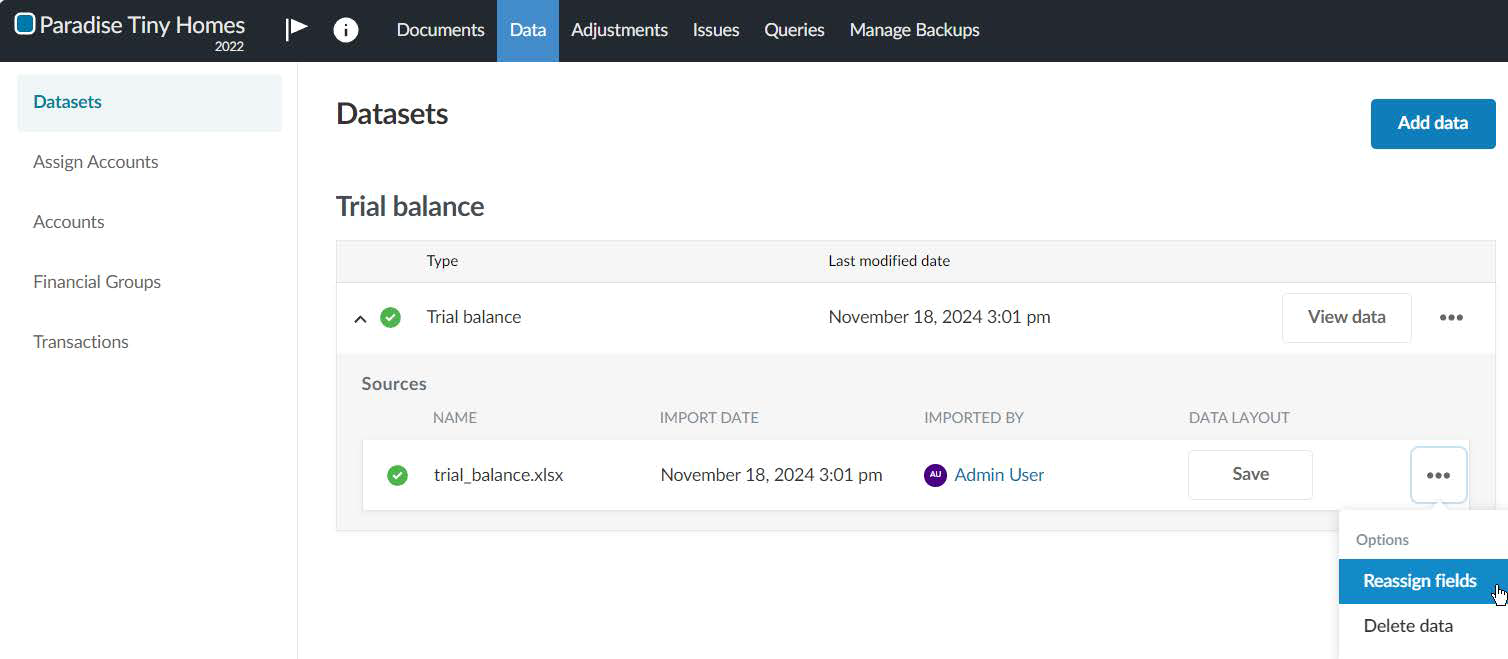
-
In the dropdowns, make any necessary changes in how fields in the data file are assigned to Caseware fields. Select Reimport.
Import a new trial balance
In an engagement where you have already imported a trial balance, you can import a new trial balance. Delete the existing trial balance and then proceed to import the new trial balance.
To import a new trial balance:
-
Delete the existing trial balance. Select Options (
) | Delete data on the Datasets page.
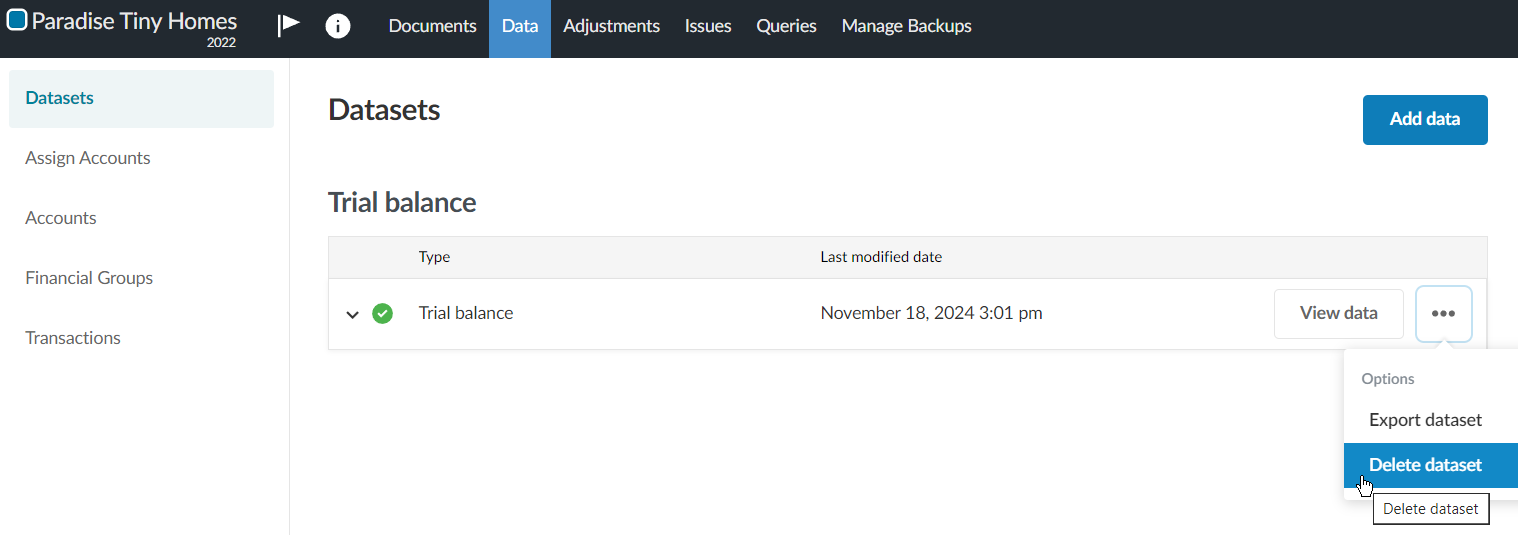
-
Proceed to import the new trial balance. Under DATA FILE UPLOAD, browse or drag the CSV or Excel file to the file upload area.