Création en masse de comptes d'utilisateurs
Au lieu de créer des comptes d'utilisateur individuels, l'option d' importation est disponible dans les pages Personnel et Contact.
Pour les entreprises de grande taille, il est préférable d'utiliser l'option d'importation pour créer en masse des comptes d'utilisateurs en important les informations relatives aux utilisateurs à partir d'une liste. Cela se fait en deux étapes :
- Préparer la liste des informations sur l'utilisateur.
- Importer la liste.
Notez que :
-
Pour créer en masse des comptes d'utilisateurs pour le personnel et les contacts de l'entreprise, vous devez créer deux listes distinctes, l'une pour le personnel de l'entreprise et l'autre pour les contacts de l'entreprise
-
Vous pouvez utiliser l'option d'importation pour mettre à jour en masse les informations relatives aux comptes d'utilisateurs existants
-
Si votre entreprise utilise des unités commerciales, vous pouvez utiliser l'importation standard de personnel pour importer du personnel dans l'unité commerciale actuelle. Si vous importez du personnel vers d'autres unités d'entreprise, vers plusieurs unités d'entreprise ou si vous déplacez du personnel entre des unités d'entreprise, sélectionnez Personnel vers unités d'entreprise. Pour cette option, un champ d'unité commerciale est requis dans la liste d'importation. Les membres du personnel qui se trouvent déjà sur le site principal du nuage peuvent continuer à utiliser les mêmes identifiants de connexion et le sélecteur d'unité opérationnelle pour naviguer entre les sites.
-
Après avoir importé avec succès une liste d'utilisateurs, Cloud envoie une notification par courriel à chaque utilisateur créé. Pour en savoir plus, consultez la section Ce qui se passe après l'importation de la liste.
Caseware Cloud propose deux méthodes pour ajouter du personnel ou des contacts à votre organisation : importer une liste en utilisant un fichier .csv ou un bloc de texte délimité ou ajouter des utilisateurs individuellement dans Cloud. Si votre organisation compte plus de 50 employés ou contacts, nous vous recommandons d'importer une liste d'utilisateurs.
Étape 1 : Préparer la liste des informations sur l'utilisateur
L'ajout d'utilisateurs à partir d'une liste permet d'ajouter un grand nombre d'utilisateurs en une seule procédure. Le fichier de liste ou le texte peut ajouter ou modifier le profil et les coordonnées des utilisateurs, ainsi que leur affectation à un groupe. Si un groupe saisi n'existe pas dans Cloud, l'importation du répertoire le créera.
Vous aurez besoin d'une liste d'utilisateurs dans un fichier .csv ou un bloc de texte délimité.
Si vous utilisez l'une ou l'autre de ces méthodes, assurez-vous que
- Chaque ligne représente un utilisateur, et
- Chaque colonne représente une propriété, telle que le nom, l'adresse électronique et le groupe d'utilisateurs. Pour inclure un utilisateur dans plusieurs groupes, placez un tilde (~) entre chaque nom de groupe.
Par exemple, un administrateur souhaite ajouter quatre membres du personnel à Cloud. Pour chaque méthode, la liste des utilisateurs pourrait ressembler à ce qui suit :
fichier .csv :

Bloc délimité de texte brut :

Étape 2 : Importer la liste
Une fois la liste préparée, vous êtes prêt à importer vos utilisateurs dans Cloud.
Pour importer une liste d'utilisateurs :
-
Assurez-vous que vous disposez du personnel : Rôle d'administrateur ou droits équivalents.
-
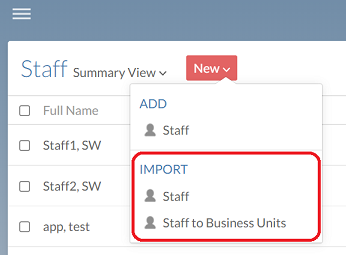
Dans le menu Nuage, sélectionnez Personnel ou Contacts.
-
Sélectionnez Nouveau et, sous Importation, sélectionnez Personnel ou Contacts.
Remarque : Si votre entreprise utilise des unités commerciales, vous pouvez utiliser l'importation standard de personnel pour importer du personnel dans l'unité commerciale actuelle. Si vous importez du personnel vers d'autres unités d'entreprise, vers plusieurs unités d'entreprise ou si vous déplacez du personnel entre des unités d'entreprise, sélectionnez Personnel vers unités d'entreprise.
-
Complétez les options d'importation si nécessaire.
Option Description Mise à jour des informations sur le personnel existant Sélectionnez cette option pour mettre à jour le personnel existant avec les détails du fichier CSV. (Standard) Désactiver le personnel non listé et activer le nouveau personnel Sélectionnez cette option pour désactiver tout personnel existant dans le site Cloud, mais non inclus dans le fichier CSV. Les nouveaux membres du personnel figurant dans la liste du personnel seront activés.
Ne sélectionnez cette option que si vous importez une liste complète de collaborateurs ou de contacts.
(Unités opérationnelles) Désactiver le personnel des unités opérationnelles non répertoriées Cochez cette case pour désactiver tout personnel existant dans les unités d'affaires qui ne sont pas incluses dans le fichier CSV.
Contient l'en-tête Sélectionnez si votre fichier CSV contient une ligne d'en-tête. Délimiteur Sélectionnez le délimiteur utilisé dans le fichier CSV pour séparer les lignes (par exemple , ; | ). Spécifier comment le mot de passe initial doit être défini Choisissez si le mot de passe initial doit être défini par les utilisateurs eux-mêmes ou par le fournisseur d'identité (admin). -
Sélectionnez Importer à partir de CSV et naviguez jusqu'à votre fichier de répertoire .csv, ou collez le texte de votre liste délimitée dans la zone de texte, puis sélectionnez Suivant.
-
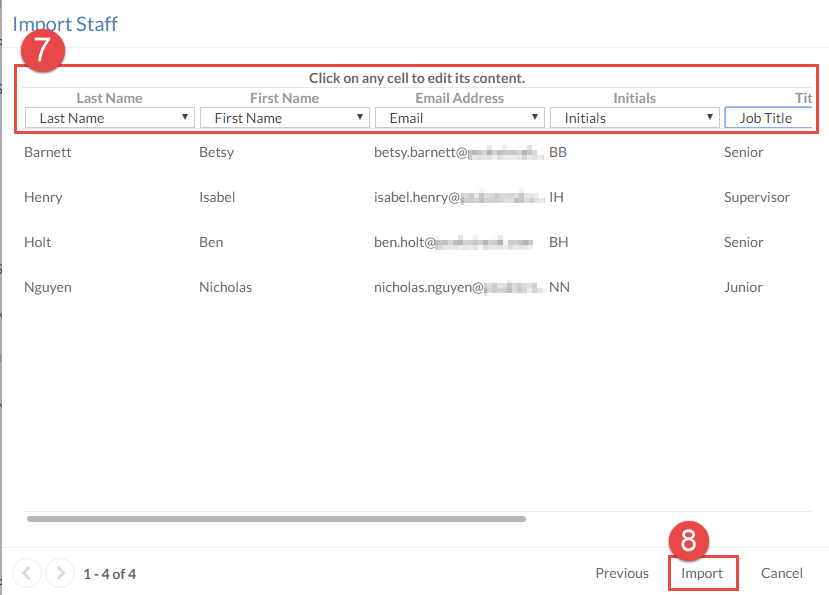
Mettez en correspondance la propriété qui correspond à chaque colonne.
Notes :
- Si des utilisateurs existants ont la même adresse électronique, ils seront mis à jour.
- Si vous importez du personnel vers des unités d'entreprise, toute valeur non vide dans la colonne unité d'entreprise doit correspondre à un nom d'unité d'entreprise. Les unités commerciales multiples peuvent être délimitées à l'aide de tildes (~).
- Si vous importez une liste de contacts, laissez le champ de l'adresse e-mail vide pour tous les contacts pour lesquels vous ne voulez pas avoir de compte dans Cloud.
-
Sélectionnez Importer.
Une boîte de dialogue de confirmation apparaît, indiquant le nombre d'utilisateurs ajoutés ou modifiés avec succès. Si vous avez saisi des groupes, ils seront également ajoutés ou modifiés.
Que se passe-t-il après l'importation de la liste ?
Après avoir importé une liste d'utilisateurs, Cloud leur enverra automatiquement un courriel avec un lien vers leur page de connexion. Un enregistrement de cet e-mail peut être trouvé dans Paramètres | Email | Journal des e-mails.
Sur l'écran de connexion, il leur sera demandé d'entrer leur adresse électronique et de saisir et confirmer un mot de passe. Les normes relatives à la difficulté des mots de passe et à la fréquence à laquelle ils doivent être modifiés peuvent être définies dans Paramètres | Sécurité | Paramètres des mots de passe.