Start the engagement
![]()
Content in this topic requires OnPoint Audit.
To start the engagement, create a new OnPoint Audit engagement file. Note that you can set key dates, budgets and assign staff members to the engagement file to prepare and review the engagement work.
-
From the Cloud menu (
 ), select OnPoint Audit.
 -
Select the New button.
-
Choose your client Entity by clicking on the quick search icon (
 ).
). -
Enter a name for the engagement file and specify the year of the engagement.
- carry forward data from an existing engagement by selecting the Carry forward data from drop-down. See Carry forward an engagement for more information.
- copy an existing engagement from another entity by selecting Entity for source engagement and Source engagement.
- select a Start Date and End Date for your engagement, enter budget information and add a description.
-
In Template version, you have two template versions to choose from when creating or carrying forward an engagement:
The OnPoint Audit dialog displays.
You can also:
| Template version | Description | Keeps customizations? |
|---|---|---|
| 2024 (Fall) | Legacy template with your existing financial statement setup |  Yes Yes |
| 2025 (Summer) | New template with updated industry content and platform alignment |  No No |
Warning: Customizations made in your current 7-600 Financial Statements will not carry over to the 2025 template. Document any critical changes before proceeding with 2025. To learn more, refer to our Transition guide - OnPoint Audit 2025 template.
In the Preparer field, enter your name and select all staff assigned to the engagement from the drop-down list.
In the Reviewer field, enter other staff members' names as required. Select them from the list to assign them as a reviewer.
Select Save.
The engagement file automatically opens in your browser.
Set the workflow status and year end date
When you first open the engagement, a pop-up displays showing the engagement's Workflow status.
The Workflow status lets clients and other stakeholders know how far along you are in the engagement process. If you intend to start working on the engagement right away, set the Workflow status to In Progress.
You can also enter:
-
Job number
-
Operating name
-
Reporting period
-
Year end date
Note that an incorrect year end date affects trial balance imports.
When setting the workflow you can also select Lockdown to close the engagement and select Consolidate to bring in data from subsidiary files.
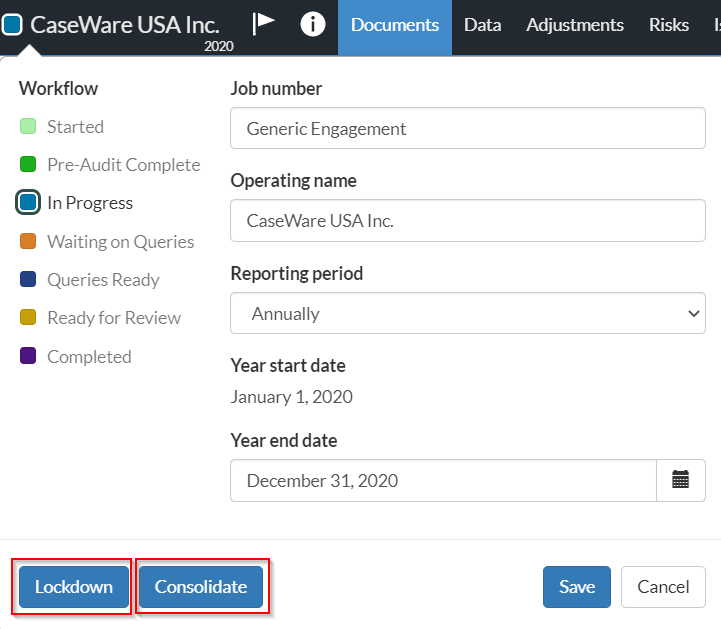
Note that you will not need to lockdown the engagement until the final audit has been signed off on, and key deliverables are provided to end users. To learn more, see Archive and lock down the engagement.
Once you select Save, you can view the Documents page.
Documents page
The Documents page acts as a central hub in OnPoint Audit. To populate content on the Documents page, complete the 1-100 - Acceptance/Continuance document. Once the document is complete and the engagement is accepted, complete the 1-200 - Engagement set up checklist.
Documents are available within three phases, which have been broken down further to allow for ease of navigation throughout the document manager. For example, the planning phase contains Risk assessment, Assessment of the controls environment and Materiality documents. The three phases are:
-
Planning
-
Fieldwork
-
Completion
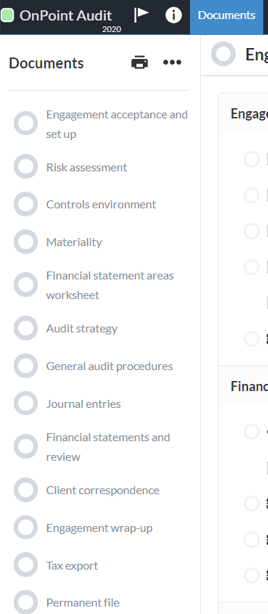
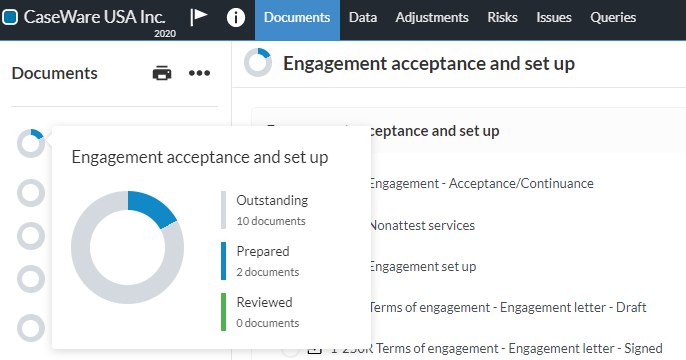
Each phase has its own progress indicator that shows the document sign-off progress. Hover over the progress indicator to view how many documents are Outstanding, Prepared or Reviewed.
To see all documents available in OnPoint Audit, select More Actions (...) | Hidden Items. Otherwise, only documents and phases applicable to your engagement type are visible.