Complete a checklist
In an engagement file, you typically record your engagement work in checklist documents that are usually also known as worksheets, work papers or work programs. Each checklist includes a series of tasks to guide you through the engagement work, and as you perform each task, enter responses or data and sign off on the task.
Complete a checklist item
Each item in a checklist is called a procedure. Procedures consist of:
-
a description of the tasks to be completed or the information to be gathered
-
fields for you to enter information or conclusions
The input fields for your procedure are called responses. Response fields are displayed beside or below the procedure.
Completing a checklist tracks the work you have done by completing procedures. Note that you can expand all or collapse all procedures using the Expand All (![]() ) / Collapse All (
) / Collapse All (![]() ) icons.
) icons.
Once you enter a response for a procedure, you can sign off on it by selecting the Sign Off icon (![]() ) to the right of the response.
) to the right of the response.
Note: Users can only remove their own signoffs. A user that has been granted one or more administrator security roles can remove signoffs by other users. See Assign system wide security roles for more information.
View procedure guidance
If procedure guidance is available in your product, you can display the guidance information on the left panel.
To view guidance information for a procedure:
Select the light bulb icon (![]() ) located beside certain procedures to display guidance for them on the left panel. This guidance may present information that helps you to complete the procedure or it may describe the procedure's outcome.
) located beside certain procedures to display guidance for them on the left panel. This guidance may present information that helps you to complete the procedure or it may describe the procedure's outcome.
View client responses related to checklist procedures
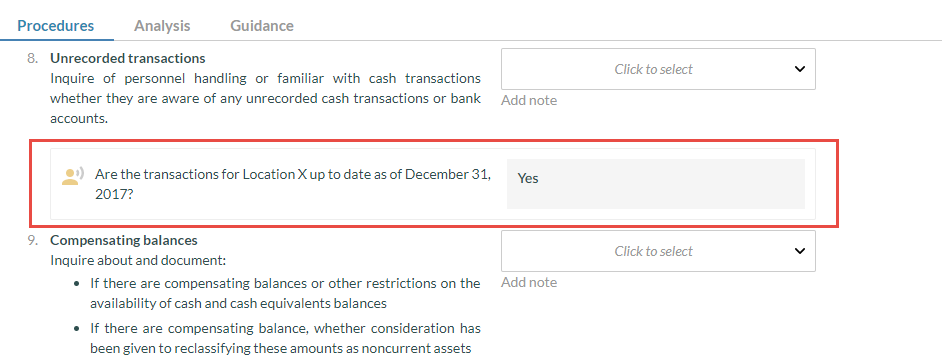
Query (client request) questions can be linked to checklist procedures that they're related to. This allows engagement staff to use the information provided by clients in queries to complete checklists.
Once a client response to a linked question in the query document is accepted, the question and the response display in the checklist beneath the linked procedure.
See Link a question to a checklist procedure for information on how to link a query question to a checklist procedure.
To view client responses in a checklist:
Select the More actions icon ( ), then select the View Client Responses check box.
Once you've enabled the setting, client responses that have been accepted are displayed beneath their linked procedures. If the client uploads a file as part of the response, the file displays as a link so you can access it directly from the checklist. You can select the Go to Query icon (![]() ) in the response to open the query document.
) in the response to open the query document.
View hidden content
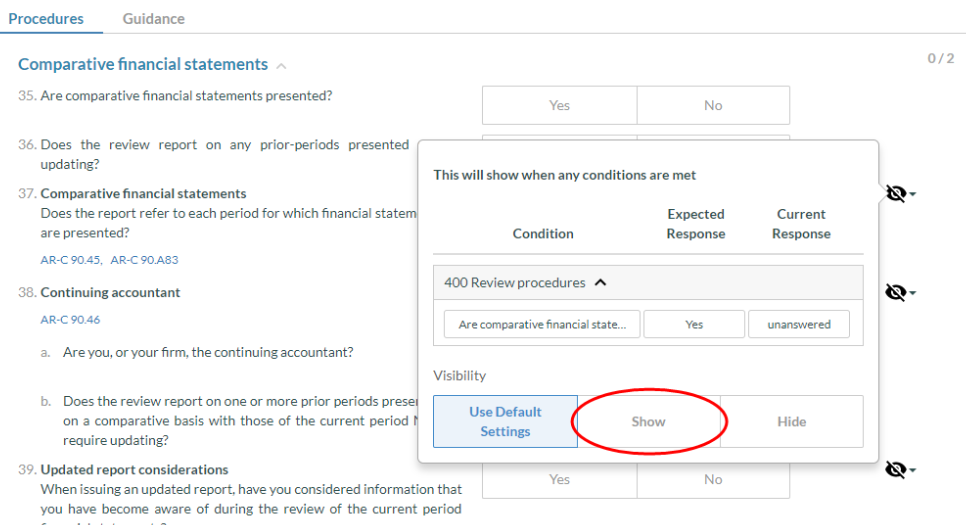
Checklists can include content that's not available by default, but are rather available based on specific conditions. For example, if you are working on a review engagement, only procedures related to review engagements are available in the checklist.
Content availability is controlled by visibility settings so that only the sections or procedures that are relevant for your work are visible in the checklist.
You can display the hidden items in your checklist document and check the visbility logic for each item.
To view hidden items in a checklist:
At the top of the document, select the More actions (![]() ) |Hidden Itemsto display the hidden sections and procedures in the checklist.
) |Hidden Itemsto display the hidden sections and procedures in the checklist.
An eye icon is available next to the checklist sections or procedures indicating whether or not the item is visible.
| Icon | Description |
| | Item is hidden because:
|
| | Visibility conditions are met but has been forced visible by a staff member. |
| | There are no visbility settings for this item. |
| | Visibility conditions are met but has been forced hidden by a staff member. |
To check the visibility logic for a procedure or a section, select the eye icon next to it.
Make a hidden procedure visible
If you find a hidden procedure that you want to include in the checklist, you can make the procedure visible.
Note: You can only display hidden items in an unlocked engagement. To unlock an engagement, select the entity name at the top left corner of the page to open the Engagement Properties dialog, then select Unlock.
To make a hidden procedure visible:
-
At the top of the checklist document, select the More actions (
 ) | Hidden Items to display the hidden sections and procedures in the checklist.
 -
Select the eye icon next to the hidden procedure to display the visibility options popup then select Show.
-
Select the More actions (
 ) | Hidden Items again to close the Hidden Items view.
The procedure you made visible in Step 2 now displays in the document. You can enter the relevant information for that procedure and sign off on it.
Add your conclusions and sign off
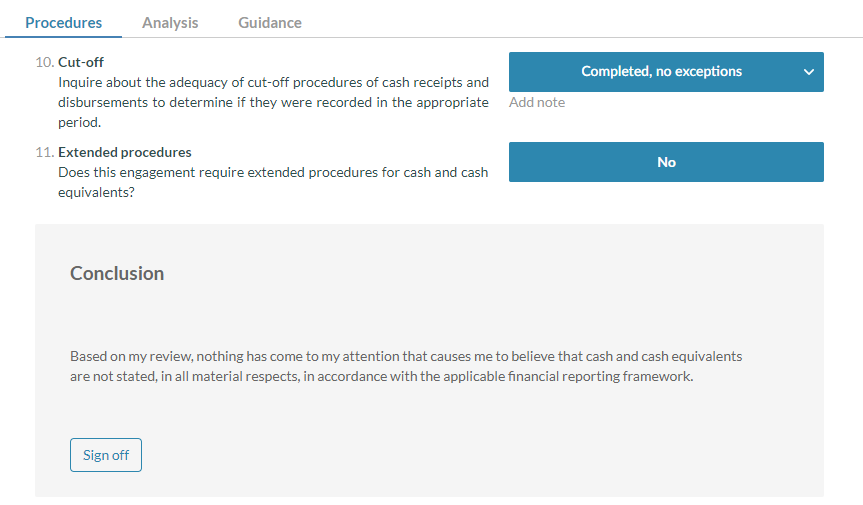
A checklist can include a Conclusion section. You can use this section to enter comments or recommendations based on your findings while completing all of the procedures in the checklist. Once you have entered responses and signed off on all the items on your checklist, you can enter your conclusion and sign off on it.
To add conclusions:
-
Open the checklist and select Edit (
 ).
). -
Go to the Conclusions section at the end of the document.
-
Select the text field and enter your conclusions for the checklist.
Tip: You can select + Conclusion to add more titles and text fields in the conclusion section. You can also select + Procedure to add procedures and subprocedures in the conclusion section.
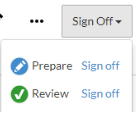
Select the Sign off button below the conclusion section to sign off conclusions. At this point, you can indicate that the checklist is complete by signing off as the preparer at the top of the document.
Add assertions in procedures
Assertions are the implicit or explicit claims and representations made by the management responsible for preparing the financial statements regarding the appropriateness of various elements.
Assertions can be related to the appropriateness of transactions in the income statements, ending balances in accounts in the balance sheet or the presentation of information within the financial statements and the accompanying disclosures.
If assertions are enabled in your checklist, the Assertions drop-down list is available in the checklist. The drop-down allows you to either view all procedures in the checklist or view procedures that address specific assertions.
See Review and modify the checklist default settings for information about enabling assertions in a checklist.
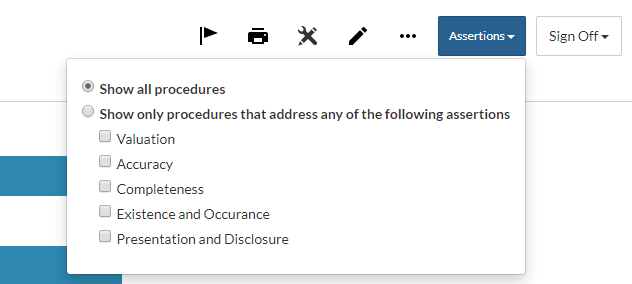
To view procedures that address specific assertions in the checklist, select the Assertions drop-down list and select the corresponding check boxes.
To add assertions:
-
Open the checklist document and select Edit (
 ).
). -
Go to the procedure where you want to add assertions and select Add Assertion (
 ).
).A list of the available assertions displays.
-
Select the check boxes next to the applicable assertions.
An icon corresponding to each added assertions displays at the procedure. For example, if you added Accuracy, the icon for accuracy (
 ) displays.
 Tip: Hover over an assertion icon to view the name of the assertion.
Add Assertion icons (![]() ) display next to procedures.
) display next to procedures.
Icon references
| Icon | Description |
| Lightbulb | Displays guidance for the related procedure. |
Number count  | Shows the total number of procedures to be signed-off in a section (the second number), and the number that have been signed off so far (the first number.) |
| Flag | Use to create review notes and document issues. You also have the option to select issue types that can be flagged, for example, to do, consideration for next year. |
| Print | Prints document to a PDF file. |
| Reviewer tools | This displays the reviewer tools. See Work with Review Tools for more information. |
| Edit | Toggles Edit mode. See Add your conclusions and sign off and Add assertions in procedures. |
| Expand all Collapse all | Use to expand or collapse all procedures in a document. |
| More actions | Use to toggle Hidden Items on the Documents page. |

 (Hidden)
 (Forced visible)
 (Forced hidden)