Import data from desktop accounting software
To import client data from third-party desktop accounting software, use the Cloud Import Utility to generate an import file that you can later import from the Datasets tab on the Data page of your Caseware Cloud engagement. The Caseware Cloud Import Utility supports most desktop accounting software.
For a complete list of third-party accounting software, see Supported third-party desktop accounting software. Note that the options available to you when you import vary depending on your product.
Prerequisites
Before you import your client data, ensure you complete the prerequisite steps for your accounting software. See Prerequisites for importing from desktop accounting software for more information.
To learn how to import data from QuickBooks desktop or Sage desktop, see the following:
For all other third-party accounting software, use the instructions on this page.
Note: Accounts with zero balances do not automatically import into Caseware Cloud apps with the exception of IDEA. To include zero-balance accounts, you must manually add and assign them to the appropriate financial groups.
Generate the import file
During this step, you download and install the Caseware Cloud Import Utility. Use it to import your client data and generate an import file.
To generate the import file:
-
Download the Caseware Cloud Import Utility.
-
Open the Utility, select Other Data Source and select Next.
-
In the Import From and Version fields, specify the accounting software you're exporting from.
The content of the page changes depending on your selection.
-
Browse to the Import Path of the client file you want to import.
If your accounting software requires you to specify a client file, you will see the Select Client ID File drop-down. If there is more than one file, be sure to select the correct one here.
-
Select Next. The New File Wizard Complete page displays.
This shows the location of a temporary file that will be used to generate the final .zip file with the imported data.
-
Select Finish to perform the conversion.
After the data is generated, the Save As dialog displays.
-
Navigate to the desired location to save the .zip file and select Save.
Note: If you're importing data into IDEA using the Cloud Import Utility, do not proceed to import the data. Your next step is to import the zip file into IDEA. See the IDEA Help for detailed instructions.
Caseware Cloud Import Utility(.exe)
Ensure you save the .exe to a new or unique folder, as it will extract a large number of files to the folder when run.
Import the data
After you generate the zip file using the Caseware Cloud Import Utility, you can import the data into your engagement.
To import the data into your engagement:
-
Open your Caseware Cloud engagement. When you first open the engagement, the Engagement properties popup appears. Set Year end date to be the same as the data you are about to import.
The year-end date is the last element of the name of the zip file you generated. For example, for the file named UNIVERSAL CONSTRUCTION 2025-06-30.zip, the year-end date is June 30, 2025.
-
Go to the Data page. The Data page opens to the Datasets tab.
-
If you’ve previously imported data, select Add data.
-
If your engagement is consolidated and has internal subsidiary entities, select which entity you want to import data for from the list.
-
Select your desktop accounting software from the list of data sources.
If the option is not visible, you can use the search box to find it.
-
At the Upload stage of the import wizard, select or drag-drop the zip file you generated using the Caseware Cloud Import Utility, then select Next.
-
At the Configure Data stage of the import wizard:
-
Reporting period is automatically filled with the reporting period of the data.
-
Year start date is automatically filled with the start date of the data.
-
Year end date is automatically filled with the end date of the data.
-
-
In Select dataset type, choose the type of dataset you are importing.
To learn more about the dataset options, see Dataset types. Note that some dataset types may not be available in your product.
-
If you selected Trial balance, collapse the list of dataset types by selecting the Collapse icon (
 ). Notice the Import the last 5 years of TB option appears. Select it to import up to five years of trial balance data if it is available in the zip file you generated.
 -
Select Next.
-
At the Confirmation stage of the import wizard, review the information and select Import.
To view the imported data, click View data next to the dataset you imported.
A new page appears displaying the data.
By default, all the columns in your dataset display. Click Columns to deselect those you want to hide.
Click Filters to filter the data displayed in the dataset.
For more information, refer to View the client's general and subledger data.
Reimport the trial balance
After you complete the import, you can reimport the trial balance data at any point in time or import a new trial balance:
When you reimport data,
-
Account names and balances will be overwritten with the reimported data for accounts that already exist in the engagement
-
Any new accounts in the reimported data that do not already exist in the engagement will be added to the engagement.
-
Accounts that exist in the engagement that are not included in the reimported data will be deleted, unless:
-
The existing account has a balance for a period, balance type or other entity that is not included in the reimported data. For example, if the existing account has a prior year balance but the reimported data only includes data for current year balances, the existing account will not be deleted.
-
The existing account has a corresponding adjustment, issue or annotation.
-
-
Any adjustments, issues and annotations made prior to reimport will remain after the data is reimported.
Note: If you reimport the data from a different source (from a different file name, for example) and there are accounts in the existing data that are not in the new data, the balance of these existing accounts is set to 0.
Note: In engagement files created from carry forward, account balances from prior years are not overwritten or deleted by the new data from reimport.
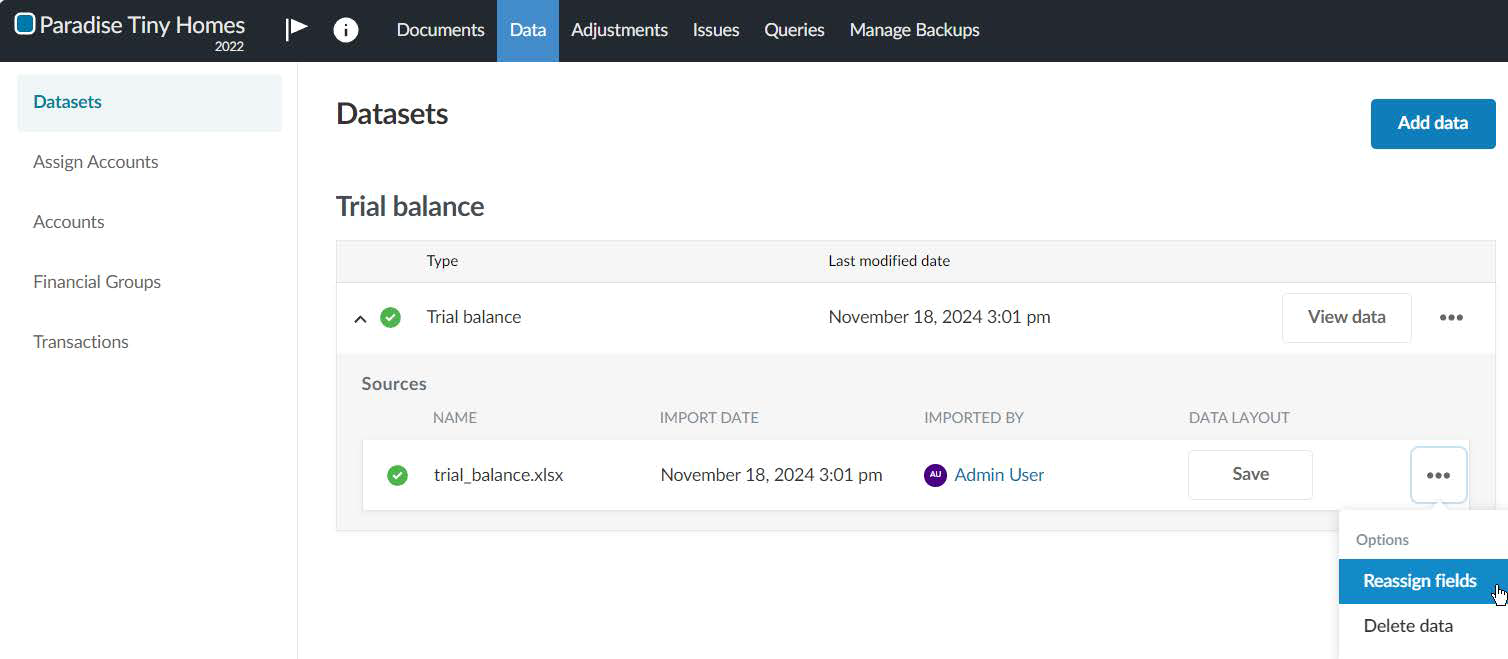
To reimport the trial balance:
-
Reassign the fields in the trial balance. Select Options (
 ) | Reassign fields on the Datasets tab on the Data page.
-
In the dropdowns, make any necessary changes in how fields in the data file are assigned to Caseware fields. Select Reimport.
Import a new trial balance
In an engagement where you have already imported a trial balance, you can import a new trial balance. Delete the existing trial balance and then proceed to import the new trial balance.
To import a new trial balance:
-
Delete the existing trial balance. Select Options (
) | Delete data on the Datasets page.
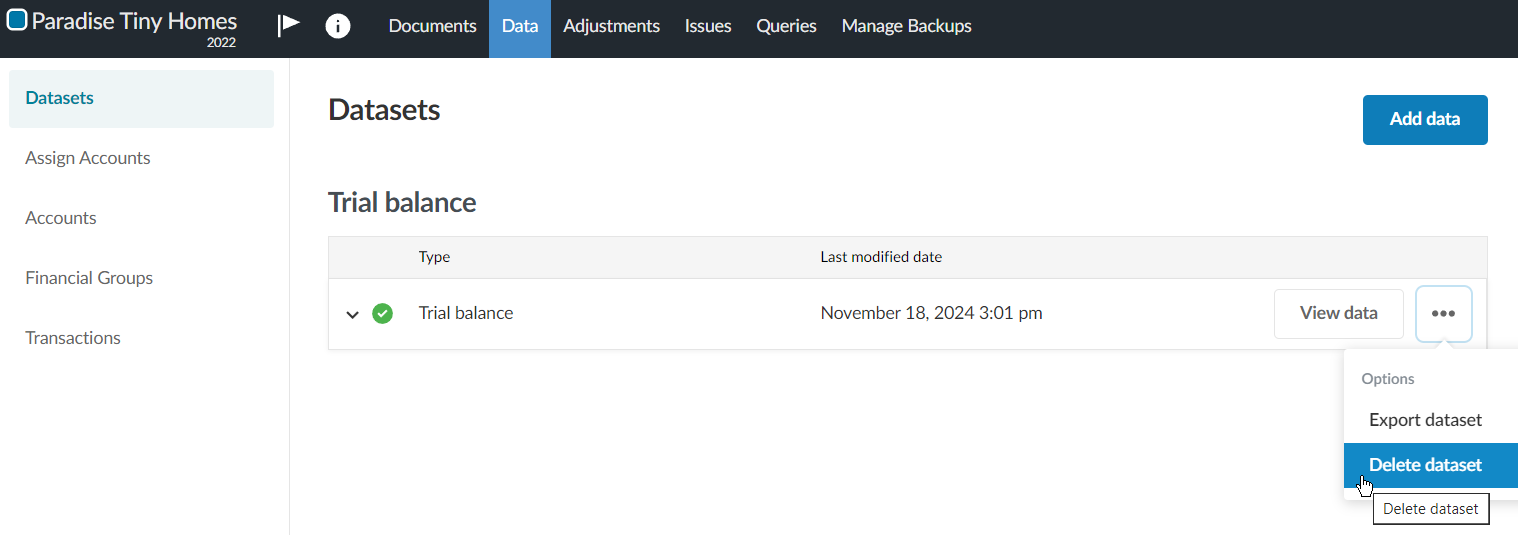
-
Proceed to import the new trial balance. Under DATA FILE UPLOAD, browse or drag the CSV or Excel file to the file upload area.
Dataset types
| Dataset type | Description |
|---|---|
| General ledger | General ledger transactions |
| Trial balance | A worksheet in which all ledgers are compiled into debit and credit columns in order to ensure a company's bookkeeping system is mathematically correct. |
| Accounts payable - invoices | The Accounts payable—invoices dataset contains all invoices received during the period under review. |
| Accounts payable - payments made | The Accounts payable—payments Made dataset contains all payment transactions (check, wire transfer, cash, and so on) made during the period. |
| Accounts payable - suppliers | The Accounts payable—suppliers dataset contains all details related to the Supplier such as Contact details, address, credit limit and so on. |
| Accounts payable - open balances | The Open accounts payable dataset contains details regarding all open, unpaid, or unresolved payable transactions as of the close of business on a specified date. |
| Accounts receivable - invoices | The Accounts receivable—invoice dataset contains all invoices generated during the period under review. |
| Accounts receivable - cash received | The Accounts receivables—cash received dataset contains all payment transactions (check, wire transfer, cash, and so on) received during the period. |
| Accounts receivable - customers | The Accounts receivable—customers dataset contains all details related to the customer, such as contact details, address, credit limit and so on. |
| Accounts receivable - open balances | The Accounts receivable—open balances dataset contains details regarding all open, unpaid, or unresolved customer transactions as of the close of business on a specified date. |
| Inventory transactions | Captures all transactions affecting inventory accounts during the time period specified (for example, receipts, shipments, transfers, returns, and adjustments). |
| Inventory on hand | Captures the on-hand inventory quantities of items by location and amounts as of the specified date. |
| Other | Unstructured transaction data that does not follow a predefined schema. |