Create staff or contact groups
User groups are a key aspect of organizing users in Cloud. Having users assigned to either contact groups or staff groups enables you to change multiple users' properties simultaneously. These properties include what apps users can access, and what security access roles users will have on content they are assigned.
For example, you may want to create staff groups for your organization based on seniority.
Create a new group
You can create both Staff and Contact groups from the Groups page.
To create a new group:
-
Ensure that you have the Staff Admin role or equivalent privileges.
-
From the Cloud Menu, select Groups.
-
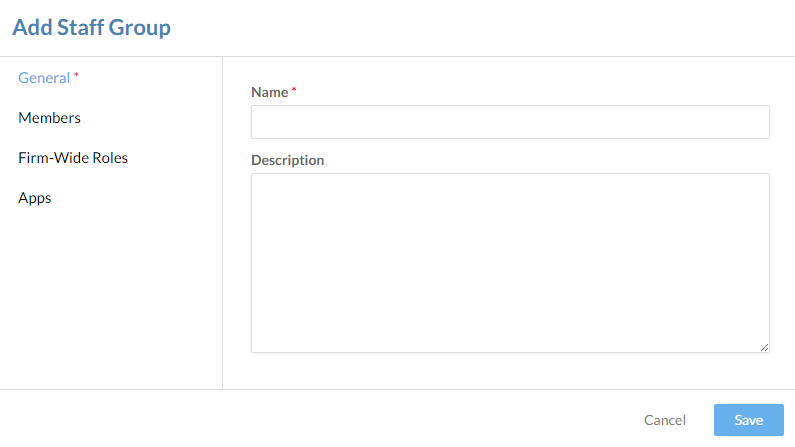
Select New, then choose Staff Group or Contacts Group. The New Group dialog opens.
-
Enter a Name and Description for your group.
-
From the sidebar, select Members. Choose the users you want to add to this group.
-
If you have the Admin role or equivalent permissions, you can also assign System-Wide Roles. To learn more, see Built-in roles.
-
Select Save.
The new group is created. You can see the new group on the Groups page. You can grant entity access to your group to ensure its members can complete their work. To learn more about granting entity access, see Assign system-wide security roles.
Add or remove users from a group
After groups are created, you can manage the membership of the groups by adding or removing users as appropriate.
To add or remove users in existing group:
-
Ensure that you have the Staff Admin role or equivalent privileges.
-
From the Cloud menu, select Groups.
-
Select the group you want to edit and, on the right side of the page, select Edit (
 ).
).
-
From the sidebar, select Members. Choose the appropriate users, then select Save.
The group's membership is updated. To see the current membership of the group, select it from the Groups page.