Track WIP in Caseware Cloud

Content in this topic requires CasewareCloud Time.
Cloud offers three methods to track WIP:
-
Using the WIP tab in the Billing app.
-
Generating WIP reports in the Analysis app.
-
Utilizing the Top 10 WIP Clients gadget or the WIP Analysis gadget on a custom dashboard.
The WIP tab provides an overview based on WIP balances, while the Analysis app provides more detailed reports that can be exported and shared. The WIP gadgets can be incorporated into a custom dashboard, and enable data to be compared with the data available in other gadgets. These tools enable your organization to accurately analyze WIP data in real time.
Displaying the WIP tab
The WIP tab displays the WIP total for each client. Use this tab to sort and compare clients quickly.
To display the WIP tab:
-
Ensure you have the Entity Access role or the equivalent privileges for the clients whose WIP totals you wish to display
-
Choose All Entities from the Entity selector.

-
Open the Billing app. The WIP tab is displayed. You can customize what data is displayed by selecting the Filter (
 ).
). 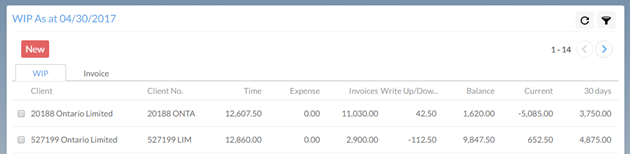
You have displayed the WIP tab.
Generating a WIP report using the Analysis app
The Analysis app provides WIP reports based on selected parameters. These reports provide more detailed information that the WIP tab, and can be exported and shared.
To create a WIP report:
-
Ensure you have been assigned the following roles, or roles with equivalent privileges:
-
Process own entries is required to access your own transactions. This permission is assigned using the Time app.
-
Staff Admin is required to view other staff members' transactions.
-
Entity Access is required for each client entity you want to include.
-
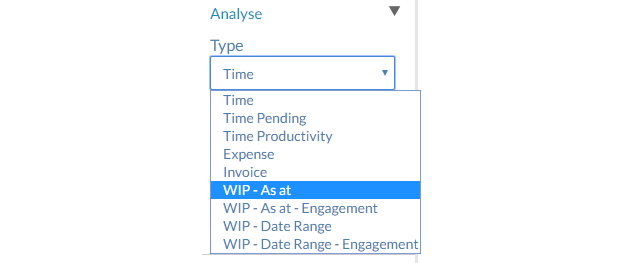
- From the Cloud menu, select Analysis
-
From the Type drop-down menu, choose a WIP report type:
-
WIP - As of - Display only WIP up to the specified day
-
WIP - As of - Engagement - Display only WIP up to the specified day that are associated with an engagement in Cloud.
-
WIP - Date Range - Display WIP for the specified date range.
-
WIP - Date Range - Engagement - Display only WIP for the specified date range that are associated with an engagement in Cloud.
-
-
Choose Detailed or Summary from the Format drop-down menu.
- Choose the appropriate options from the Select, Date and Sort drop-down menus.
-
Select Generate

You have generated a WIP report. You can now Print or Export it.
Creating a WIP dashboard
A dashboard provides a quick snapshot of WIP data without having to generate a report each time. Adding other widgets to this dashboard enables you to contrast WIP data with other information.
To create a WIP dashboard:
-
Ensure you have the Editor role or equivalent privileges and the View WIP and Billing permission.
-
From the Cloud menu, select Dashboards.
-
Select New.
-
Enter a Name and Description.
-
Choose who to share this dashboard with by selecting All Staff, All Contacts, or both. Then select OK.
-
Select Add | Time, then add WIP gadgets:
-
Top 10 WIP Clients - Shows a list of the top 10 WIP clients by balance at a selected date.

-
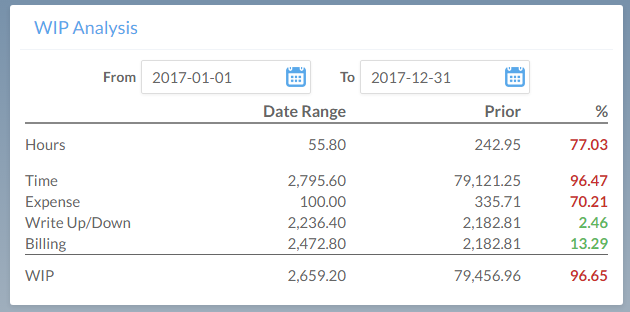
WIP Analysis - Compares WIP balance for a given date range with WIP balance for that same date range in the prior period.
-
-
Select Save.
You have a created a dashboard that provides quick access to WIP data. Display it by selecting Dashboards from the Cloud menu.