Aanmeldingsinstellingen
Wanneer je voor het eerst begint met het instellen van je Cloud-profiel, kun je Cloud-instellingen configureren voor de beveiliging van je organisatie. Als beheerder kun je:
-
De Cloud-wachtwoordinstellingen wijzigen
-
Online-sessielengte instellen
-
Authenticatie met twee factoren configureren
Wachtwoordvereisten instellen
Cloud heeft een standaardset wachtwoordvereisten die worden afgedwongen voor alle nieuwe gebruikers. Zodra je zelf succesvol bent ingelogd in Cloud, kun je deze eisen strenger maken.
Wachtwoordvereisten instellen:
-
Zorg ervoor dat u de beheerdersrol voor instellingen of gelijkwaardige rechten hebt.
-
Selecteer Activiteitenin het menu Cloud.
-
Beveiliging | Wachtwoordinstellingen De pagina Password Settings wordt weergegeven.
Je kunt een minimale wachtwoordsterkte instellen en je kunt kiezen of wachtwoorden verlopen of niet. Nadat u de wachtwoordvereisten hebt ingesteld, selecteert u Opslaan om uw wijzigingen toe te passen.
Minimale wachtwoordsterkte
De minimale wachtwoordsterkte is een instelling die de minimale lengte bepaalt voor Cloud-wachtwoorden en de verschillende soorten tekens die moeten worden opgenomen. Personages zijn gegroepeerd in vier types:
-
kleine letters
-
hoofdletters
-
Nummers
-
niet-alfanumerieke tekens
De minimale wachtwoordsterkte is standaard Matig , maar u kunt deze instellen op Sterk of Zeer Sterk. Hoe sterker je Cloud-wachtwoorden moeten zijn, hoe langer de wachtwoorden moeten zijn of hoe meer verschillende soorten tekens je gebruikers moeten gebruiken.
Als je bijvoorbeeld de instelling Matig toepast, kan een personeelslid een wachtwoord gebruiken dat uit allemaal kleine letters bestaat als het minstens 12 tekens lang is. Als je de instelling Zeer sterk toepast, kan hetzelfde personeelslid alleen een wachtwoord met allemaal kleine letters gebruiken als het wachtwoord minstens 30 tekens lang is.
Vervallen wachtwoord
Met deze instelling voor het verlopen van wachtwoorden kun je medewerkers verplichten om periodiek hun wachtwoorden te wijzigen. Wachtwoorden verlopen standaard nooit.
Om wachtwoorden in te stellen die verlopen, kiest u Ja in het veld Wachtwoorden verlopen . Er wordt een nieuwe regel weergegeven waarin u het aantal maanden kunt opgeven voordat wachtwoorden verlopen.
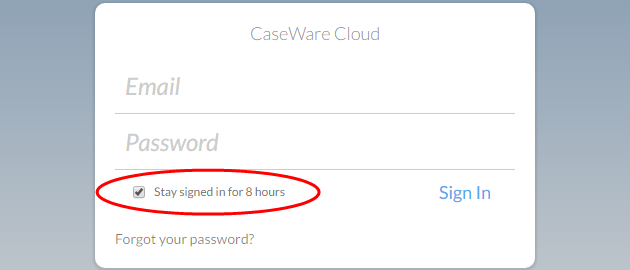
Online-sessielengte instellen
Wanneer een medewerker zich aanmeldt bij Cloud, begint hij of zij een sessie. Die medewerker beëindigt zijn sessie wanneer hij zich afmeldt bij Cloud of wanneer hij de applicatie afsluit (in de webbrowser of in Working Papers).
U kunt deze instelling voor sessiebeheer wijzigen voor alle gebruikers in uw organisatie. Als je Cloud instelt om gebruikers te onthouden bij het aanmelden, hoeven gebruikers maar één keer in te loggen voor een bepaalde periode. Ze kunnen hun browser sluiten zonder de sessie te beëindigen en als ze in dezelfde browser teruggaan naar Cloud, keren ze automatisch terug naar de laatste plek waar ze hebben gewerkt zonder opnieuw te hoeven inloggen.
Hoewel een langere sessieduur je aanmeldfrequentie verlaagt, vergroot het de kans dat de sessie gecompromitteerd kan raken. We raden je aan om de duur van de online sessie op een redelijke duur in te stellen.
Om de lengte van een online sessie in te stellen:
-
Zorg ervoor dat u de beheerdersrol voor instellingen of gelijkwaardige rechten hebt.
-
Selecteer Activiteitenin het menu Cloud.
-
Selecteer Beveiliging | Sessiebeheer. De pagina Sessiebeheer wordt weergegeven.
-
Schakel het selectievakje in voor Gebruikers onthouden bij Aanmelden. Er wordt een nieuwe regel weergegeven met een veld voor Uren om gebruikers te onthouden .
-
Voer het aantal uren in dat de Cloud-sessies van je organisatie open moeten blijven nadat gebruikers de applicatie hebben gesloten.
-
Klik op OK om de parameters toe te passen.
Zodra deze instelling is ingeschakeld, hebben gebruikers van je organisatie de optie om aangemeld te blijven gedurende het aantal uren dat je hebt opgegeven in de instellingen.
Authenticatie met twee factoren configureren
Let op: SMS-gebaseerde twee-factor authenticatie is momenteel gratis beschikbaar op proefbasis. In een toekomstige release zal ons ontwikkelingsteam een tweede methode voor tweefactorauthenticatie toevoegen. Die methode werkt met mobiele apparaten, is niet afhankelijk van sms en is gratis te gebruiken. Als de tweede methode beschikbaar komt, kunnen er extra kosten zijn voor het blijven gebruiken van sms-gebaseerde twee-factor authenticatie.
Om de gevoelige gegevens van je organisatie effectief te beveiligen, kun je overwegen om tweefactorauthenticatie in te schakelen. Met tweefactorauthenticatie wordt van gebruikers verwacht dat ze twee gegevens verstrekken om hun identiteit te verifiëren voordat ze toegang krijgen tot de Cloud.
-
Uw wachtwoord
-
Een eenmalige code die naar je mobiele telefoon wordt gestuurd
Het gebruik van twee gegevens helpt ervoor te zorgen dat jij de enige persoon bent die toegang heeft tot je account, zelfs als iemand anders je wachtwoord heeft.
Beste praktijken
We raden het volgende aan om ervoor te zorgen dat gebruikers met tweefactorauthenticatie toegang kunnen houden tot Cloud:
-
Zorg ervoor dat je organisatie ten minste twee medewerkers met de rol Beheerder heeft voordat je de verificatie met twee factoren inschakelt. Alleen medewerkers met de rol Beheerder kunnen tweefactorauthenticatie uitschakelen. Door deze rol aan twee gebruikers toe te kennen, zorgt u ervoor dat ten minste één account altijd toegang heeft tot Cloud. Zie Beveiligingsrollen toewijzenvoor instructies.
-
Back-upcodes genereren. Back-up codes zijn codes voor eenmalig gebruik waarmee je kunt inloggen als je geen toegang hebt tot je mobiele telefoon, of als een beheerder niet beschikbaar is om twee-factor authenticatie voor je uit te schakelen.
Extra vereisten voor gebruikers van werkbladen
Op dit moment wordt verificatie met twee factoren alleen ondersteund met Working Papers 2017.00.283 of later. Als je een eerdere versie van Working Papers gebruikt, moet een beheerder twee-factor authenticatie uitschakelen voor je Cloud account, anders kun je je niet aanmelden.
To learn more about disabling two-factor authentication for individual accounts, see Twee-factor authenticatie inschakelen voor je eigen account.
Twee-factor authenticatie inschakelen in je hele organisatie
Let op: Medewerkers en contactpersonen kunnen altijd tweefactorauthenticatie inschakelen vanuit hun eigen accounts. Voor meer informatie over het inschakelen van twee-factor authenticatie voor individuele gebruikers, zie Twee-factor authenticatie inschakelen voor je eigen account.
Je kunt tweefactorauthenticatie inschakelen voor alle medewerkers en contactpersonen via de pagina Instellingen. Je kunt ook verificatie met meerdere factoren inschakelen voor je account.
Twee-factor authenticatie inschakelen voor medewerkers en contactpersonen:
-
Zorg ervoor dat u de beheerdersrol voor instellingen of gelijkwaardige rechten hebt.
-
Selecteer in het Cloud-menu Instellingen | Beveiliging | Authenticatie en Sessiebeheer.
-
Selecteer Alle medewerkers, Alle contactpersonenof beide. Als je wilt dat een van de groepen tijdelijk geen gebruik kan maken van de twee-factor authenticatie, selecteer dan Allow user to skip setup until: en kies een datum en tijd. Deze optie is bedoeld om gebruikers voldoende tijd te geven om het installatieproces te voltooien.

-
Selecteer in het vervolgkeuzemenu Elke 30 dagen of Elke aanmelding om in te stellen hoe vaak verificatie met twee factoren vereist is wanneer u zich aanmeldt. U moet een nieuwe code opgeven wanneer u zich voor het eerst aanmeldt vanaf een nieuw apparaat, ongeacht uw keuze.
-
Selecteer Opslaan.
Je hebt tweefactorauthenticatie ingeschakeld voor medewerkers en contactpersonen. Als je wilt, kun je de beslissing om twee-factor authenticatie in te schakelen overlaten aan individuele gebruikers. Voor meer informatie, zie Twee-factor authenticatie inschakelen voor je eigen account.
Twee-factor authenticatie inschakelen voor je eigen account
Je kunt op elk moment twee-factor authenticatie inschakelen voor je eigen account, zelfs als het niet is ingeschakeld in je hele organisatie. Je hebt een geldig telefoonnummer nodig om deze optie in te schakelen.
Twee-factor authenticatie inschakelen voor een individuele account:
-
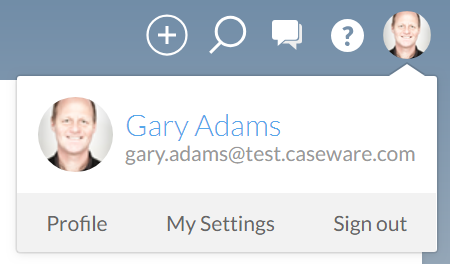
Selecteer je avatar en kies Mijn instellingen.
-
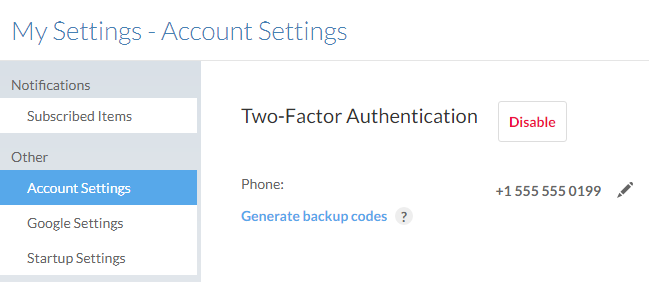
Selecteer Accountinstellingenin de zijbalk.
-
Selecteer Inschakelenen kies vervolgens je land in het vervolgkeuzemenu Land .
-
Voer je mobiele telefoonnummer in het veld Mobiele telefoon in en selecteer vervolgens Telefoonnummer bijwerken.

-
Voer je wachtwoord in en voer vervolgens je verificatiecode in het veld Verificatiecode in.
-
Selecteer Verifiëren.
Je hebt tweefactorauthenticatie ingesteld voor een individuele account. Als je je telefoon verliest, kan een beheerder twee-factor authenticatie tijdelijk uitschakelen. Voor meer informatie, zie Twee-factor authenticatie uitschakelen voor een specifieke gebruiker.
Voer je telefoonnummer in.
Als je je telefoonnummer wijzigt, moet je je instellingen voor twee factoren bijwerken. Als je geen toegang meer hebt tot je Cloud-account, kan een beheerder je tweefactorauthenticatie tijdelijk uitschakelen (zie Twee-factor authenticatie uitschakelen voor een specifieke gebruiker ).
Voer je telefoonnummer in.
-
Selecteer je avataren vervolgens Mijn instellingen.
- Selecteer Accountinstellingenin de zijbalk.
-
Voer je mobiele telefoonnummer in het veld Mobiele telefoon in en selecteer Telefoonnummer bijwerken.
-
Voer je wachtwoord in en voer vervolgens je verificatiecode in het veld Verificatiecode in.
-
Selecteer Verifiëren.
Je hebt je telefoonnummer bijgewerkt. Als je tweefactorauthenticatie voor je account wilt uitschakelen, moet je contact opnemen met een beheerder. Zie voor meer informatie over het uitschakelen van GL Twee-factor authenticatie uitschakelen voor een specifieke gebruiker.
Back-upcodes genereren.
Back-up codes zijn codes voor eenmalig gebruik waarmee je kunt inloggen als je geen toegang hebt tot je mobiele telefoon, of als een beheerder niet beschikbaar is om twee-factor authenticatie voor je uit te schakelen. Back-upcodes zijn voor eenmalig gebruik en moeten worden gegenereerd terwijl je toegang hebt tot je account.
Back-upcodes genereren.
-
Ensure you have enabled two-factor authentication for your account. Voor meer informatie, zie: Twee-factor authenticatie inschakelen voor je eigen account
-
Selecteer je profielfoto en kies Mijn instellingen.
-
Selecteer Accountinstellingenin de zijbalk.
-
Back-upcodes genereren.
-
Voer je wachtwoord in en selecteer Doorgaan.
-
Schrijf je back-upcodes op en bewaar ze op een veilige plaats, of selecteer Downloaden om ze in een TXT-bestand op te slaan.
-
Selecteer Sluiten.
Je hebt back-upcodes gegenereerd. Als u de toegang tot uw back-upcodes en uw mobiele telefoon verliest, moet u contact opnemen met een beheerder om weer toegang te krijgen tot uw account.
Twee-factor authenticatie uitschakelen voor een specifieke gebruiker
Als je de toegang tot je mobiele telefoon verliest of je telefoonnummer verandert, heb je geen toegang tot je account. Om weer toegang te krijgen, moet een beheerder tijdelijk de authenticatie met twee factoren voor je account uitschakelen. Merk op dat als een beheerder de verificatie met twee factoren permanent uitschakelt, je je telefoonnummer voor verificatie met twee factoren niet kunt wijzigen.
Twee-factor authenticatie uitschakelen voor een specifieke gebruiker:
-
Zorg ervoor dat je de beheerdersrol hebt.
-
Selecteer Activiteitenin het menu Cloud.
-
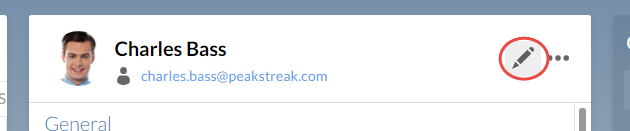
Kies een medewerker of contactpersoon en selecteer Bewerken (
 ).
).
-
Selecteer Wachtwoord; kies vervolgens Twee-factor authenticatie uitschakelen.
-
Selecteer Tot: om een personeelslid of contactpersoon toe te staan zich tijdelijk af te melden. Dit zorgt ervoor dat de medewerker toegang heeft tot zijn account en indien nodig zijn telefoonnummer voor twee-factor authenticatie kan wijzigen. Geef in het veld de datum op waarop de authenticatie met twee factoren automatisch opnieuw moet worden ingeschakeld.

-
Selecteer Opslaan.
Je kunt twee-factor authenticatie ook om andere redenen uitschakelen. Je kunt bijvoorbeeld twee-factor authenticatie permanent uitschakelen omdat een medewerker geen mobiele telefoon heeft of bepaalde Caseware software met Cloud heeft geïntegreerd. Voor meer informatie over de interactie tussen geïntegreerde software en twee-factor authenticatie, zie Extra vereisten voor gebruikers van werkbladen.