Edit the OnPoint PCR engagement letter
![]()
This topic applies to OnPoint PCR.
Sample standard letters are included in OnPoint PCR. You can review and edit the engagement letter draft to add your own wording and meet requirements and firm preferences in OnPoint PCR before it is sent to the client to complete, sign and return.
To edit the engagement letter:
-
Open the engagement letter and select Edit (
 ) at the top of the document. The text toolbar appears.
 -
Once you're satisfied with the contents of the engagement letter, select the signoff icon (
 ).
). -
Choose the applicable role for your signoff. Once the content is reviewed, you can send a copy to your client.
While editing the letter, you will also see the following functionalities:
| Veld | Value |
| Instructions | Contains information about the contents of the letter, and includes instructions for finalizing the draft. |
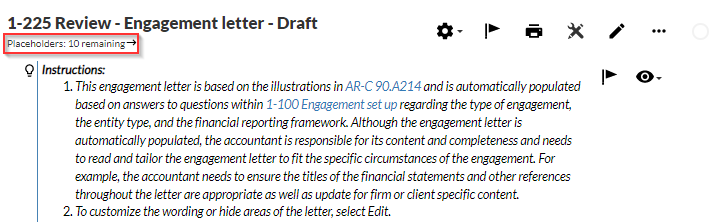
| Placeholders | Tracks your progress on placeholders and displays the number of placeholders that haven’t been replaced with specific information related to the engagement, organization or client. The top of the letter displays the number of placeholders awaiting responses. Tip: Click the remaining placeholders to quickly navigate to the placeholders in the document. |
| | Shortcut to create document-specific issues. |
| | Documents with issues. |
| | Print the document. |
| | Review tools to allow a reviewer to see what has been changed in the document. |
| | Turns on document edit functionality. Edit actions include:
|
| | More actions. More actions include:
|
| | Sign off the document. |
Tekst vervangen en placeholders
Door middel van placeholders kan in de brief nog specifieke informatie worden ingevoegd met betrekking tot de opdracht, organisatie of de klant.
To edit the text in a letter, select Edit (![]() ). You can begin typing in any Text Area to customize the wording. Throughout the letter, fields that are highlighted gray pull their responses from other areas of the engagement, or from the Cloud entity.
). You can begin typing in any Text Area to customize the wording. Throughout the letter, fields that are highlighted gray pull their responses from other areas of the engagement, or from the Cloud entity.
Een voorbeeld:
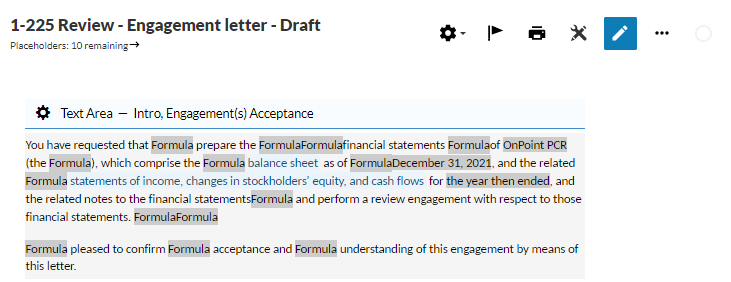
The Placeholders indicator located under the engagement letter document title tracks your progress on placeholders. Klik op de melding om naar de volgende placeholder te gaan die nog niet is ingevuld.
Een tekst-placeholder invullen:
-
Klik op de placeholder.
Tip: Placeholders worden in het document weergeven als blauwe tekst.
-
Een pop-up verschijnt waar u de relevante informatie kunt invullen. Klik op Opslaan.
Let op: Placeholders are in the form of picklists or input values. You can either make a selection from the available options or manually type a value. Als u geen wijzigingen wilt aanbrengen aan de tekst, klik dan op de placeholder en in de pop-up alleen op opslaan zodat de melding voor deze placeholder verdwijnt.
Een placeholder invullen:
-
Klik op de placeholder.
Tip: Placeholders worden in het document weergeven als blauwe tekst.
-
Selecteer de juiste medewerker, contactpersoon, datum of andere waarde om de placeholder in te vullen.
Dynamische tekst en termen in de woordenlijst van de opdracht aanpassen
Let op: U kunt termen in de woordenlijst of voor dynamische tekst alleen aanpassen als de optie 'overschrijven' is ingeschakeld in de template.
Een woordenlijst voor de opdracht bevat termen. Termen zijn woorden en zinnen die vaak terug kunnen komen in de tekst van het product. Als een term gewijzigd wordt, is het overal aangepast waar de schrijver dit bedoelt.
Dynamische tekstvelden veranderen als er aan bepaalde voorwaarden voldaan wordt. Bijvoorbeeld, als de klant een vraag in een checklist wil beantwoorden met 'ja', dan staat er 'correct' in het dynamische tekstveld.
In het document kunnen termen zijn opgenomen vanuit de woordenlijst of vanuit dynamische tekstvelden. U kunt deze termen opheffen, maar de opties daarvoor zijn wel afhankelijk van welk product u gebruikt.
Het aanpassen van termen in de woordenlijst of de dynamische tekst output:
-
Selecteer het tekstgebied in het document waar u een verandering wilt aanbrengen.
Let op: Termen of dynamische tekstvelden worden gemarkeerd in grijs.
-
Selecteer de term of de dynamische tekst om het venster Data Link te openen.
Let op: Als u de term selecteert kunt u klikken op het icoon voor informatie (
 ) om zo te zien waar en hoe vaak deze term gebruikt wordt.
 -
Verander de Output naar wens en klik dan op Opslaan.
Als aan de Output-voorwaarde is voldaan wordt de tekst overal in de opdracht aangepast. Als na de wijziging aan een andere voorwaarde wordt voldaan dan verandert de Output in overeenkomst met de ingestelde tekst voor die voorwaarde.
Een bedrijfslogo invoegen
You can insert the firm logo in any text area or in the document head or footer.
Een bedrijfslogo invoegen:
-
Selecteer de tekstsectie waar u het logo wilt invoegen.
-
In de opmaakbalk klikt u op logo invoegen (
 ).
).
Let op: U kunt alleen in de kantoorlaag een bedrijfslogo uploaden. Om toegang te krijgen tot de template heeft u de rol Beheerder instellingen nodig. Voor meer informatie over rollen, zie Standaardrollen en Beveiligingsrollen toewijzen.
Een pagina-einde invoegen
Een pagina-einde wordt gebruikt om aan te geven in het document waar een pagina eindigt en een nieuwe pagina moet beginnen. Zo kunt u de lay-out van de pagina aanpassen voor het printen.
Klik in het document op +Nieuwe sectie | Pagina-einde. Het pagina-einde wordt ingevoegd en krijgt de standaardtitel Pagina-einde. Klik in het document op de titel om deze te wijzigen. Note this title is not part of the document content and will not be displayed when printed.
Let op: U kunt geen pagina-einde toevoegen in lege groepeergebieden. In het groepeergebied zelf kunnen alleen tekstgebieden en guidance worden toegevoegd.
-
To add text areas, select +New section | +Text Areas.
-
To add guidance sections, select +New section | +Guidance Sections.
Om een pagina-einde te verwijderen klikt u op Instellingen (![]() ) | Verwijderen.
) | Verwijderen.
Add a table of contents
You can add a table of contents to make it easier for users to easily navigate through your letter.
To add a table of contents, select +New section | +Table of Contents. A table of contents is inserted with the default title Table of Contents. Klik in het document op de titel om deze te wijzigen. De titel wordt echter niet opgenomen in het uiteindelijke document.
To delete a table of contents, select Settings (![]() ) | Delete | Yes.
) | Delete | Yes.
De printopties instellen
Als u op de Printknop klikt (![]() ) wordt het document opnieuw geopend in een PDF-bestand zodat gebruikers het kunnen printen of opslaan. Guidance wordt niet opgenomen in een PDF.
) wordt het document opnieuw geopend in een PDF-bestand zodat gebruikers het kunnen printen of opslaan. Guidance wordt niet opgenomen in een PDF.
De printopties instellen:
-
Ga in de Documentnavigatie naar Meer acties (
 ) | Printinstellingen voor document.
 -
Als u voor een pagina-einde, groep of inhoudsopgave andere opties wilt instellen, ga dan naar Instellingen (
 ) | Pas printinstellingen aan.
Geef de opties in voor het briefhoofd, de paginagrootte en de marges.
-
Klik op Liggend om de afdrukstand te wijzigen.
-
De standaard afdrukstand staat ingesteld op Staand.
Als u wilt dat de paginanummering pas na de inhoudsopgave begint, haal dan het vinkje weg bij Inhoudsopgave meenemen in paginanummering.