HÜ-Daten des Kunden anzeigen
Sobald Sie die HÜ-Daten Ihres Kunden erhalten und erfolgreich importiert haben, können Sie im linken Bereich der Seite Daten Konten und Gruppen anzeigen.
Konten anzeigen
Auf der Registerkarte Konten werden im linken Bereich die Kontendaten Ihres Kunden angezeigt. Es werden hauptsächlich Kontonummern, Namen, vorläufige Salden (importierte Salden), endgültige Salden (nach Abschlussbuchungen, Rundungen usw.) und frühere Salden (Vorjahr) angezeigt.
Bitte beachten Sie: Basierend auf Ihrer Produktkonfiguration können die Spaltenüberschriften Vorläufig und Final unterschiedlich sein.
Wenn die Summenbilanz nicht ausgeglichen ist, wird der Indikator Unausgeglichen (
Sie können die Daten in jeder Spalte in aufsteigender oder absteigender Reihenfolge sortieren, indem Sie die Spalte auswählen. Auf der Seite wird ein Aufwärtspfeil (![]() ) oder ein Abwärtspfeil (
) oder ein Abwärtspfeil (![]() ) angezeigt, um anzugeben, ob die Daten in aufsteigender oder absteigender Reihenfolge sortiert sind.
) angezeigt, um anzugeben, ob die Daten in aufsteigender oder absteigender Reihenfolge sortiert sind.
In der Drop-down-Liste Zeilen pro Seite können Sie auswählen, wie viele Datenzeilen auf jeder Seite angezeigt werden sollen. Die Standardeinstellung ist 100 Zeilen.

Mit den Drop-down-Listen oben auf der Registerkarte Konten können Sie weitere Spalten oder Indikatoren in die Seite einfügen und die Daten filtern.
Zusätzliche Daten auf der Registerkarte Konten anzeigen:
-
Klicken Sie auf die Drop-down-Liste Spalten.
-
Aktivieren Sie das Kontrollkästchen neben der Spalte, die Sie anzeigen möchten.
- Differenz
- Differenz (Prozent)
- Prüffeld
- Prozess
- Steueranpassungen
- Steuerschlüssel
Eine Liste der verfügbaren Spalten wird angezeigt.
Zu den verfügbaren Optionen gehören:
So fügen Sie zusätzliche Indikatoren in die Registerkarte Konten ein
-
Klicken Sie auf die Drop-down-Liste Indikatoren.
-
Aktivieren Sie das Kontrollkästchen neben dem Indikator, den Sie anzeigen möchten.
- Aufgaben
- Referenzen
- Wesentlichkeit
Eine Liste der verfügbaren Indikatoren wird angezeigt.
Zu den verfügbaren Optionen gehören:
Sie können die Seite auch durchsuchen, indem Sie oben im Suchfeld Schlüsselwörter eingeben. Übereinstimmende Ergebnisse werden hervorgehoben und angezeigt, sobald Sie mit der Eingabe beginnen.

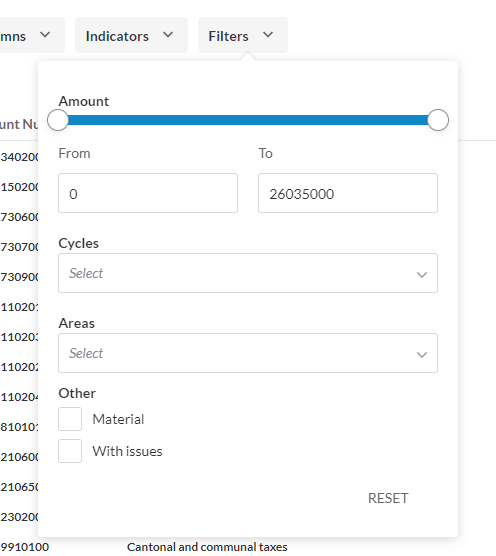
Sie können die Daten auf der Seite auch wie gewünscht filtern. Wählen Sie die Drop-down-Liste Filter, um eine Filteroption anzugeben:
-
Bei Betrag können Sie einen Bereich für die Salden angeben (Von und Bis), so dass Sie nur Kontosalden innerhalb dieses Bereichs sehen können. Sie können auch mit dem Schieberegler den Bereich festlegen.
-
In der Drop-down-Liste Prozesse können Sie die angezeigten Konten basierend auf dem ausgewählten Prozess filtern.
-
In der Drop-down-Liste Prüffelder können Sie die angezeigten Konten basierend auf dem ausgewählten Prüffeld filtern.
-
Sie können das Kontrollkästchen Wesentlich aktivieren, um nur wesentliche Konten anzuzeigen.
-
Sie können das Kontrollkästchen Mit Aufgaben aktivieren, um nur Konten mit erfassten Aufgaben anzuzeigen
Sie können auch Transaktionen für jedes Konto anzeigen. Weitere Informationen finden Sie in Kontotransaktionen anzeigen.
Gruppen anzeigen
Im linken Bereich stehen Ihnen drei Hauptgruppenregisterkarten zur Verfügung:
-
Standardpositionen - zeigt die Standardpositionen an. Dies ist die Standardgruppierungsstruktur, der die HÜ-Daten des Kunden zugeordnet werden. Diese Registerkarte steht Ihnen immer zur Verfügung, sobald Sie die Daten des Kunden importiert haben. Beachten Sie, dass bei Produkten mit mehreren Standardpositionsstrukturen möglicherweise bis zu drei Registerkarten für Standardpositionen angezeigt werden.
-
Steuercode - zeigt die Gruppe Steuercodes an. Diese Registerkarte ist auf der Seite nur verfügbar, wenn die Gruppierungsstruktur Steuerschlüssel in Ihrem Produkt verwendet wird.
-
Kontenplan - zeigt den Kontenplan an. Diese Registerkarte ist auf der Seite nur verfügbar, wenn in Ihrem Produkt ein Standardkontenplan verwendet wird.
Hinweis: STANDARDPOSITIONEN - Die Registerkarte ist immer auf der Seite verfügbar. STEUERGRUPPEN und VORDEFINIERTE GRUPPEN sind auf der Seite nur verfügbar, wenn in Ihrem Produkt die Gruppierungsstrukturen Steuerschlüssel oder Kontenplan aktiviert sind.
Beachten Sie, dass Gruppennamen blau und Kontonamen schwarz angezeigt werden.

Wenn die Summenbilanz nicht ausgeglichen ist, wird der Indikator Unausgeglichen (
In der Drop-down-Liste Zeilen pro Seite können Sie auswählen, wie viele Datenzeilen auf jeder Seite angezeigt werden sollen. Die Standardeinstellung ist 100 Zeilen.
Mit den Symbolen Zuklappen () und Aufklappen (
) können Sie Gruppen ein- und ausblenden. Wenn alle Untergruppen auf derselben Ebene zugeklappt sind, können Sie sie per „Drag-and-Drop und dem Symbol Neu anordnen (
![]() ) reorganisieren.
) reorganisieren.
Mit den Drop-down-Listen oben auf den Gruppenregisterkarten können Sie weitere Spalten oder Indikatoren in die Seite einfügen.
Zusätzliche Daten auf den Registerkarten Gruppen anzeigen:
-
Klicken Sie auf die Drop-down-Liste Spalten.
-
Aktivieren Sie das Kontrollkästchen neben der Spalte, die Sie anzeigen möchten.
- Differenz
- Differenz (Prozent)
- Prüffeld
- Prozess
- Steueranpassungen
- Steuerschlüssel
Eine Liste der verfügbaren Spalten wird angezeigt.
Zu den verfügbaren Optionen gehören:
Zusätzliche Indikatoren in die Registerkarten Gruppen einfügen:
-
Klicken Sie auf die Drop-down-Liste Spalten.
-
Aktivieren Sie das Kontrollkästchen neben dem Indikator, den Sie anzeigen möchten.
- Aufgaben
- Referenzen
- Wesentlichkeit
Eine Liste der verfügbaren Indikatoren wird angezeigt.
Zu den verfügbaren Optionen gehören:
In den Registerkarten Gruppen nach Dimension filtern:
-
Klicken Sie auf die Drop-down-Liste Dimension.
Eine Liste der verfügbaren Dimensionen wird angezeigt.
-
Wählen Sie die Dimension, die Sie anzeigen möchten.
Sie können auch das Feld Suchen verwenden, um die Dimension in der Liste zu finden.
Um die Konten auszublenden und nur Gruppen anzuzeigen, deaktivieren Sie die Option Konten.

Die Gruppen, die standardmäßig auf der Seite angezeigt werden, basieren auf Ihrem Produkt-Setup. Wenn in Ihrem Produkt keine Standardgruppen eingerichtet wurden, werden auf der Seite alle Gruppen in der Hierarchie angezeigt.
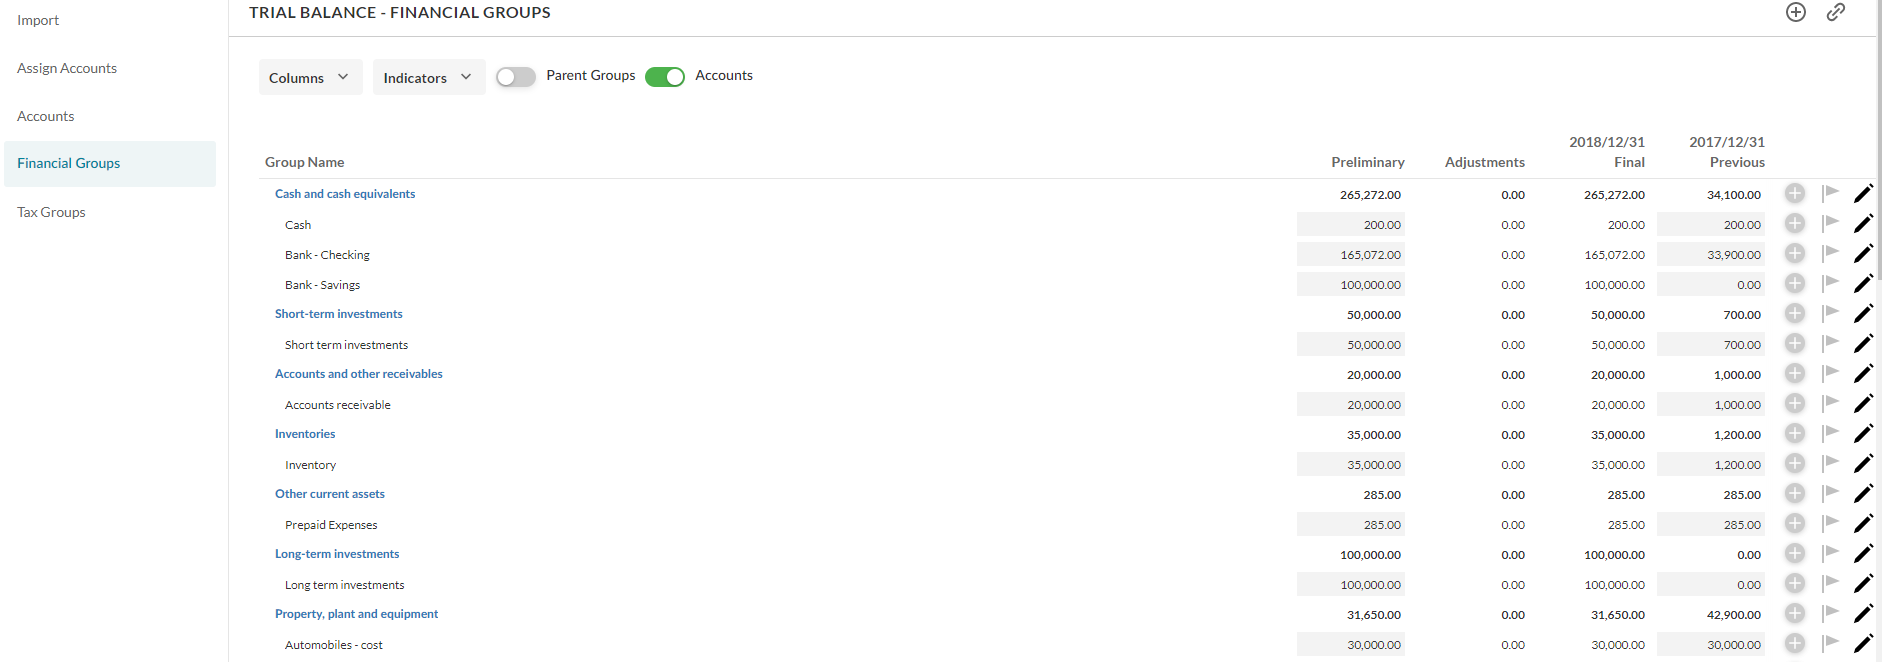
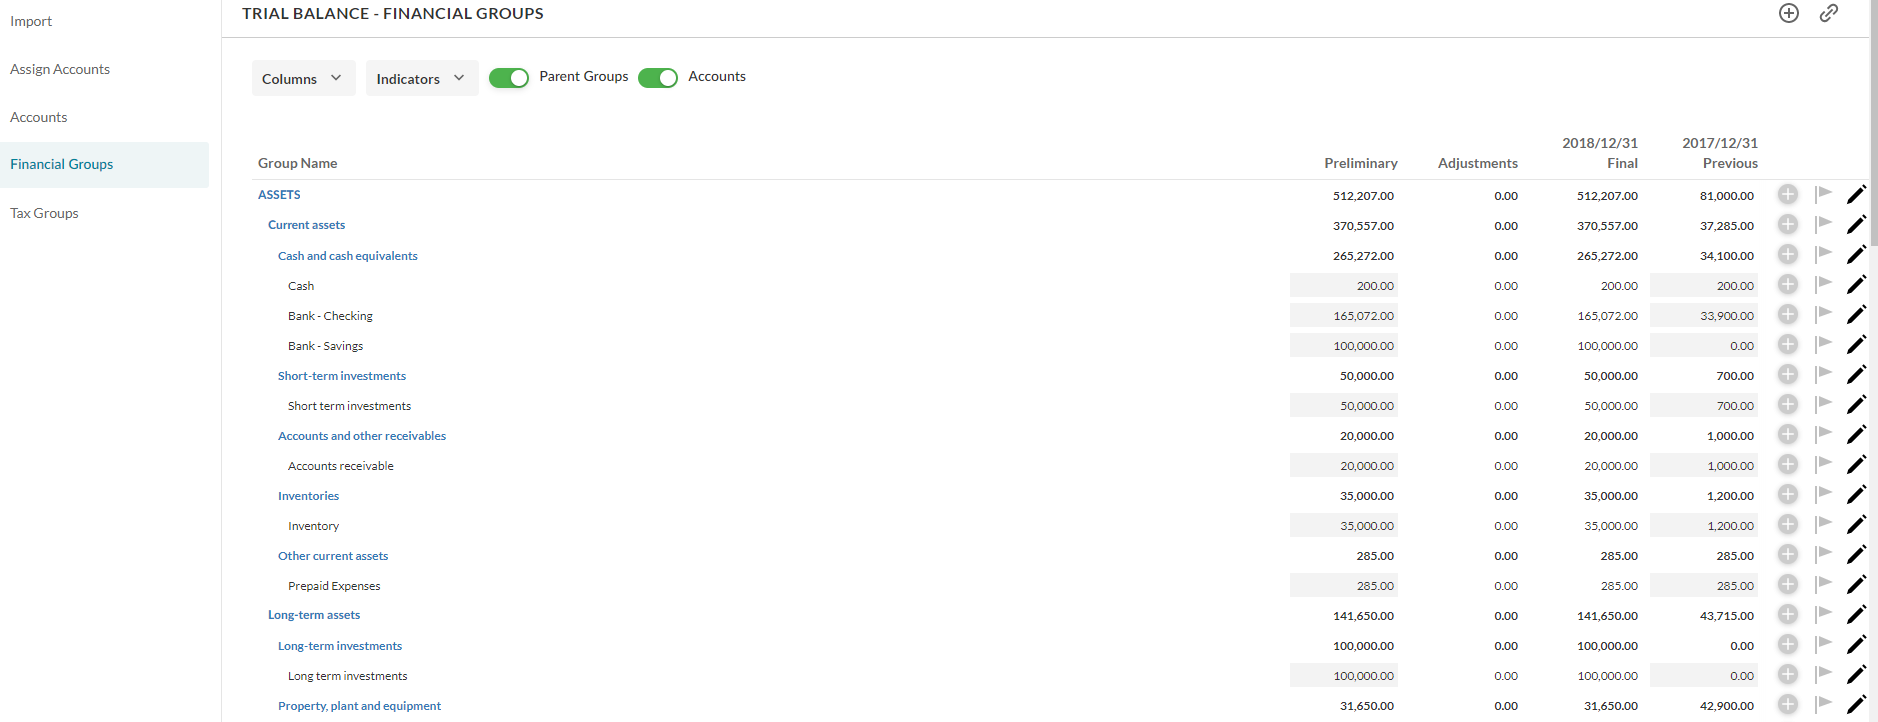
Wenn in Ihrem Produkt Standardgruppen definiert sind, können Sie die übergeordneten Gruppen für die Standardgruppen anzeigen, indem Sie die Option Übergeordnete Gruppen aktivieren.
In der nachfolgenden Abbildung wurden beispielsweise Standardgruppen im Produkt eingerichtet, sodass auf der Seite standardmäßig die folgenden Gruppen angezeigt werden.
Wenn Sie die Option Übergeordnete Gruppen aktivieren, werden auf der Seite alle Ebenen über der Standardgruppe in der Hierarchie angezeigt (d. h. die übergeordneten Gruppen für jede Standardgruppe). Beachten Sie, dass die Aktivierung dieser Option keine Auswirkungen auf die Seite hat, wenn keine Standardgruppen definiert sind.
Sie können auch eine bestimmte Gruppe auswählen, um einen Drill-down der nachfolgenden Gruppen nur auf der Seite anzuzeigen. Sie können beispielsweise Aktuelle Vermögenswerte auswählen, um die nachfolgenden Gruppen nur auf der Seite anzuzeigen. Beachten Sie, dass oben auf der Seite ein Navigationspfad angezeigt wird, damit Sie problemlos zu übergeordneten Gruppen navigieren können.

Abschlussbuchungsdetails anzeigen
Wenn für bestimmte Gruppen oder Konten Abschlussbuchungen vorgenommen werden, können Sie von der Seite Daten direkt zur Seite Buchungen navigieren, wo Sie die Details jeder Abschlussbuchung anzeigen können.
Hinweis: Die Spalte Buchungen muss auf der Seite Daten sichtbar sein. Stellen Sie sicher, dass Sie in der Drop-down-Liste Spalten das Kontrollkästchen Buchungen aktivieren.
Wenn die Option Buchungen aufteilen (Splitbuchungen) in Ihrem Produkt verfügbar ist, können Sie sie aktivieren, um Nachbuchungen und Umgliederungen in separaten Spalten anzuzeigen.

Details einer Buchung anzeigen:
-
Gehen Sie zur Spalte Buchungen.
-
Wählen Sie die Buchung, deren Details Sie anzeigen möchten.
Buchungen werden in blauer Farbe angezeigt.
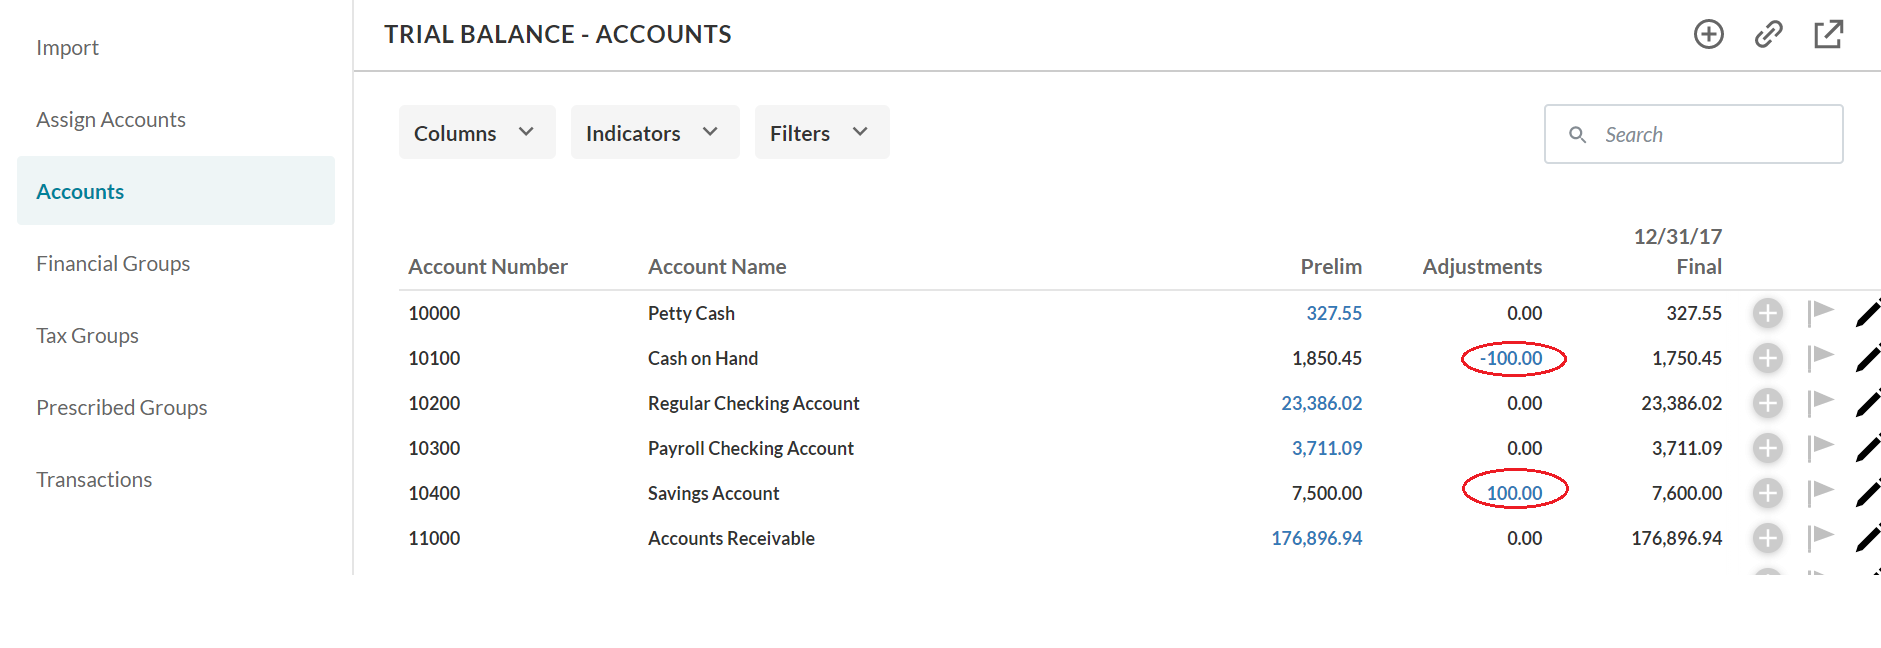
Sie werden zur Seite Buchungen weitergeleitet, auf der Sie die Details der ausgewählten Abschlussbuchung anzeigen können.
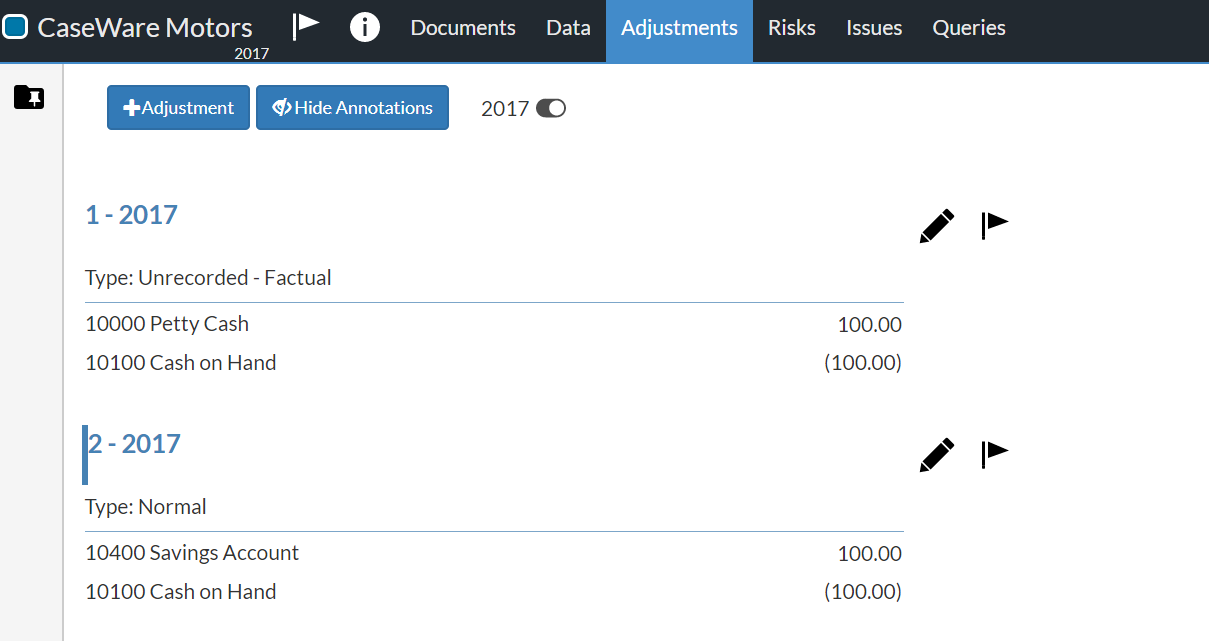
Hinweis: Die ausgewählte Abschlussbuchung wird links mit einem blauen vertikalen Balken markiert.
Eine Ansicht speichern
Wenn Sie eine Ansicht so angepasst haben, dass sie einen bestimmten Datensatz anzeigt, den Sie wieder aufrufen möchten, können Sie die Ansicht speichern.
Eine Ansicht speichern:
-
Wählen Sie auf der Seite Daten das Symbol Ansichten speichern (
 ).
). -
Eine Liste der zuvor gespeicherten Ansichten wird angezeigt. Wählen Sie Aktuelle Ansicht speichern.
-
Geben Sie einen Namen für die neue Ansicht ein und wählen Sie Speichern.
Sie können nun Ihre gespeicherte Ansicht aus der Liste unter dem Symbol Ansichten speichern (![]() ) auswählen und verwalten.
) auswählen und verwalten.
