Import from QuickBooks desktop
You can import data from QuickBooks desktop by exporting it as a file, generating a zip file using the Caseware Cloud Import Utility, then importing it into your engagement.
Note: Accounts with zero balances do not automatically import into Caseware Cloud apps with the exception of IDEA. To include zero-balance accounts, you must manually add and assign them to the designated groups.
Export data from Quickbooks
Before you start, make sure that you complete the necessary prerequisite steps based on your QuickBooks version:
QuickBooks Canada / UK / Australia:
-
Install an applicable version of QuickBooks on your workstation.
-
Install the QuickBooks Export Utility on your workstation. You can download it from MyCaseware on the Support Files page.
-
In QuickBooks, you must permit the QuickBooks Export Utility access to the file. On the ribbon, click Edit | Preferences... | Integrated Applications | Company Preferences and deselect Don't allow any applications to access this company file.
QuickBooks USA:
After completing the prerequisites, you can export data from QuickBooks Canada / UK / Australia or QuickBooks US.
To export data from QuickBooks Canada / UK / Australia:
-
Log in to your QuickBooks desktop account, then open the company file that you want to import into Caseware Cloud.
-
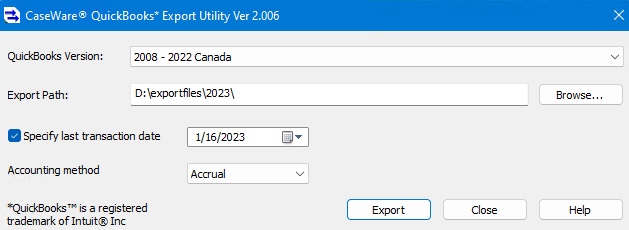
Open the QuickBooks Export Utility.
-
In the QuickBooks Version drop-down, select your QuickBooks version.
-
In the Export Path field, select Browse….
The Browse For Folder dialog opens.
-
Navigate to the where you want to create the export file, then select OK.
-
Select Specify last transaction date and enter the applicable date.
-
In the Accounting method drop-down, select the applicable accrual method.
-
Select Export.
The accounting data from the QuickBooks Desktop file is exported to a file in the specified location.
To export data from QuickBooks US:
-
Log in to your QuickBooks desktop account, then open the company file that you want to import.
-
On the ribbon, select File | Utilities | Copy Company File for QuickBooks Online....
If prompted to close any open windows, select OK.
-
In the Save Exported Company file to... dialog, navigate to the location on your workstation where you want to create the QuickBooks Online file and select Save.
-
Select OK.
The accounting data from the QuickBooks Desktop file is exported to a file in the specified location.
Generate the import file for Quickbooks
After exporting your data from QuickBooks, you can now generate the import file by using the Caseware Cloud Import Utility.
To generate the import file for Quickbooks:
-
Download the Caseware Cloud Import Utility.
Caseware Cloud Import Utility(.exe)
-
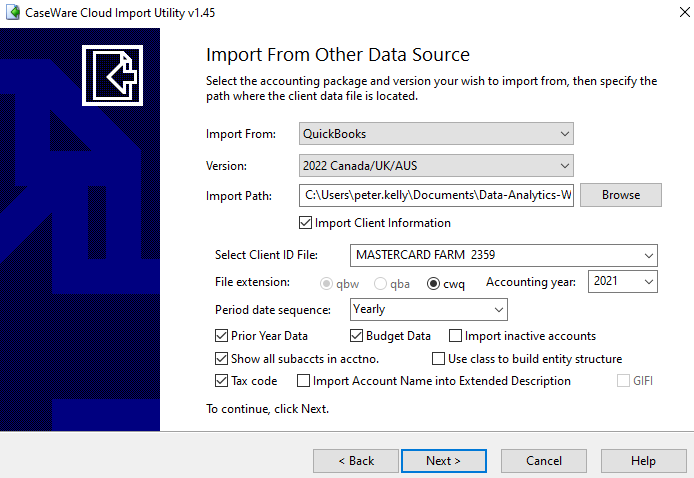
Open the Utility, select Other Data Source and select Next.
-
In the Import From and Version drop-downs, select QuickBooks and the version you're importing from.
Note: For a list of versions we support, see Supported third party accounting packages.
-
In Import Path, select Browse and navigate to the folder containing the collection of files you exported from QuickBooks using the Caseware QuickBooks Export Utility.
-
Select Client ID File is automatically filled with the name of the client ID file.
-
File extension is automatically filled with the correct file extension for the file. (The file extension options vary based on the version you previously selected.)
-
In the Accounting year drop-down, select the year for which you want to import data.
-
Determine the remaining settings for the import.
The settings vary based on the version you previously selected.
-
Select Next, then Finish.
-
Save the generated zip file using the displayed prompt.
Import the data into your engagement
After you generate the zip file using the Caseware Cloud Import Utility, you can import the data into your engagement.
To import the data into your engagement:
-
Open your Caseware Cloud engagement file. When you first open the engagement, the Engagement properties popup appears. Set Year end date to be the same as the data you are about to import.
The year-end date is the last element of the name of the zip file you generated in Generate the import file for Quickbooks. For example, for the file named SUNBRIDGE FARMS LTD. Mastercard Mark 8386 2022-09-30.zip, the year-end date is September 30, 2022.
-
Go to the Data page. The Data page opens to the Datasets tab.
-
If you’ve previously imported data, select Add data.
-
If your engagement is consolidated and has internal subsidiary entities, select which entity you want to import data for from the list.
-
Under IMPORT FROM DATA CONNECTOR, select QuickBooks Desktop from the list of data sources, then select Next.
If the option is not visible, you can use the Search box to find it.
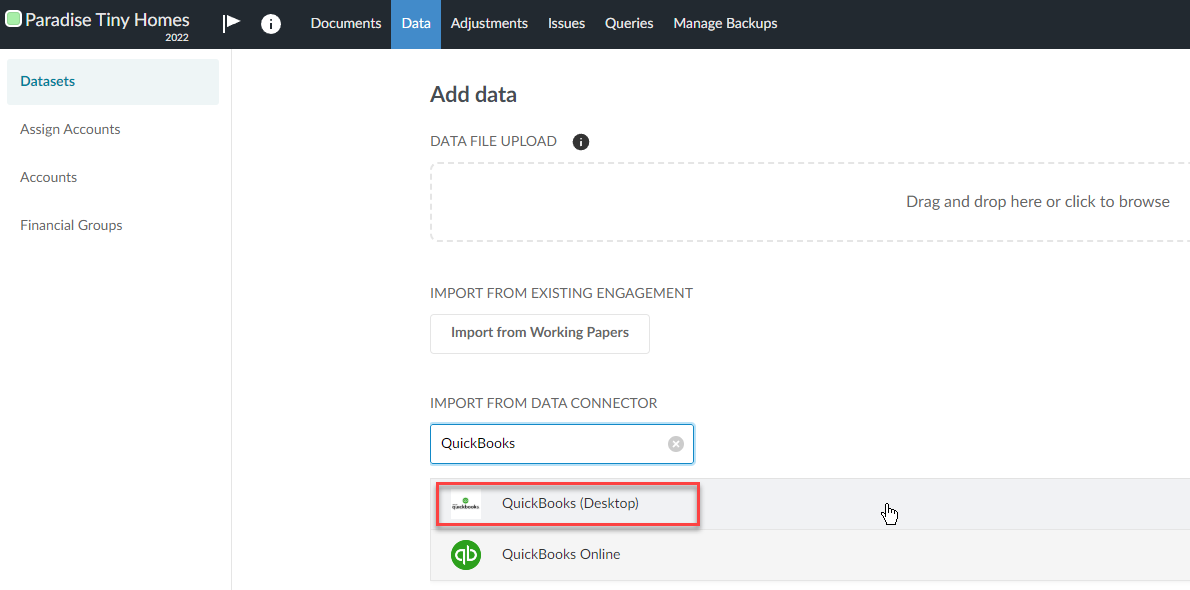
At the Upload stage of the import wizard, select or drag-drop the zip file you generated using the Caseware Cloud Import Utility, then select Next.
At the Configure Data stage of the import wizard:
Reporting period is automatically filled with the reporting period of the data.
Year start Date is automatically filled with the start date of the data.
Year end Date is automatically filled with the end date of the data.
In Select dataset type, choose the type of dataset you are importing. Select Trial balance if you are importing a trial balance and General ledger if you are importing transactions.
If you selected Trial balance, you can select the Import the last 5 years of TB option to import up to five years of trial balance data if it is available in the zip file you generated.
To view the imported data, click View data next to the dataset you imported.
A new page appears displaying the data.
By default, all the columns in your dataset display. Click Columns to deselect those you want to hide.
Click Filters to filter the data displayed in the dataset.
For more information, refer to View the client's general and subledger data.