What's new - OnPoint Audit Winter 2025 Release (v2.2630.0)
Here is what’s new in the OnPoint Audit Winter 2025 release.
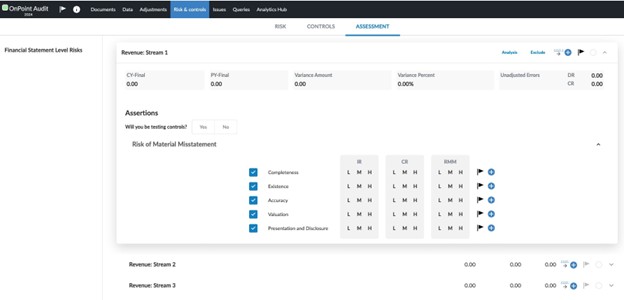
Disaggregation of risks for Revenues
OnPoint Audit now supports the disaggregation of risks for the Revenue financial statement area. You can perform separate risk assessments for three distinct revenue streams, if required. New financial groupings and separate audit programs have also been added to support each of the three new revenue streams.
Homeowners’ Association (HOA)/Common Interest Realty Association (CIRA) taxonomy
OnPoint Audit now provides taxonomy-only support for Homeowners' Associations (HOA) and Common Interest Realty Associations (CIRA). Selecting this industry generates the base commercial entity content in OnPoint Audit.
Notes:
-
OnPoint Audit does not provide industry-specific content for HOA/CIRA engagements. This applies across checklists, letters and other documents, including risks and responses or financial statement formats and disclosures unique to this industry.
-
To complete a HOA/CIRA engagement in OnPoint Audit, auditors will need to identify industry-specific risks and design applicable procedures to meet the industry-specific reporting requirements. Auditors will also need to ensure that the financial statement presentation and disclosures are appropriate for the engagement.
New features and enhancements in Cloud Engagements
Group Audit
OnPoint Audit now includes the group audit functionality. This new feature streamlines the use of common work areas within a group audit. This includes the ability to:
-
Identify common work areas for various group audit components.
-
Share common work areas with component auditors.
-
Adapt common work areas to engagements with evolving statutory standards and complex requirements.
You can now share common work areas, such as Risks, during a group audit within the same engagement and document specific performance materiality for each group audit components.
Group audit functionality also reduces manual data entry and inconsistencies in a group audit by enabling the group auditor to consolidate and track the work through OnPoint Audit.
To learn more, refer to Group audit.
Central planning for documents across engagements
OnPoint Audit now includes a central planning feature that makes it easier to share documents and content across engagements. Firm and enterprise authors can define centrally governed content, such as documents and checklists, for consistent use. Risks and controls are automatically synchronized into destination engagements, allowing source engagements to maintain alignment and reduce drift from standardized practices.
To learn more about central planning, refer to Get started with central planning.
Create issues and annotations on an assertion row in a risk assessment
Note: This feature is automatically available and applies to both new and existing engagements.
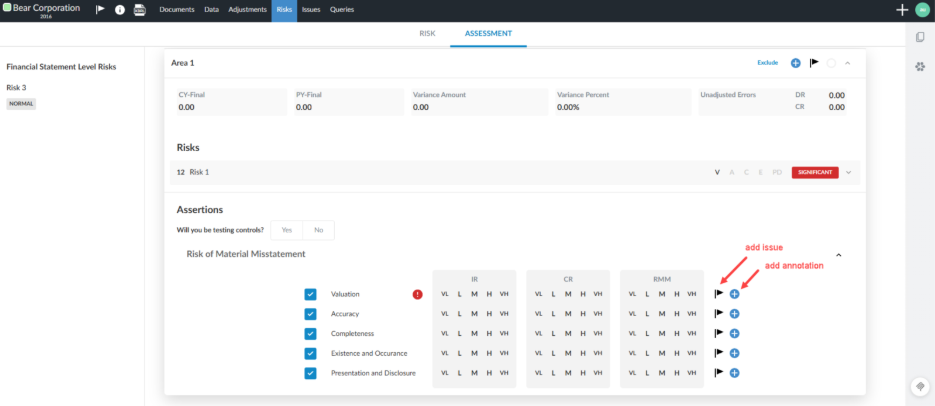
In OnPoint Audit you can now add and track issues and annotations where they are most relevant and view related notes in the correct risk assessment section. This helps you keep reviews clear, accurate and easy to navigate. If you mark an issue as "consideration for next year", it will carry forward to future engagements, helping you track recurring or long-term items. Annotations remain engagement-specific, so that context stays focused on the current work.
The Risk tab displaying the option to add an issue or annotation:
To learn more about managing risks and risk assessment, refer to Manage risks and risk assessments.
Post adjustments to accounts not mapped to financial groups
Note: This feature is automatically available when unassigned accounts exist and applies to both new and existing engagements.
OnPoint Audit now has a simplified workflow for managing account adjustments, particularly for accounts that have not yet been mapped to a financial group. A Show unassigned accounts checkbox is now available in the Account selector when adding an adjustment in Accounts. This feature streamlines the adjustment process and reduces manual effort.
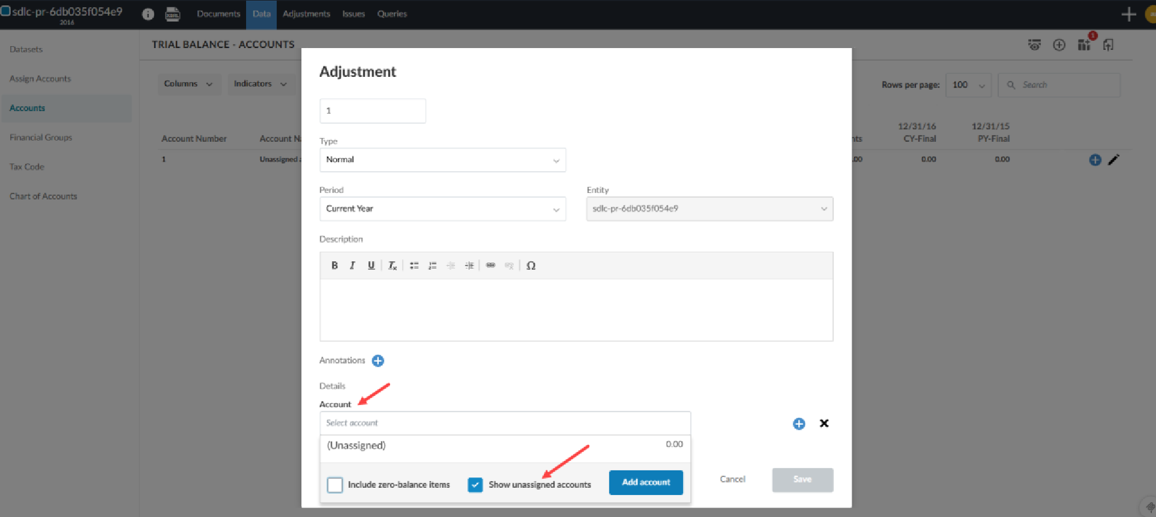
Feature highlights
-
The option appears only if there are unassigned accounts.
-
The selector respects the zero-balance filter and saves the toggle state to session storage.
-
The Unassigned group appears at the bottom of the list, and the selector jumps to this group when enabled.
To learn more about adjustments, refer to Post adjustments to the trial balance.
New dynamic table formatting options
OnPoint Audit now includes several new customization options for dynamic tables.
Customize dynamic table border styles
Note: This feature is automatically available and applies to both new and existing engagements.
The following updates are part of ongoing work to give you more flexibility over border styles in dynamic tables. These enhancements allow you to:
-
Apply different border styles to tables within the same document.
-
Match table formatting styles to firm or client preferences, such as only underlining numeric, currency, or percentage columns for clearer financial reporting.
-
Retain settings when tables are carried forward, copied, or when a page break occurs.
Customize header border styles for individual dynamic tables
You can now select and apply header border styles for individual tables within the Edit dynamic table dialog box.
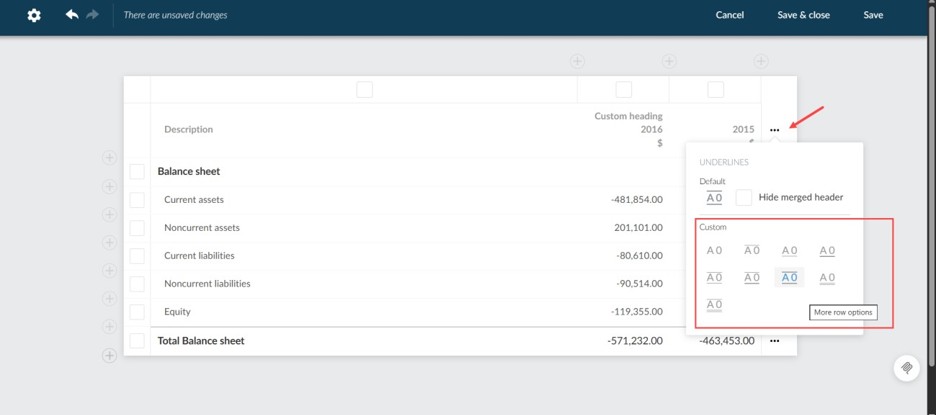
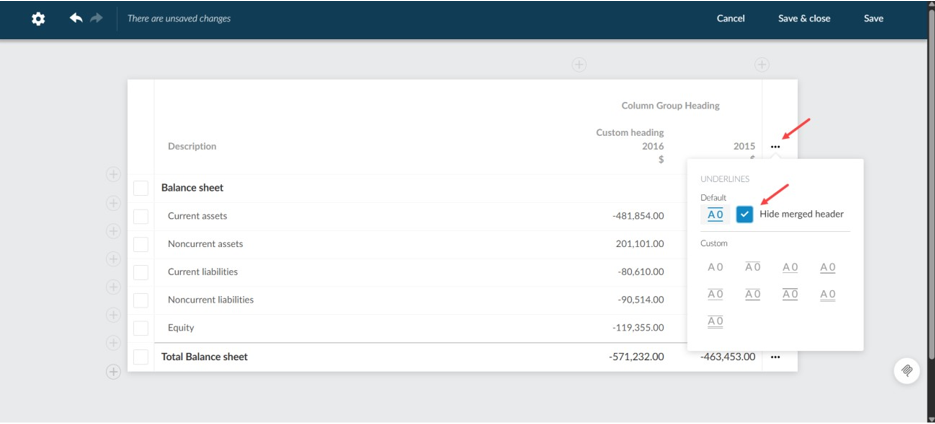
Show or hide underlines in merged headers in dynamic tables
You can now customize the appearance of dynamic tables by choosing whether to display the underline for merged headers. This feature appears as a new checkbox in the Edit dynamic table dialog box.
Column underline in dynamic tables
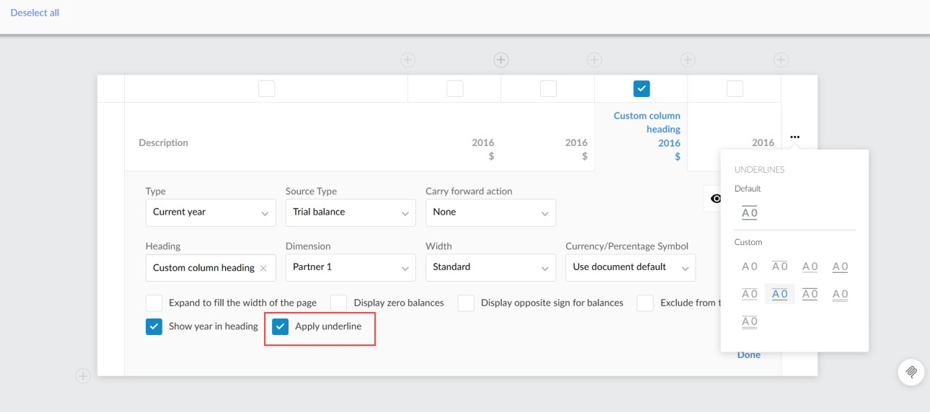
You can now enable or disable underlines for individual columns in dynamic tables. This feature appears as a new checkbox in the Edit dynamic table dialog box. This option is available for all column types except Name and Notes and is checked by default to display underlines on rows such as Total, Grand Total or Final Rows.
Enhancements to dimensions feature
OnPoint Audit now includes several new enhancements that improve support for working with dimensions.
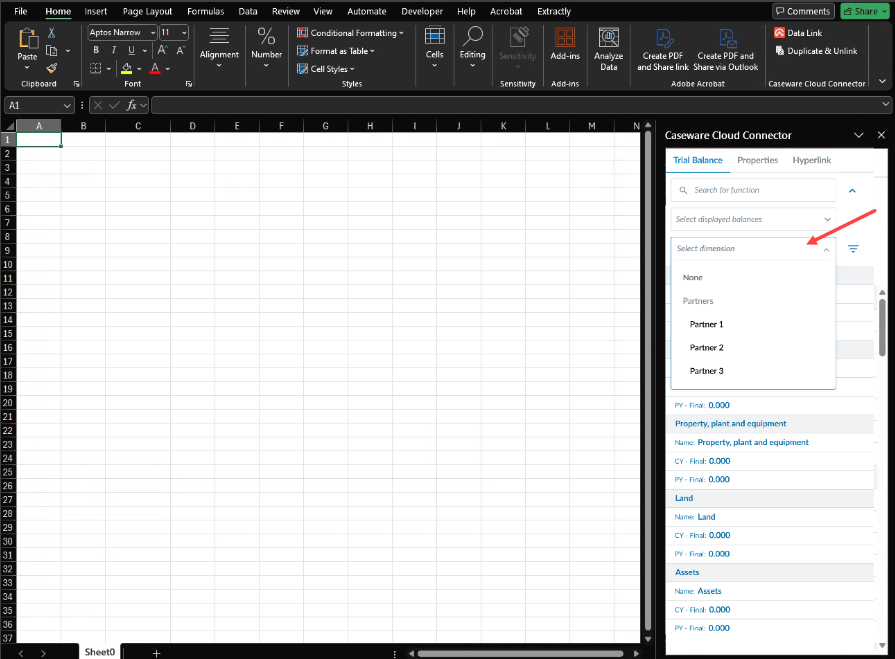
Insert dimension balances in Cloud Connector
Note: This feature is automatically available on both new and existing engagements that use the Cloud Connector.
You can now select dimension balances in Cloud Connector that match the final balances available in Datalink. This selector is available in the Cloud Connector dialog box when the final balance is selected, and other balance types are still available.
Authors can link templates to the correct dimension balances, reducing maintenance and ensuring all users access consistent and current data.
Add dimension values in individual input cells in dynamic tables
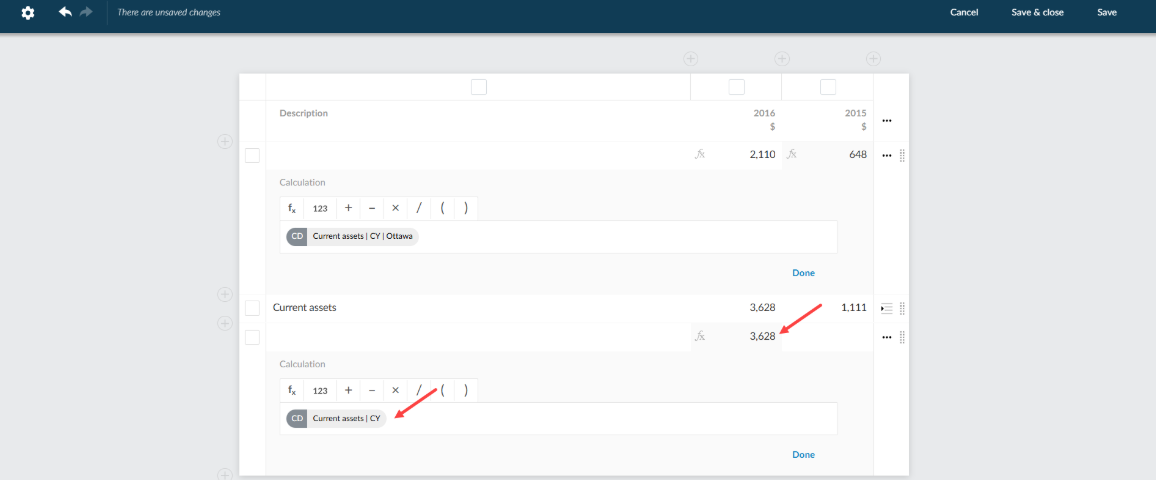
You can now link a value from the trial balance for a specific account and dimension directly to an individual cell in a dynamic table using the Function icon [![]() ]. Previously, you could only link dimensions by column or row. Now, you can select and reference dimensions at the cell level, providing greater flexibility and accuracy when working with financial data in dynamic tables.
]. Previously, you could only link dimensions by column or row. Now, you can select and reference dimensions at the cell level, providing greater flexibility and accuracy when working with financial data in dynamic tables.
Select the fx function inside the input row cell:
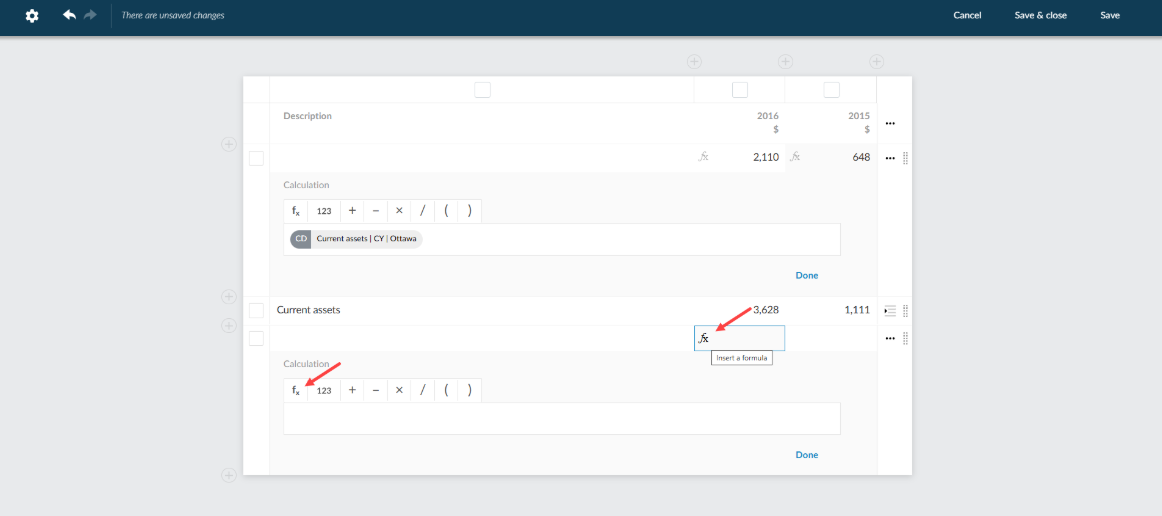
Dimension value added to input row:
To learn more about dimensions, refer to Set up trial balance with dimensions.
